Tl pile e Please read all instructions carefully before using this product for the first time [o avoid the risk of accidents and damage to the appliance This user manual contains important notes on the installation, safety, use, and maintenance of this product. Heinlein cannot be half liable for non-compliance with these instructions. Keep these instructions in a safe place and ensure that new users are familiar with the contents. Pass these instructions on to any future owner of this product. 1.
Warning and Sally pile e and the risk of scalding or burns can be avoided. 11. Ream will be rapidly evaporated and not easily seen if the oven cavity is at a high temperature or just Banished using convection modes. This is normal 12. Do not touch the door and door frame when using the appliance. 13. Fill the water tank with tap water, drinking water or distilled water up to the MAX mark {maximum level}.
Warning and Safely pile e 26. Never leave the steam oven in operation unattended. 27. The manufacturer's warranty will be invalidated if the appliance is not repaired by a F. Bidmlein approved service technician 28. Repairs and other work by unqualified persons could be dangerous. Please contact if there is any issue related to installation, maintenance work, or repairs to electrical appliances. 29 Faulty components must only be replaced by genuine Flambeing spare parts.
Two or more people are required to install or move this appliance as iris heavy. [t must be securely placed on a firm and level surface. Failure to do so can cause physical injuries or damage to the appliance. 39. Danger of burning! The oven becomes hot when in use. Depending on the function being used, you could burn yourself on the heating elements, the oven interior, cooked food, or oven accessories. Use caution.
Warning and Safely e e 51. Odor will be emitted from the cavity when using different baking functions for the first time. Iris normal. 52. To avoid damage (o the appliance, do not block the ventilation vent 53. The oven door can support a maximum load of 15 bs (7kg). Do not lean or piton an open oven door, or place heavy items on it. Also, make sure that nothing can get trapped between tha door and the oven cavity. This could damage the oven 54. This device complies with Part 15 of the FCC Rules.
el el Jailed ladle g does happen, wipe these away thoroughly to avoid corrosion on the stainless steel surface. B For details see the ‘Cleaning and Maintain’ section of this user manual. Instructions for Children Danger of suffocation! Children may be able to wrap themselves in packing material or pull it over their heads with the risk of suffocation. Keep children away from any packing material.
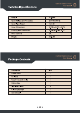
Lo (1 gain pars Accessories @ Alr Outlet Cleaning Sponge @ Water Tank Insulated Gloves @ Lower Heating Element Grill Rack @ Even Door Baking Tray @ Drip Tray {*no need o uninstall} Steam Tray 10
Control Pane| Timer Display DO Shows remaining cook time or delayed start time Cooking Time Range: 0C: 01 02:59 Delay Start Range: 0001 2359 OO0 Temperature Setting LA Range: 105°F 450°F Empty Water Tank ;@ This icon indicates that the water tank is empty or the water tank is not properly inserted into the steam oven \9 Delayed Start icon This icon indicates that the delayed start function is on Upper Heater This icon indicates that you are setting the temperature for the upper heater.
Bl ey Bake Brahe cohos food by filling the oven with hot air. Heats released from the top and bottom to cook food evenly, similar to a conventional oven. This mode is suitable for cooking meat, fish, or baked goods; particularly cakes, cooties, and biscuits. Time: 20 mind Tern: 360°F Tire: 1-179 mind Temp: 140-450°F Lower Heater Lower Heater cohos food by releasing heat from the bottom of the oven.
Bl e Combs mode combines steam cooking with upper & lower heating laments at the same time. Adding steam during the cooing process can prevent moisture loss during high temperature cooking. This mode is suitable for cooing all types of food. Time: 20 mind | Time: 1-179 mind Combs Temp: 360°F | Temp: 140-450°F Fermentation uses steam (o ensure a stable temperature . and humidity inside the oven Fer men-| This mode allows dough {for Time: 60 mind | Time: 1-179 mind won |\ D/’i pizza or bread) to rise quickly
Bl e Touch Pansy | (_ w Decrease Decrease the time / temperature. o increase Increase the tme / temperature. Settings A“\ Set cooking temperature and time. 3 (iie} | Touch once to adjust the temperature with the buttons. . Touch a second time to adjust the hours Touch a third time to adjust the minutes. Light 7 Child-lock Touch once to twin on the oven light It will automatically shut off ( after 30 seconds. 4 \}H& Touch again to wrn the oven light off Press and hold for 3 seconds to turn on the child-lock
B sylphlike g g el Be lore Your Stan When the steam oven is first pigged in a ‘beep’ will be heard and all of the icons on the control panel will light up. After three seconds, the oven will automatically enter standby mode.
Choosing an Oven Alp il These & fund ions are the main cooking modes in the Oven Functions menu. 1. Fill the water tank with cold, filtered tap water to the MAX mark and install {not necessary for Broil, Bake, or Lower Heat modes ) 2. Place food on the grill rack, steam tray, or baking tray, then place in the oven 3. From the home screen, select your desired oven function to begin adjustments. 4. The display wail show the default temp and time for that oven mode.
Choosing an Oven Alp il 4. The display will show the default temperature and time for the fermentation mode. Use + and = to adjust time settings as needed. The temperature cannot be adjusted in this mode. 5. Press the Start/Pause button after adjusting the time settings [o begin Water used during the steam modes may result in limescale or other buildups inside the vane cavity, water tank, or water hoses.
Use an 8mm or 5/16" socket to remove the 2 nuts on either side of the rear oven pane! by twining counter-clockwise. 2. Remove the rear oven panel. Clean using a sponge or soft cloth. Use mild detergent as needed 3. Clean the area behind the rear oven pane! as needed.
8 T Wil e 2. Clean the bottom of the oven with a sponge or soft cloth. Use mild detergent as needed. 3. Rotate the heating element back towards the bottom of the steam oven. 1. Under normal circumstances, cleaning is the only maintenance required for your steam oven. 2. After each use: i} Empty the water tank ii} Clean the inside of the oven cavity {after the oven is cool {o the touch) iil) Always leave the door open for 15-30 minutes after use to dry the oven and door frame. 3.
el el Normal Conditions Water condensation tan be found around the ventilation vent or The steam oven produces a large amount of steam when using any steam function. Most of the steam will be vented from the front exhaust vent and some condensation water vane may be found around the ventilation vent Common ls suss Power supply plug is not Try to plug in the power connected correctly supply again The oven door is not .
el el The oven door is not Close the oven door tightly Lola of water o steam ! 4 | can be found during closed tightly rooking Door seal is damaged & | Nightclothes not Light is damaged working Control board is damage .