
User's Manual


6
• Enter the pairing code that's shown on the bridge display and press "Assign". The
code is only valid for a short period of time and changes every few minutes.
• You'll then see the bridge settings form.
• Configure the bridge to your liking and press "Save changes".
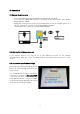
• Plug the power cord of your equipment (e.g. your 3D printer) into the bridge's
power socket.
3.6. Authorize your Member Card
If you haven’t done it before, you'll need to assign a member card to your user account: go
to “Members” and select your name in the list. If your name is not listed, just click the “Add
member” button to add a new member. Click on “Assign a key” on the member’s details
page and follow the instructions.
Now you can test the Fabman bridge by swiping your member card close to the RFID
symbol on the enclosure. If the configuration is correct, the bridge will switch on and
show your name on the display. You can switch if off again by pressing the left button.
Admins and account owners are automatically authorized to use any equipment. To grant
permission to non-admin members you need assign them one or more packages. Some
standard packages have been created automatically for you. If you need more specific
access control you can add customized packages in “Configure / Packages”.
3.7. Mounting the Fabman Bridge
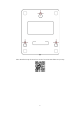
The product can be mounted on walls using screws (1). Therefore three pear-shaped
mounting holes are located on the back of the bridge. Screw the screws to the wall using
the drilling template (3). Then the product can be mounted on the screw heads without
opening the enclosure.
Furthermore the optional Bridge Stand (2) can be used to place the Bridge on flat surfaces
like on desks. The Bridge Stand is available in the Fabman online shop.
(1)
(2)