
Installation Guide
13
EXISTING ROOFS
In many cases, FABRAL’s Steel Roofing Panels can be installed over existing roofing without tear-off of the old roofing.
Check with your local codes or building department for the specific requirements in your area.
If the roof is to be stripped down to the existing decking, follow the procedures for new roofs on page 12. Be sure to check
the existing roof and repair any damaged areas prior to installation of the new roof system.
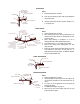
The following steps should be taken when installing new metal roof panels over existing roofing.
1. Inspect the roof for damage and make the necessary repairs.
2. Secure any warped or loose roofing.
3. Make sure there are no nails or other objects protruding from the roof that might puncture the new underlayment or
damage the new roof panels.
4. Remove all moss and other debris from the roof.
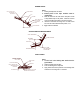
5. Cut off any overhanging roofing flush with the roof deck, and remove all hip and ridge caps.
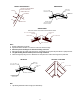
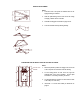
6. Install 2x4 Purlins @ 24” o.c. to attach the panels or follow the directions on page 12, #2 through #4, on roof
preparation.
Note: For best results, Metal Roofing requires a relatively smooth and flat substrate. Application over rough
and/or uneven surfaces is not recommended.
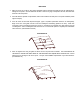
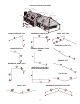
PANEL INSTALLATION
Note: Prior to panel installation, determine which items need to be installed prior to panels (such as eave, valley, swept wing, etc.)
1. Working off the eave edge, establish a straight line up the gable edge from which you are starting. This will insure that
the first panel laid will be straight and square with the eave. (See Illustration #2 on page 12)
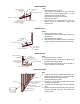
2. Before fastening the panel to the roof deck, check to make sure that the panel is overhanging the eave by 1”.
3. Once the first panel is in proper position, secure it to the roof deck with #14 fasteners per the standard fastening
pattern.
4. Set the gable trim into a bead of butyl tape and screw it to the fascia board (see pages 16-17). This fully secures the
first panel to the roof deck.
5. Position the second panel (overlap edge on top of the underlap edge of first panel) assuring that the eave edge is in
position (1” overhang). Secure the second panel to the deck with #14 fasteners.
6. Each consecutive panel will be installed in the same manner.