
Installation Guide


16
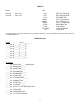
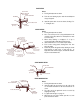
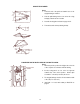
EAVE DETAIL
FASTENER
@ 12" C/C
CE-1
FASTENER
BUTYL TAPE
TOP & BOTTOM
OF CLOSURE
ROOF STRUCTUR
E
29 GA. AGRI PANEL
INSIDE
CLOSURE
Notes:
1. Roofing underlayment not shown.
2. Tack the eave flashing in place under the underlayment
using roofing nails.
3. Install the panels and closures as shown, allowing ½” to
1” of hang at eave.
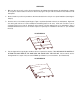
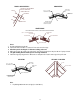
VALLEY DETAIL
CUT PANEL AS
NECESSARY
4" MINIMUM
29 GA. AGRI PANEL
SEALER STRIP,
1"x1"x13'
BLOCK CLOSURE
FILLS RIB VOIDS
ROOF FELT AND
ICE & WATER SHIELD
ROOF STRUCTURE
PLYWOOD OR
SOLID SUPPORT
SCREWS
EACH SIDE OF MAIN
RIB (EAVE/ENDLAP
PATTERN) AND
ONE ADDITIONAL,
CENTRALLY LOCATED
IN THE PAN OF THE
PANEL.
RV-1 OR
RV-2 (SHOWN)
BUTYL SEALANT
TOP & BOTTOM
OF SEALER STRIP
Notes:
1. Roofing underlayment not shown.
2. Place a second layer of 36” roofing underlayment in the
centerline of the valley with 18” of underlayment on each
side of the valley.
3. When valley flashing is overlapped, 6” of lap is
recommended with sealant applied under the lap.
4. Install sealant and 1 x 1 x 19’ sealer strip as shown.
5. Field cut the roofing panels holding back 4”-6” from
valley as shown.
6. Fasten the panels through the valley flashing as shown
with fasteners on both sides of each main rib. In
applications with extreme angles, an additional fastener
may be needed between ribs.
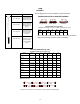
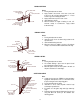
START GABLE DETAIL
ROOF STRUCTURE
29 GA. AGRI PANEL
RG-1, OR
WG-1
SCREW
FASTENER
@ 12" C/C
BUTYL TAPE
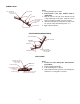
FINISH GABLE DETAIL
CUT PANEL AS
NECESSARY
BUTYL TAPE
29 GA. AGRI PANEL
RG-1, OR
WG-1
SCREW
FASTENER
@ 12" C/C
ROOF STRUCTURE
Notes:
1. Roofing underlayment not shown.
2. Install the gable trim by placing it over the edge of the
roof as shown and fasten it to the fascia board at 12” on
center.
3. The eave end of the gable-trim can be closed-off by
snipping and folding.
4. For gable detail at ridge, see page 17.
5. When the last roof panel extends past the roof, trim
panel and finish as shown.