Installation Instructions / Warranty Massaud 18440001
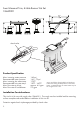
Axor Massaud Trim, 4-Hole Roman Tub Set 18440001 check valve Product Specification Max. incoming water pressure 145 psi Recommended water pressure 14.5 - 72 psi Max. incoming hot water temp. 176oF* Recommended hot water temp. 120oF - 140oF* Max. flow rate at 44 psi approx. 4.5 gpm Max. flow rate of handshower 2.5 gpm *Know and follow all applicable local plumbing codes when setting the temperature on the water heater. In Massachusetts, the water heater may be set no higher than 112oF.
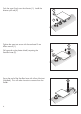
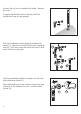
Installation Turn the water off at the main (1). Remove the plaster shields from the hot and cold valves and the diverter housing (2). Install the escutcheons (1). Install the color rings (2). Push the handles firmly over the escutcheons and color rings. Turn the handles clockwise so that the valves are in the off position (3). 3. 2. 1. Remove the plug from the diverter housing (1). Install the spout escutcheon (2). 1. Put a light coating of the enclosed lubricant on the diverter o-rings (3).
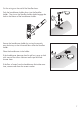
Push the spout firmly over the diverter (1). Install the diverter pull rod (2). 2. 1. Tighten the spout set screw with the enclosed 3 mm Allen wrench (1). Pull upward on the plaster shield, exposing the Secuflex hose (2). Spray the end of the Secuflex hose with silicon lubricant (included). This will make it easier to remove from the holder. 2. 1.
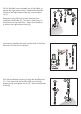
Pull the Secuflex hose completely out of the holder, to expose the high pressure hose. Separate the Secuflex hose from the high pressure hose by unscrewing the nut (1). Remove the plug (2) from the high pressure hose. Install the check valve (3). The arrow should point in the direction of the water flow. Attach the handshower hose to the high pressure hose (4). Lubricate the handshower hose and the ends of the Secuflex hose with the silicon lubricant.
Unscrew the nut from the handshower holder. Remove the insert. Compress the Secuflex hose so that the end of the handshower hose can be grasped. Push the handshower hose through the handshower holder (1). Snap the two halves of the insert around the hose (2). Push the nut over the end of the hose (3) and screw it back into place (4). Push the handshower holder escutcheon over the hose and handshower holder (1). Place the handshower screen washer into the hose end connector on the handshower hose.
Cut the o-rings on the end of the Secuflex hose. Push the handshower holder down into the Secuflex holder. The pin on the Secuflex holder should engage the hole in the bottom of the handshower holder. Secure the handshower holder by turning the escutcheon clockwise, so that it threads down onto the Secuflex holder. Place the handshower in the holder. If the handshower becomes hard to pull out, spray a cloth with some of the silicon lubricant and wipe the handshower hose.
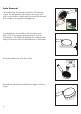
Scale Removal The handshower incorporates the RubitTM self cleaning system. If scale deposits are noticed in the spray channels, turn the water on lightly and rub across the channels with a finger or a sponge to dislodge them. If scale deposits are noticed on the spray face, pour about 3/4” of a commercial scale remover, such as Lime-Away or CLR (diluted if directed) into a shallow dish. Soak just the spray face of the handshower in the cleaner. Rinse the handshower with clear water.
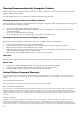
Replacement Parts 3 2 9 10 8 11 1 6 7 12 13 4 5 1 2 3 4 5 6 7 8 9 10 11 12 13 diverter knob 98707000 spray former 97448000 spout 98706000 handle escutcheon 98708000 diverter 96775000 handle 18098000 spout escutcheon 97779000 handshower holder escutcheon 94052000 screen washer 94246000 handshower 28509001 handshower holder 92380000 hose 94148000 check valve 94074000
Cleaning Recommendation for Hansgrohe Products Modern sanitary faucetry and shower fixtures consist of very different materials to comply with the needs of the market with regard to design and functionality. To avoid damage and returns, it is necessary to consider certain points when cleaning: Cleaning materials for faucets and shower products: Acids are necessary ingredients of cleaning materials for removing lime.
and (ii) for 5 years, with respect to AXOR products. THIS WARRANTY DOES NOT COVER, AND HANSGROHE WILL NOT PAY FOR: A. Conditions, malfunctions or damage not resulting from defects in material or workmanship. B.
www.hansgrohe-USA.com US - Installation Instructions • Part No. 90414521 • Revised 04/2007 Hansgrohe, Inc. • 1490 Bluegrass Lakes Parkway • Alpharetta, GA 30004 Tel.