Installation Instructions / Warranty Metris S 31063XX1 Metris S 31067XX1 Metris S 31263XX1 Metris S 31267XX1 Talis S 32310XX1 Focus S 31730001
31063XX1 31067XX1 31263XX1 31267XX1
2310XX1 31730XX1
Technical Information / Données techniques / Datos tecnicos Recommended water pressure Pression d’eau recommandée Presión recomendada en servicio 14.7 - 72.5 psi Max. water pressure Pression d’eau maximum Presión en servicio max. 147 psi Recommended hot water temp. Température recommandée d'eau chaude Temperatura recomendada del agua caliente 120� - 140� F* Max. hot water temp Température maximum d'eau chaude Temperatura del agua caliente max.
Installation Considerations • For best results, Hansgrohe recommends that this unit be installed by a licensed, professional plumber. • Please read over these instructions thoroughly before beginning installation. Make sure that you have all tools and supplies needed to complete the installation. • This faucet requires ½" hot and cold supply lines (not included). • Keep this booklet and the receipt (or other proof of date and place of purchase) for this product in a safe place.
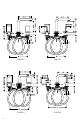
English Note: 2.5 mm To prevent shipping damage, the spout is attached to the spout escutcheon with two adhesive strips. Remove the strips before installing the spout. adhesive strips bandes adhésives tiras adhesivas red rouge rojo Installation For proper operation of the faucet, the hot supply must be on the left, and the cold supply must be on the right. Remove the valve mounting nuts from the valves. Push the valves up into the holes. Install the mounting nuts on the valves.
Français Español Avis: Aviso: Pour empêcher les dommages d’expédition, le bec est attaché à la rosace avec deux bandes adhésives. Para prevenir envío daño, el surtidor es conectado al de escudete con dos tiras adhesivas. Quite las tiras antes de instalar el surtidor. Enlevez les bandes avant installer le bec. Installation Instalación Installez la valve de l’eau chaude à gauche et celle de l’eau froide à droite.
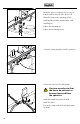
English Place the handles over the valve mounting nuts. Tighten the handles by rotating the escutcheons clockwise. The handles should be parallel to the basin. If necessary, remove, rotate, and reinstall the handle.
Français Español Placez les poignées sur les écrous de montage des valves. Coloque las manijas sobre las tuercas de montaje de las válvulas. Serrez les poignées en tournant les rosaces dans le sens horaire. Apriete las manijas girando los escudetes en sentido horario. Les poignées doivent être parallèles à la cuvette. Las manijas deben quedar paralelas al lavatorio. Au besoin, retirez, tournez, et reinstallez la poignée. Si fuera necesario, reinstale la manija.
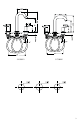
English Rotate the spout escutcheon if necessary, so that the hole for the pull rod is at the rear. Place the spout on the mounting surface. Install the fiber washer, metal washer, and mounting nut. Tighten the mounting nut. Tighten the tensioning screws. Screw the connecting hoses into the spout tee. Connect the hoses to the valve outlets. Use two wrenches so that the hoses do not twist or become loosened from the spout tee. Install the supply lines (not included). Install the drain.
Français Español Si nécessaire, faites tourner la rosace du bec de façon à ce que le trou de la tirette soit situé à l’arrière. Gire el escudete del surtidor si fuera necesario, de modo que el orificio para el tirador quede hacia atrás. Déposez le bec sur la surface de montage. Apoye el surtidor en la superficie de montaje. Installez la rondelle en fibre, la rondelle métalilique, et l’écrou de montage sur le bec.
English Install the pop-up drain Remove the plunger. Unscrew the drain outlet flange from the tee. Unscrew the tailpiece from the tee. Wrap the threads with Teflon tape. Install the tailpiece on the tee. Install the sealing gasket on the flange. Rest the flange in the sink outlet. Install the mack gasket, friction ring, retainer nut, tee, and tailpiece on the flange. Tighten the retainer nut. Place the plunger in the drain. Install the two pivot ball seals on the ball rod. Install the ball rod on the tee.
Français Español Installez l’obturateur à clapet Instale el tapón elevable Retirez le plongeur. Retire el émbolo. Dévissez la collerette de l’obturateur du raccord en T. Desenrosque la brida de salida del drenaje del tubo en “T”. Dévissez la queue du raccord en T. Desenrosque la alcachofa del tubo en “T”. Enveloppez les filets avec du ruban de Téflon. Installez la queue sur le raccord en T. Envuelva las roscas con cinta de Teflon. Instale la alcachofa en el tubo en “T”.
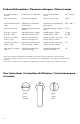
Replacement Parts / Pièces détachées / Repuestos 9 12 14 13 6 7 10 1 11 19, 20 4 3 2 8 5 Metris S 21 14
18 15 7 10 11 17 16 6 4 2 7 10 11 3 8 5 4 2 Talis S 3 8 5 Focus S 15
1 hot handle poignée eau chaude mando agua caliente 97503XX0 cold handle poignée eau froide mando agua fría 97502XX0 2 complete valve robinet d’arrêt cpl.
Cleaning Recommendation for Hansgrohe Products Modern lavatory faucets, kitchen faucets, and showers consist of very different materials to comply with the needs of the market with regard to design and functionality. To avoid damage and returns, it is necessary to consider certain criteria when cleaning.
Nettoyez vos produits de robinetterie et de douche aussi souvent que nécessaire. • Utilisez la quantité de produit nettoyant et respectez la durée recommandée par le fabricant. Ne laissez pas le produit sur les articles de robinetterie plus longtemps que nécessaire. • Un nettoyage régulier peut prévenir la formation de dépôts calcaires. • Si vous utilisez des nettoyants en vaporisateur, vaporisez d’abord sur une éponge ou un chiffon.
Limited Lifetime Consumer Warranty This product has been manufactured and tested to the highest quality standards by Hansgrohe, Inc. (“Hansgrohe"). This warranty is limited to Hansgrohe products which are purchased by a consumer in the United States after March 1, 1996, and installed in either the United States or Canada. WHO IS COVERED BY THE WARRANTY This warranty extends to the original consumer purchaser only. This warranty is non-transferable.
Some States do not allow the exclusion or limitation of incidental or consequential damages, so the above limitation or exclusion may not apply to you. This warranty gives you specific legal rights, and you may have other rights which vary from State to State. You may be required by law to give us a reasonable opportunity to correct or cure any failure to comply before you can bring any action in court against us under the Magnuson-Moss Warranty Act. PRODUCT INSTRUCTIONS AND QUESTIONS Hansgrohe, Inc.