&2 / ' /' &2 / &2 Installation / Warranty ' &2 /' +2 7 +2 7 +2 7 +2 7 10/2003 9.05014.
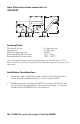
Axor Citterio four-hole roman tub set 39454XX1 Technical Data Flow rate @ 45 psi Handshower Maximum water pressure Recommended water pressure: Recommended hot water temp.: 6.0 gpm per side 2.5 gpm max. 145 psi 14.5 - 75 psi 120oF - 140oF* *Some municipalities limit the maximum water temperature from the water heater to 120o or below. Please know and follow all applicable local codes when setting the temperature on the water heater.
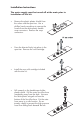
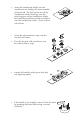
Installation Instructions The water supply must be turned off at the main prior to installation of this kit. • Remove the plastic plaster shields from the valves and the spout tee. Use a phillips head screwdriver to remove the screws from the white plastic handle snap connectors. Remove the snap connectors. • Press the diverter firmly into place in the spout tee. Remove the cold cartridge. • Install the new cold cartridge included with the trim kit.
• Remove the brass plug from the end of the high pressure hose. Attach the chrome inner Secu-flex hose. Use the enclosed Hansgrohe Color towelette to clean and lubricate the inner hose. Have a co-worker use the towelette to clean and lubricate the ends of the outer hose. If the towelette is missing, use a soft cloth sprayed with a silicon lubricant. • Disassemble the handshower holder as shown in the diagram. Feed the inner hose through the outer hose.
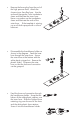
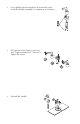
&2 &2 &2 /' +2 7 +2 7 +2 7 +2 7 • &2 / ' /' &2 / Inspect the handles, making sure that they are aligned properly. ' • &2 / ' /' +2 7 +2 7 Press the hot and cold escutcheons over the sub-escutcheon rings. +2 7 • &2 /' Screw the sub-escutcheon rings onto the hot and cold valves.. ' • &2 / Lower the handshower holder onto the handshower tee, feeding the hose assembly under the tub.
• Pull upward on the lever to remove it. Turn it approximately 60o. Reinsert it. Tighten the screw. • Reinstall the handle. +2 7 +2 7 +2 7 Use a phillips head screwdriver to loosen the screw inside the handle assembly 3 complete turns clockwise.
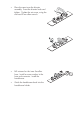
Place the spout over the diverter assembly. Insert the diverter knob and tighten. Tighten the set screw, using the enclosed 3 mm allen wrench. &2 / ' /' &2 / &2 • ' &2 /' +2 7 +2 7 +2 7 &2 / &2 +2 7 &2 / ' /' ' &2 /' +2 7 +2 7 +2 7 &2 / ' /' &2 / ' &2 /' +2 7 +2 7 Guide the handshower back into the handshower holder. +2 7 +2 7 • Pull outward on the inner Secu-flex hose. Install a screen washer in the hose end connector. Install the handshower.
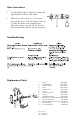
User Instructions • Turn the left handle to obtain hot water, the right handle to obtain cold water. • When the water comes on, it will come through the spout. Pull the diverter lever up to divert the water to the handshower. When the water is turned off, the diverter will automatically reset to the spout position.
Cleaning Recommendation for Hansgrohe Products Modern faucetry and shower products utilize a combination of materials to comply with the needs of the market with regard to design and functionality. To avoid damage, it is necessary to use some caution when cleaning. Damage caused by improper treatment is not covered under the Hansgrohe warranty. Cleaning Materials for Faucets and Showers • • • • To remove lime scale, use only products made specifically for that purpose.
THIS WARRANTY DOES NOT COVER, AND HANSGROHE WILL NOT PAY FOR: A. B. C. D. Conditions, malfunctions or damage not resulting from defects in material or workmanship. Conditions, malfunctions, or damage resulting from (1) improper installation, improper maintenance, misuse, abuse, negligence, accident or alteration, or (2) the use of abrasive or caustic cleaning agents or no rinse cleaning products, or the use of the product in any manner contrary to the product instructions.
Hansgrohe Inc. 1490 Bluegrass Lakes Parkway Alpharetta GA 30004 770 360 9880 website: www.hansgrohe-USA.