
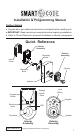
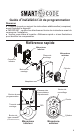
Instruction Manual

7
12.LowBatteryIndicators.
●WithunitinthelockedpositiontheLEDwillashORANGEthenash
Red,andrepeatevery5seconds.
●WilllightREDwhen“Lock”buttonispressed
●Fivesecondsafteran“Unlock”command,thebeeperwillsoundfor5
seconds.
●WithunitintheunlockedpositiontheLEDwillashGREENthenRed,
every5seconds.
●Regardlessofswitch#1position,under“LowBattery”condition-red
LEDwillashevery5seconds.
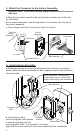
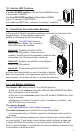
TheinteriorLED(whenswitch#1isintheONposition).
TheexteriorKeypad.
TheAudioIndicator(whenswitch#3isintheONposition).
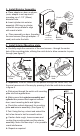
Note:Forfuturebatteryreplacement,removebatterypack,replacebatter-
ies(seesection7)andsimplyreinsertbatterypackasshown,abeepand
aGreenLEDashwillindicateasuccessfulsysteminitialization.Nobolt
directiondeterminationisrequiredaftertheinitialinstallationunlessthelock
isre-installedonadifferentdoor.
11.SmartCodeUserSelectableSettings.
Switch #1 The LED blinks when in
theONposition.Note: The low battery
REDLEDcannotbedisabled.
Switch #2 EnablestheAUTOLOCK
whenintheONposition.WithAutoLock
enabled, SmartCode will automatically relock the door
(extendthebolt)30secondsafterunlocking.
Switch #3 EnablestheAUDIOsound(Beeper)
whenintheONposition.
Switch #4 ExtraswitchwithNOFUNCTION.
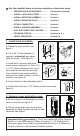
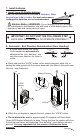
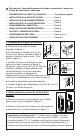
a.ThepanelofSmartCodefeatureswitchesarelocatedtotherightofthe
programbutton.Theseswitchesenableand
disablethefollowingSmartCodesettings.
b.Selectthefeaturesthatyouwanttoenableordisable
andmovetheswitchtotheappropriateposition.Hint: for
easier access, use a ball point pen to operate the switches.
Switches
ON
1 2 3 4
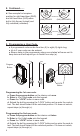
10.InteriorLEDFeatures.
●IntheLOCKEDposition:LEDwillashORANGEevery
3-5secondsifLOCKED.
●IntheUNLOCKEDposition:LEDwillashGREEN
every3-5secondsifUNLOCKED.
●AnadditionalREDash,indicates“lowbattery”condition.
LED