
Operation Manual


4
Mounting
Before beginning installation:
• Check that the product purchased is of a suitable size for
the chosen installation area.
• To facilitate installation, remove the fat filters and the
other parts allowed and described here, dismantle and
mount it.
To remove see also the relative paragraphs.
• Remove the active carbon (*) filter/s if supplied (see also
relative paragraph). This/these is/are to be mounted only
if you want lo use the hood in the filtering version.
• Check (for transport reasons) that there is no other
supplied material inside the hood (e.g. packets with
screws (*), guarantees (*), etc.), eventually removing
them and keeping them.
• If possible, disconnect and move freestanding or slide-in
range from cabinet opening to provide easier access to
rear wall/ceiling. Otherwise put a thick, protective
covering over countertop, cooktop or range to protect
from damage and debris. Select a flat surface for
assembling the unit. Cover that surface with a protective
covering and place all canopy hood parts and hardware
in it.
• Disconnect the hood during electrical connection, by
turning the home mains switch off.
• In addition check whether near the installation area of the
hood (in the area accessible also with the hood mounted)
an electric socket is available and it is possible to
connect a fumes discharge device to the outside (only
suction version).
• Carry out all the masonry work necessary (e.g.
installation of an electric socket and/or a hole for the
passage of the discharge tube).
Expansion wall plugs are provided to secure the hood to most
types of walls/ceilings. However, a qualified technician must
verify suitability of the materials in accordance with the type of
wall/ceiling. The wall/ceiling must be strong enough to take
the weight of the hood. Do not tile, grout or silicone this
appliance to the wall. Surface mounting only.
In the case of the presence of panels and/or walls and/or
lateral wall units check that there is sufficient space to install
the hood and that access to the command panel is easy.
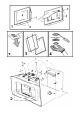
Fig. 5
• Trace a central line on the wall in order to ease mounting
(1), position the hole template in a way that the middle
line printed on top corresponds to the central line marked
previously and the lower side of the mask corresponds to
the lower part of the hood once mounted. (2).
• Make 3 holes Ø 8 mm with a drill and fix the support
bracket with two dowels and screws to the wall (3), insert
the third dowel into the lower hole.
• Open the vapour scheme and remove the grease filters
(see relevant paragraph).
• Hang the hood (4), regulate the position (5-6) and fasten
it securely with one screw and washer(7).
• Carry out electrical connections (8), but leave the hood
disconnected from the general electrical main panel.
• Install the grille/deflector F (9).
• Mount the grease filters and close the vapour scheme.
Warning! Make sure that the carbon filter is already
mounted on the back of the grease filter, or in case it’s
missing, buy it and install it.