
User Manual


8
(6
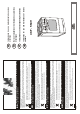
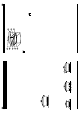
• En la parte superior del horno está instalada la resistencia superior 1 y la resistencia
del grill 2, así como la lámpara 7, que ilumina en interior del horno. Debajo del fondo
(invisible) está la resistencia inferior 3. En la pared posterior se encuentra el motor
girapollos 4.
• En las partes laterales del horno se han montado los paneles 6. Estos paneles 6
están cubiertos de esmalte catalítico que posee cualidades autolimpiantes.
EQUIPAMIENTO
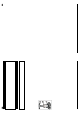
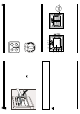
Fig. 8
Bandeja esmaltada para pasteles. Se puede usar como
depósito de recogida de grasa si la cocción se realiza
directamente en la rejilla.
Rejilla sirve para depositar recipientes usados en el horno.
En la rejilla se pueden asar directamente algunos alimentos
como carnes, pescados, etc.
Protección de mandos protege los mandos del calentamiento
excesivo. Debe colocarse cuando se cocina con la puerta
entreabierta.
Soporte del girapollos sirve para fijar el mismo.
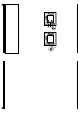
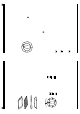
4.2 MANDO SELECTOR DE FUNCIONES
HORNO
0
Fig. 9
0 - horno apagado
- resistencia inferior
- resistencia inferior y
superior
- resistencia superior
- resistencia del grill
- girapollos y resistencia del
grill
- girapollos y resistencia
superior
El mando dispone de siguientes posiciones:
• Después de posicionar el mando selector de funciones (figura 9) en la posición de
trabajo, se enciende el piloto de control y la lampara del horno.
• Después de terminar la cocción apague siempre el horno.
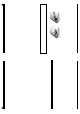
4.3 MANDO REGULADOR DE TEMPERATURA
• El mando regulador de temperatura (figura 10) permite posicionar y mantener de
forma automática la temperatura del horno en el nivel preseleccionado.
• En el mando se han marcado las posiciones 50, 100, 150, 200, 250 que
corresponden a las temperaturas del horno medidas en
O
C.
9
*%
4.4 TIMER
The timer is designet for controlling the time of oven operation. When the set time has
elapsed, the timer turns on a sound alarm, and turns the oven off. The setting range of
the timer is from 0 - 120 minutes.
How to set the time of operation:
- rotate the timer knob clockwise to the time required, e.g. 50 minutes.
After the set time elapses, the oven turns off automatically, alarm sounds and timer knob
returns to its "0" position.
If timer knob is in its position "0", the oven may not be turned on.
It is protection against children.
If you do not intend to use the timer, select manual mode. To do
so, turn the timer knob to the position
and set oven knobs as
required.
Fig. 11
4.5 TURNING THE OVEN ON AND OFF
4.5.1 TURNING THE OVEN ON
1. Set the cooking method with the function selector.
2. Set the temperature with the temperature selector.
3. Turn the timer knob to position
or set the required time.
4.5.2 TURNING THE OVEN OFF
Always remember to set the function and temperature selector back to „0” when you
finish using the oven.
OVEN
20
40
60
80
100
120
0
4.6 COOKING METHODS
LOWER HEA TER ON
This function allows for extra heating of the cake bottom. It is used during the last
10 - 15 minutes of the dish stay in the oven.
CONVENTIONAL SYSTEM (lower heater and upper heater turned on)
With this function, dishes are heated from the bottom and from the top. This kind
of heating is ideal for cooking cakes, meat, fish, pizza and bread. The dishes
should be placed on a single, preferably middle level of the oven.
UPPER HEATER TURNED ON
The function is intended for baking finish. Thanks to this function the dish can be
browned from the top. This heating method can also be used for fast cooking
(toasts, casseroles).