Installation Use & Care Instructions Instructions d’installation, d’utilisation & d’entretien 24” SIDE OPENING CONVECTION OVEN FOUR À CONVECTION de 24 PO À OUVERTURE LATÉRALE 6HA-200 TLX 6HA-200 TRX
OVENS CONTENTS THANK YOU . . . . . . . . . . . . . . . . . . . . . . . . . . . . . . . . . . . . . . . . . . . . . . . . . . . . . . 4 1. IMPORTANT SAFEGUARDS . . . . . . . . . . . . . . . . . . . . . . . . . . . . . . . . . . . . . . 5 2. INSTALLATION AND ELECTRICAL CONNECTION . . . . . . . . . . . . . . . . . . . . 2.1. Before Installation . . . . . . . . . . . . . . . . . . . . . . . . . . . . . . . . . . . . . . . . . . . . 2.2. Installation Dimensions . . . . . . . . . . . . . . . . . . . . . . . . . .
THANK YOU Congratulations! You are now the proud owner of a Fagor oven and we would like to thank you for the confidence you have placed in our company and our products. Fagor offers a wide variety of high quality and eco-friendly products that are designed to work efficiently while consuming less energy. Our goal is to bring energy efficiency to the forefront of the market with products that consistently work and deliver on our promise.
1. IMPORTANT SAFEGUARDS We recommend that you read the instructions in this user’s manual carefully before use for optimum performance and to extend the life of your appliance. The user’s manual will provide you with all the instructions you need to ensure your oven’s safe installation, use and maintenance. Always keep this user’s manual close at hand since you may need to refer to it in the future. Safety Instructions Installation of this oven must be performed only by a licensed electrician.
WARNING The appliance should be powered down before replacing the lights to avoid the possibility of electric shock. During oven operation, the interior surfaces become very hot. Safety During Operation • This oven has been designed for residential use only. • During use, the oven interior surfaces become hot enough to cause burns. Do not touch heating elements or interior surfaces of the oven until they have had time to cool. • Never store flammable materials in the oven.
Child Safety • WARNING: Accessible parts may become hot during use. Young children should be kept away. • Do not allow anyone to climb, stand, lean, sit, or hang on any part of this appliance, especially the door, warming drawer or storage drawer. This can damage the appliance, and the unit may tip over, potentially causing severe injury. CAUTION: Children’s items should not be stored inside an appliance, in cabinets above an appliance or on the backsplash.
Accessories Wash all bakeware and accessories after each use and dry with a kitchen towel. To clean easily, soak bakeware and accessories in warm soapy water for about 30 minutes. WARNING The manufacturer may not be held responsible for any damage due to incorrect installation, improper, incorrect or irrational use. Disposing of the Packaging Material • The material used to package this appliance is recyclable.
2. INSTALLATION AND ELECTRICAL CONNECTION 2.1 BEFORE INSTALLATION This appliance should only be installed according to the manufacturer’s instructions. Installation should only be attempted by an authorized professional. The manufacturer declines all responsibility for improper installation, which may harm persons and animals and damage property. This appliance must be installed in accordance with the norms and standards of the country where it is being installed.
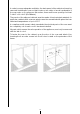
In order to ensure adequate ventilation, the back panel of the cabinet unit must be removed. Installing the oven so that it rests on two strips of wood is preferable. If the oven rests on a continuous, flat surface, there must be an opening of at least 1 49/64” x 22 23/64” (45×568mm). The panels of the adjacent cabinets must be made of heat-resistant materials. In particular, cabinets with a veneer exterior must be assembled with glues that can withstand temperatures of up to 215°F.
2.3 ELECTRICAL CONNECTION WARNING! ELECTRICAL SHOCK HAZARD Disconnect electrical power at the breaker box or fuse box before installing this appliance. Please make sure the unit is properly grounded for safety. Use copper conductors only. Failure to follow these indications could result in serious injury or death. CAUTION Label all wires prior to disconnecting when servicing controls. Wiring errors can cause improper and dangerous operation. Always verify proper operation after servicing.
• Never use reductions, shunts, or adaptors as they can cause overheating or burning. If their use cannot be avoided, remember to use only single or multiple adapters and extensions which comply with current safety regulations. In these cases, never exceed the maximum current capacity indicated on the single adapter or extension and the maximum power indicated on the multiple adapter. The manufacturer is not liable for any direct or indirect damage caused by faulty installation or connection.
3. USING THE OVEN AND PRACTICAL TIPS 3.1 BEFORE USING THE OVEN FOR THE FIRST TIME Adjusting the Clock We recommend that you set the correct time after full oven installation is complete. Getting Started Before using your new oven for the first time, make sure you have removed all packing materials and protective plastic. Heat the oven empty for about 30 minutes with the door closed at MAX temperature. During this process, you may detect some odor and possible smoke, both of which are normal.
3.2 GENERAL DESCRIPTION A B C D A. Control Panel B. Guides C. Oven Rack D. Drip Pan or Baking Sheet 3.3 CONTROL PANEL The oven can be operated in test mode for testing or performing all operating steps. The oven will not heat up during the test. Switching Test Mode On. • Switch off the appliance using the On/Off button . • Press and hold and buttons at the same time until an acoustic signal is heard and “d” lights up in the display. Switching Test Mode Off.
OVEN LIGHT • The oven light will switch on whenever an oven function is running. • The oven light will turn off automatically 10 minutes after the oven is shut off. 3.4 COOKING WITH YOUR OVEN • To turn your oven on, press the On/Off button. • Press the or buttons repeatedly until the desired oven function appears. • A suggested temperature will appear on the temperature display. If the suggested temperature is not changed within approximately 5 seconds, the oven will begin to heat up.
Turbo Plus: The oven is heated up by the top, bottom and central round heating element. The fan distributes the heat evenly throughout the oven. Turbo Plus mode provides optimum results with cakes (soft and thick), large quantities of foods and when cooking various dishes simultaneously. Cake: The rear heating element and the fan come on, guaranteeing delicate heat distributed uniformly throughout the oven. This mode is ideal for baking and cooking delicate foods, especially cakes that need to rise.
3.5 STOP/START DIGITAL DISPLAY 3.5.1 CLOCK The oven only operates when the time has been set. When the appliance is connected to the electrical supply or when there has been a power cut, the symbol for Time will flash automatically. To change the time: 1. Press the Clock button on the display. repeatedly until the symbol for Time 2. Set the current time using the or flashes buttons. After few seconds, the flashing will stop and the clock will display the time set. The oven is now ready for use. 3.5.
b Auto-Stop Cooking With this function, you can set your oven to switch itself off automatically at a particular time. The “auto-stop” function is used simultaneously with the “Cooking Time” function so that the oven switches itself on and off automatically after operating for the desired time. To set the auto-stop cooking time: 1. Select a cooking function and set a temperature. 2. Press the button repeatedly until the symbol flashes. 3.
d Timer The oven has a built-in countdown beeper function. This works with the oven on or off as it has no impact on the operation of the appliance. In this way, you can use it as a simple kitchen timer. To set the Timer: 1. Press the button several times until the 2. Set the countdown time by pressing the symbol starts flashing. or buttons (max 99 minutes). After a few seconds, the function will be activated, the remain lit and the display will show the time remaining.
3.5.4 SAFETY FUNCTIONS Child Safety Lock You may lock the control panel buttons on the oven so that they cannot be manipulated by children. No cooking function must be selected. To set the child safety lock: Press and hold the is now activated. button until appears in the display. The child safety lock To unlock the child safety lock: Press and hold the button until disappears from the display. The child safety lock is now deactivated and all functions are available again. 3.5.
3.6 OPERATING THE OVEN 5 Below are the steps for turning on your oven. 4 1. Place food in the oven on the recommended tray and level. 3 2. Select the cooking program using the cooking program knob. 1 2 3. Set temperature by turning the temperature knob or following the instructions given in the timer operating section. 4. Once your meal is finished, do not forget to push the ON/OFF button. 3.
b Traditional Baking Time & Temperature Charts Below is a cooking chart which will help you to adjust your cooking temperature appropriately. Cooking times can vary according to the type of food and volume. We understand that, after a few attempts, your experience might suggest possible variations to the temperatures on the table. TABLE OF COOKING TIMES The table below gives you recommended shelf positions for use with your oven. Please note, the temperature and cooking times are estimates only.
5. Broil Soles and Cuttlefish 2 4 5 Max 8-10 Squid and Prawn Kebabs 2 4 5 Max 6-8 Cod Filet 2 4 5 Max 10 Grilled Vegetables 2 3-4 5 Max 10-15 Veal Steak 2 4 5 Max 15-20 Cutlets 2 4 5 Max 15-20 Hamburgers 2 4 5 Max 7-10 Mackerels 2 4 5 Max 15-20 Toasted Sandwiches – 4 5 Max 2-3 6. Convection Broil Grilled Chicken 3 3 5 400 55-60 Cuttlefish 3 3 5 400 30-35 7. Cake Tarts 1 3 15 350 20-30 Fruit cakes 2 2/3 15 350 40-45 1.
4. OVEN CLEANING AND MAINTENANCE 4.1 CLEANING 4.1.1. Oven Exterior Clean the exterior of the oven with warm water and a mild detergent. Rinse thoroughly & dry all stainless steel components with a soft cloth. If any stains are difficult to remove, we recommend that you use products specifically designed for stainless steel. Test the product on a small area before you apply it to the entire surface. Follow the manufacturer’s instructions closely.
Helpful Tips: • To clean the glass cover protecting the oven lamp, unscrew the cover and clean it, preferably with washing liquid. Once the area is clean, replace the lamp cover. 4.1.3. Accessories Soak the trays racks and rotisserie immediately after use in a mild dishwashing detergent. Food residue can be easily removed by scrubbing with a sponge or a soft brush. 4.2 REPLACING THE INTERIOR LIGHT BULB To replace the interior light bulb, please follow the below steps.
5. ENERGY-SAVING TIPS • Pre-heat the oven only when indicated in the recipe. • It is better to use dark colored bakeware, preferably enamelled in black, as these materials absorb heat particularly well. • If you wish to make several cakes at one time, we recommend that you cook one cake after the other. As the oven is already hot, the baking times of second and subsequent cakes are shorter.
FOURS TABLE DES MATIÈRES MESSAGE DE BIENVENUE . . . . . . . . . . . . . . . . . . . . . . . . . . . . . . . . . . . . . . . . . . 28 1. INSTRUCTIONS DE SÉCURITÉ IMPORTANTES . . . . . . . . . . . . . . . . . . . . . . . 29 2. INSTALLATION ET CONNEXION ELECTRIQUE . . . . . . . . . . . . . . . . . . . . . . . 2.1. Avant L’installation. . . . . . . . . . . . . . . . . . . . . . . . . . . . . . . . . . . . . . . . . . . . 2.2. Mesures Pour L’installation . . . . . . . . . . . . . . . . . . . . . . . . . . . . .
MESSAGE DE BIENVENUE Félicitations ! Vous êtes maintenant le fier propriétaire d’une cuisinière Fagor et nous aimerions vous remercier pour la confiance que vous avez placée en notre entreprise et en nos produits. Fagor offre une grande variété de produits de haute qualité et respectueux de l’environnement qui sont conçus pour travailler dur tout en consommant moins d’énergie.
1. INSTRUCTIONS DE SÉCURITÉ IMPORTANTES Nous vous recommandons de lire les instructions du manuel de l’utilisateur avant toute utilisation pour une performance optimale et pour prolonger la vie de votre appareil. Le manuel de l’utilisateur vous fournira toutes les instructions dont vous avez besoin pour assurer la sécurité de l’installation, de l’utilisation et de l’entretien de votre four. Gardez toujours ce manuel de l’utilisateur à portée de main car vous pourriez devoir vous y référer à l’avenir.
MISE EN GARDE L’appareil doit être mis hors tension avant de remplacer les lampes afin d’éviter un risque de choc électrique. Pendant le fonctionnement du four, les surfaces intérieures deviennent très chaudes. Sécurité Pendant le Fonctionnement • Ce four a été conçu pour un usage ménager. • Pendant l’utilisation, les surfaces intérieures du four chauffent au point de causer des brûlures.
Sécurité des Enfants • MISE EN GARDE: Les parties accessibles peuvent devenir chaudes pendant l’utilisation. Les jeunes enfants doivent être tenus à l’écart. • Ne pas permettre à quiconque de grimper, de se tenir debout, de s’appuyer, de s’asseoir ou de s’accrocher à toute partie de l’appareil, en particulier la porte, le tiroir chauffant ou le tiroir de rangement. Cela peut endommager l’appareil, et l’appareil peut basculer, ce qui pourrait causer de graves blessures.
Attention Le verre de la porte du four peut se briser si vous utilisez une force excessive lors de l’ouverture ou de la fermeture, en particulier sur les bords de la feuille avant. Accessoires Lavez tous les ustensiles et accessoires de cuisson après chaque utilisation et séchez-les avec une serviette de cuisine. Pour les nettoyer facilement, faites tremper les moules et accessoires de cuisson dans de l’eau chaude savonneuse pendant environ 30 minutes.
2. INSTALLATION ET CONNEXION ELECTRIQUE 2.1 AVANT L’INSTALLATION Cet appareil doit être installé conformément aux instructions du fabricant. L’installation ne doit être réalisée que par un professionnel agréé. Le fabricant décline toute responsabilité pour une installation incorrecte, qui peut nuire à des personnes et à des animaux, et occasionner des dommages matériels. Cet appareil doit être installé en conformité avec les normes et standards du pays dans lequel il est installé.
Afin d’assurer une ventilation adéquate, le panneau arrière de l’armoire doit être retiré. Il est préférable d’installer le four de sorte qu’il repose sur deux bandes de bois. Si le four doit reposer sur une surface plane uniforme, il faut une ouverture d’au moins 1 49/64 po x 22 23/64 po (45 x 568 mm). Les panneaux des armoires adjacentes doivent être en matériaux résistant à la chaleur.
2.3 BRANCHEMENT ÉLECTRIQUE AVERTISSEMENT ! RISQUE DE CHOC ÉLECTRIQUE Coupez l’alimentation électrique au disjoncteur ou à la boîte à fusibles avant d’installer cet appareil. Assurez-vous que l’appareil est correctement mis à la terre par mesure de sécurité. Utilisez des conducteurs en cuivre uniquement. Le non respect de ces indications peut entraîner des blessures graves ou la mort. ATTENTION Étiquetez tous les fils avant de les déconnecter lors des contrôles d’entretien.
• Après avoir effectué la connexion au câblage électrique principal, vérifiez que le câble d’alimentation n’entre pas en contact avec des parties soumises à un chauffage. Le cordon doit être placé de sorte qu’il n’atteigne pas une température supérieure à 125 °F (51 °C) par rapport à la température ambiante sur toute sa longueur. • Ne jamais utiliser de réductions, shunts, ou d’adaptateurs qui peuvent provoquer une surchauffe ou un incendie.
3. UTILISATION DU FOUR ET CONSEILS PRATIQUES 3.1 AVANT D’UTILISER LE FOUR POUR LA PREMIÈRE FOIS Réglage de l’heure Nous vous recommandons de régler l’heure exacte après l’installation du four. Mise en Route Avant d’utiliser votre nouveau four pour la première fois, assurez-vous que vous avez retiré tous les matériaux d’emballage et de protection en plastique. Chauffez le four à vide pendant environ 30 minutes avec la porte fermée à température MAX.
3.2 DESCRIPTION GÉNÉRALE A B C D A. Panneau de Configuration B. Guides C. Grilles du Four D. Lèchefrite ou Plaque de Four 3.3 PANNEAU DE CONTRÔLE Le four peut être utilisé en mode de test pour tester ou réaliser toutes les étapes de fonctionnement. Activation du Mode de Test. • Éteindre l’appareil à l’aide du bouton Marche/Arrêt . • Appuyez sur les boutons et les maintenir enfoncés signal sonore retentisse et qu’un ‘d’ s’allume sur l’écran. jusqu’à ce qu’un Inactiver le Mode de Test.
LA LUMIÈRE DU FOUR • La lumière du four s’allume chaque fois qu’une fonction du four est travaille. • L’éclairage du four s’éteint automatiquement 10 minutes après que le four soit éteint. 3.4 CUISINER AVEC VOTRE FOUR • Pour allumer votre four, appuyez sur le bouton Marche/Arrêt. • Appuyez plusieurs fois sur les boutons ou jusqu’à ce que la fonction du four apparaisse. • Une proposition de température apparaît sur l’affichage de la température.
Turbo Plus : Le four est chauffé par les éléments de chauffage ronds du haut, du bas et central. Le ventilateur fait circuler l’air chaud à l’intérieur du four en distribuant la chaleur de façon plus uniforme. Le mode Turbo Plus offre des résultats optimaux avec : Les gâteaux (mous et épais), de grandes quantités d’aliments et la cuisson simultanée de différents plats.
3.5 AFFICHAGE NUMÉRIQUE STOP/START (ARRÊT/MARCHE) 3.5.1 HORLOGE Le four ne fonctionne que lorsque l’heure a été réglée. Lorsque l’appareil est connecté à l’alimentation électrique ou après une coupure de courant, le symbole Heure clignote automatiquement. Pour changer l’heure : 1. Appuyez sur le bouton Horloge clignote à l’écran. jusqu’à ce que le symbole Heure 2. Régler l’heure actuelle à l’aide des boutons ou . Après quelques secondes, le clignotement s’arrête et l’horloge affiche l’heure réglée.
b Cuire Avec l’Auto-Stop Avec cette fonction, vous pouvez régler l’arrêt automatique votre four à un moment donné. La fonction « Auto-Stop » est utilisée simultanément avec la fonction « Temps de cuisson » de sorte que le four se met en marche et s’éteint automatiquement après avoir fonctionné pendant le temps désiré. Pour régler le temps de cuisson Auto-Stop : 1. Sélectionnez une fonction de cuisson et réglez la température. 2. Appuyez sur le bouton jusqu’à ce que le symbole clignote. 3.
d Minuterie Le four possède une fonction intégrée de compte à rebours/alerte sonore. Elle fonctionne que le four soit allumé ou éteint, et n’a aucun impact sur le fonctionnement de l’appareil, de sorte que vous pouvez l’utiliser comme une simple minuterie de cuisine. Pour régler la minuterie : 1. Appuyez plusieurs fois sur le bouton clignote. jusqu’à ce que le symbole 2. Réglez le temps du compte à rebours en appuyant sur les boutons (max 99 minutes).
3.5.4 FONCTIONS DE SÉCURITÉ Verrouillage de Sécurité Pour Enfants Vous pouvez verrouiller les boutons du panneau de commande sur le four de sorte qu’ils ne puissent pas être manipulés par les enfants. Aucune fonction de cuisson ne doit être sélectionnée. Pour régler le verrou de sécurité pour enfants : Appuyez et maintenez le bouton enfoncé jusqu’à ce que l’écran. Le verrouillage de sécurité pour enfants est activé.
3.6 FONCTIONNEMENT DU FOUR Pour mettre votre four en marche, procédez comme suit. 5 1. Posez le plat à l’intérieur du four sur le plateau et au niveau recommandé. 4 2. Sélectionnez une fonction de cuisson à l’aide de la commande de sélection des fonctions de cuisson. 2 3 1 3. Réglez la température à l’aide de la commande de sélection des températures ou bien suivez les instructions fournies dans le manuel de fonctionnement du programmateur. 4.
b Tableau des Temps de Cuisson & des Températures Traditionnels Le tableau de cuisson ci-dessous vous aidera à régler la température de cuisson appropriée. Les temps de cuisson peuvent varier selon le type et le volume de nourriture. Nous sommes persuadés qu’après quelques tentatives, votre expérience vous permettra d’éventuelles variations de température par rapport à celles du tableau.
5. Grillade Soles et seiches 2 4 5 Max 8-10 Brochettes de calmars et de crevettes 2 4 5 Max 6-8 Filet de cabillaud 2 4 5 Max 10 Légumes grillés 2 3-4 5 Max 10-15 Steak de veau 2 4 5 Max 15-20 Côtelettes 2 4 5 Max 15-20 Hamburgers 2 4 5 Max 7-10 Maquereaux 2 4 5 Max 15-20 Sandwiches grillés – 4 5 Max 2-3 6. Grillade par convection Poulet grillé 3 3 5 400 55-60 Seiches 3 3 5 400 30-35 7.
4. NETTOYAGE ET ENTRETIEN DU FOUR 4.1 NETTOYAGE 4.1.1. L’extérieur du Four Nettoyer l’extérieur du four de préférence à l’eau tiède et avec un détergent doux. Rincer abondamment et sécher avec un chiffon doux les parties en acier inoxydable. Si les tâches résistent, nous vous recommandons d’utiliser des produits spécifiques pour acier inoxydable. Essayez le produit sur une petite surface avant de l’appliquer sur toute la surface. Suivez scrupuleusement les instructions du fabricant.
Conseils Utiles • Si vous souhaitez nettoyer la tulipe en verre qui protège la lampe du four : dévissez la tulipe de la lampe et nettoyez-la de préférence avec du liquide vaisselle. Une fois nettoyée, replacez-la sur la lampe en suivant la procédure décrite. 4.1.3. Les Accessoires Faites tremper les accessoires après utilisation en utilisant pour cela un produit nettoyant d’usage courant. De cette façon, les restes d’aliments s’éliminent facilement à l’aide d’une éponge ou d’une brosse souple. 4.
5. CONSEILS POUR ÉCONOMISER DE L’ÉNERGIE • Préchauffez le four uniquement si la recette ou la table de cuisson l’indique. • Utilisez de préférence des moules à pâtisserie de couleur foncée, de préférence émaillés noirs, car ces matériaux absorbent particulièrement bien la chaleur. • Si vous souhaitez préparer plusieurs gâteaux, nous vous conseillons de le faire de façon successive. Les temps de cuisson du deuxième gâteau seront moins longs car le four est déjà chaud.
FAGOR AMERICA, INC. PO BOX 2181 SO. HACKENSACK, NJ 07606 For technical support or repair please call: 1.877.743.2467 For additional support please call: 1.800.207.0806 Email: infoappliances@fagoramerica.com www.fagoramerica.com The manufacturer reserves the right to modify the items described in this manual. Le fabricant se réserve le droit de modifier des éléments décrits dans ce manuel.