
User manual


NOTES
41
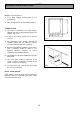
FITTING INTO THE SPACE BETWEEN
CABINETS
IMPORTANT: Ensure that the oven is
switched off at the wall before any further
work is carried out.
· Ensure the cooker is in front of the cabinet. See
Fig. 13.
· Take out all oven furniture before installation to
reduce the weight you need to lift.
· To place the cooker into the space between
cabinetry follow the procedure below:
· N.B. Two people will be required to carry out
the lifting procedure.
· Warning: Do not attempt to lift this appliance by
the handle(s).
Each person should squat either side of the
cooker.
Tilt the cooker so that your hands can support
the underside of the cooker.
Raise the appliance to the correct height.
Rest the rear underside of the cooker on the
mounting brackets while your hands support the
front.
The cooker can be pushed fully into the space.
Take care to avoid fouling the mains lead.
Ensure the cooker is central and level.
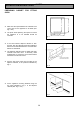
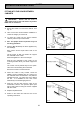
· When the cooker is fully housed, screw the
stability screws (supplied with the cooker) into
the underside of the worksurface in the positions
indicated (see Fig. 14), taking care not to distort
the trim. It is advisable to turn each screw
alternatively to avoid damaging the trim.
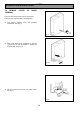
· Place the top trim flush with the edge of the
worksurface, with the cork spacers upover (see
Fig.15) and screw into using the screws supplied
with the cooker.
· Replace the plinth board.
· Switch on the cooker and refer the user to the
operating instructions.
INSTALLATION INSTRUCTIONS
Fig.13
Fig.14
Fig.15