CARE & INSTRUCTIONS MANUAL GUIDE D’UTILISATION ET D’ENTRETIEN MANUAL DE INSTRUCIONES Y MANTENIMIENTO FULLY INTEGRATED AIS DISHWASHERS: LAVE-VAISSELLE D’INTÉGRATION TOTAL: LAVAVAJILLAS DE INTEGRACIÓN TOTAL: • LFA-073 IT • LFA-073 SS • LFA-65 IT • LFA-65 SS • LFA-65 ITX NOTE: To avoid accident and damage, please read these instructions carefully before operating the appliance. NOTE: Veuillez lire ces instructions attentivement a fin d’éviter accidents et dommages.
INDEX ENGLISH GENERAL INSTALLATION AND FITTING 3 4 OPERATING INSTRUCTIONS A FEW PRACTICAL TIPS 12 APPLIANCE MAINTENANCE AND CLEANING 21 TROUBLE SHOOTING 23 FRANÇAIS GENERAL 27 INSTALLATION ET MONTAGE 28 UTILISATION DE L’APPAREIL ET CONSEILS PRATIQUES 36 NETTOYAGE ET ENTRETIEN DE L’APPAREIL 45 DIAGNOSTIC ET SOLUTION AUX PROBLÈMES 47 ESPAÑOL GENERAL 51 INSTALACIÓN Y MONTAJE 52 USO DEL APARATO Y CONSEJOS PRÁCTICOS 60 MANTENIMIENTO Y LIMPIEZA DEL APARATO 69 LOCALIZACIÓN Y SOLUCIÓN DE P
IMPORTANT SAFETY INSTRUCTIONS WARNING – When using your dishwasher, follow basic precautions, including the following: a) Read all instructions before using the dishwasher. b) Use the dishwasher only for its intended function. c) Use only detergents or wetting agents recommended for use in a dishwasher and keep them out of the reach of children.
DISHWASHER INSTALLATION AND FITTING 1 UNPACKING THE DISHWASHER UNPACKAGING Remove the inner protection parts: polystyrene wedges for holding racks firmly.
English 2 PLUMBING IN El lavavajillas está The dishwasher is equipped with a high pressure water connection pipe with a 3/4 (1.905 cm) directional internal pipe thread at normal temperature and pressure values (NPT). In order to make its installation easier, the dishwasher includes a 3/8” (0.9525 cm) brass compression part for 3/4 NPT which adapts the pipe connector to a 3/8” compression part which incorporates the majority of the valves which close the water connection for domestic dishwashers.
DRAINAGE Connect the drainage pipe incorporated into a waste disposal unit, on a drainage pipe tap or in a residual gap depending on plumbing standards in force. It is possible to lengthen the drain pipe with material resistant to hot water and detergent. Always keep an inner diameter of at least 5/8” (1.5875 cm). Never exceed the maximum distance of 9” (22.86 cm) to the drainage piping. Raise the drain pipe and fasten it to the lower part of the worktop.
English 3 ELECTRICAL CONNECTION Please refer to the specifications label on the top edge of the door, before making electrical connections. Make sure than the voltage sent to the plug socket is the voltage which appears on the label. When installing or moving the dishwasher, take care not to damage the power cable. The dishwasher requires an earthed 120 V, 15 Amp, 60 Hz plug socket.
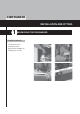
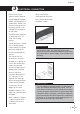
4 INTEGRATION To install a built-in dishwasher: WORKTOP a If the worktop is made of wood, fit plastic protection over the worktop, which prevents the vapors affecting and damaging this area. b Fit the veneer to the front part of the dishwasher in order to fasten it to the piece of furniture. a b c d d e f g LEGS – LEVELLING c In order to build it into a line of furniture with a single base, loosen the extra bases and remove them.
English DOOR There is a useful template with the assembly instructions. h Fit the corresponding template (J-120:K-110), fasten it down and mark the position of the holes. i Drill, using a Ø 1,16” bit and screw in the supports (part which curves upwards) to the decorative door. j Take the Decorative Door and slide the supports into the door slots. Pull up until touching the control panel making sure that it has been properly fixed down.
For integrated stainless steel models, the following installation instructions should be taken into account: Column-integrated 58 min.
English 5 PRE-WASHING Once the dishwasher has been installed correctly, it should be first used on prewash programme: a Open the dishwasher door. b Press the dishwasher ON button. c Select programme 1 (prewash), with no dishes or detergent. d Close the door. The dishwasher will start up automatically.
DISHWASHER OPERATING INSTRUCTIONS - A FEW PRACTICAL TIPS 1 RINSE-AID AND DETERGENT The rinse-aid helps drying and prevents drops of water forming on the dishes after washing. The rinse-aid compartment is inside the door, next to the detergent. The compartment has a 4 position dispenser to adjust the quantity of rinse-aid depending on the water quality (the dispenser leaves the factory in position 2). If drops of water can be seen on the dishes, increase the number on the rinse-aid dispenser.
English When should you add more rinse-aid? EMPTY FULL The dishwasher itself will tell you when you need to top up the rinse-aid. Depending on the model, there are two types of indicator: window or pilot light. WINDOW Transparent window next to the rinse-aid compartment cover. If the window shows a clear background, a top-up is required. If the background is dark, there is enough rinse-aid. PILOT LIGHT A light on the front of the dishwasher shows when rinse-aid must be topped up.
2 UTENSILS. TYPES AND POSITIONING Types of utensils Not all dishes can be used in a dishwasher. It is not advisable to put in wooden or clay utensils, or non heat resistant plastic. Stainless steel cutlery can be washed easily although make sure it does not come into contact with silver cutlery as this can stain. Aluminum items can fade over time. The pictures on decorated porcelain could be worn away if it is not good quality. I M P O R TA N T Make sure that the utensils can be used in a dishwasher.
English c The cutlery, with the exception of knives, should be put in the cutlery rack making sure the handles face down c d FOR 13 PLACE SETTINGS EN-50242 d Fit the more delicate pieces such as cups and glasses made of porcelain or glass, and standard sized plates in the top rack. There is an area specifically for large cutlery. There are also racks which, when vertical, can be used to hold wine glasses.
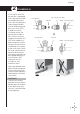
Adjusting the racks The racks can be adjusted depending on the load The top rack can be fitted at two different heights so that different size plates can be washed. In the high position, it is possible to wash standard 7 1/2 plates in the top rack and 12 1/5 plates in the lower rack. Fitting the top rack in the low positions, it is possible to wash 9 4/9 plates on top and 10 2/9 plates below.
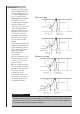
English 3 SELECTING THE WASH PROGRAM DELAYED PROGRAMMING END OF PROGRAM light PROG 161º 155º 150º 150º 130ºF PROGRAM lights TOP OR LOW LOAD Selector ON/0FF Button RINSE-AID light TIME DELAY Selector PROGRAM Selector PROG TOP OR LOW LOAD lights PROGRAM DISPLAY Window To select the wash program, follow these steps: a b c d Open the dishwasher door. Press ON button on the dishwasher, Select the wash program with the PROG button.
There are several types of program depending on the dishwasher model. It is very important to choose the wash program correctly depending on the dirtiness, quantity and type of dishes.
English 4 SELECTING ADDITIONAL FUNCTIONS The wash functions must always be selected after choosing the wash program. Any change of program during selection cancels out the previously selected functions. These functions allow specific adjustments on the wash load, timing and consumption. The additional functions depend on the model: Button: Time delay Allows you to delay wash start. There are models which can delay the wash by 3, 6 or 9 hours.
5 START UP Once the wash program has been chosen and the additional functions selected, close the dishwasher door and it will start up automatically. When the dishwasher is operating and... – You wish to put another piece in the dishwasher. – You wish to change the wash program. 1. Open the dishwasher door. 2. Put the piece in the dishwasher and/or modify the wash program 3. Close the dishwasher door.
DISHWASHER APPLIANCE MAINTENANCE AND CLEANING It is recommended that cleaning operations are carried out frequently in order to for your dishwasher to last longer. Every three months, the following operations should be carried out: 1 • Filter cleaning • Water spray arm cleaning • Internal cleaning • External cleaning. If you plan to be away for a long period, leave your dishwasher open to let air circulate freely inside the machine. In this way, your dishwasher will last longer.
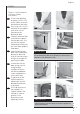
2 WATER SPRAY ARM CLEANING The third water spray arm (depending on the model), the upper water spray arm and the lower water spray arm must be cleaned every three months. Dismantling the water spray arms: a The third water spray arm is dismantled by pressing upwards and unscrewing. b The upper water spray arm is mounted on the top rack. It must be totally unscrewed for disassembly. The lower water spray c arm is dismantled by loosening the lower nut to the left and extracting it upwards.
DISHWASHER TROUBLESHOOTING 1 TECHNICAL OR FUNCTIONAL PROBLEMS When the dishwasher detects a dysfunction, it will display this with sounds or visual signals, depending on the model. On the top edge of the dishwasher door there is a table identifying possible incidents. (F1) Models with display. In these models, the identification appears with the letter “F” followed by a number (from 1 to 9). 1 Models without display.
• Why does the dishwasher not start? This could be because: - There is no electricity supply. - It is not plugged in properly - The fuses have tripped - The dishwasher is not connected to the electricity supply - You have not pressed the On/Off button (the indicator light for this button must be continuously lit) - The dishwasher door is not closed properly. - The start button has not been pressed. • The dishwasher starts but no water enters This could be because: - There is no water in the network.
English 2 PROBLEMS WITH WASH EFFICIENCY • Dirt or food remains on the crockery This could be because: - The wash filter is incorrectly fitted, dirt or blocked. - The water spray arm holes are dirty or the water spray arms are blocked by a piece of crockery. - There is insufficient or inappropriate detergent. - The crockery is not positioned correctly. There are pieces touching each other. - The racks are overloaded.
DISHWASHER WARNINGS ECOLOGICAL WASHING In order to protect the environment, deliver you old machine to a official collection centre or a recyclable material recovery centre. Before getting rid of your old machine, make it unusable by cutting the plug off the cable.
MESURES DE SÉCURITÉ IMPORTANTES AVERTISSEMENT.- Avant toute utilisation du lave-vaisselle, suivez les précautions de base cidessous : a) Lisez les instructions avant d’utiliser le lave-vaisselle. b) N’utilisez le lave-vaisselle que pour laver la vaisselle. c) N’utilisez que des détergents et des produits recommandés pour les lave-vaisselle et gardez-les à l’écart des enfants.
LAVE-VAISSELLE INSTALLATION ET MONTAGE 1 DÉBALLAGE DU LAVE-VAISSELLE DÉBALLAGE Eliminer les éléments de protection intérieure : cales en polystyrène pour fixer les paniers.
Français 2 RACCORDEMENT A L’ARRIVÉE D’EAU Le lave-vaisselle est muni d’un tuyau fileté d’entrée d’eau à haute pression interne et orientable de 3/4 pouces (1.905 cm) à température et pression normales (NPT). Afin de faciliter son installation, le lavevaisselle est livré accompagné d’une pièce de laiton de 3/8 pouces (0,9525 cm) de compression x 3/4 pouces NPT, adaptable à la plupart des vannes de fermeture des prises d’eau pour lave-vaisselle domestiques. 3/8" Comp.
VIDANGE Raccordez le tuyau de vidange incorporé à un éliminateur de résidus à la cannette d’un tuyau de vidange ou à un entrefer, conformément aux normes de plomberie en vigueur. Il est possible d’allonger le tuyau de vidange à l’aide d’un matériau résistant à l’eau chaude et au détergent. Veillez à respecter toujours un diamètre intérieur d’au moins 5/8 pouces (1,5875 cm). Ne jamais dépasser la distance maximum de 9 pouces (22,86 cm) jusqu’au tuyau de vidange.
Français 3 RACCORDEMENT ÉLECTRIQUE Consultez l’étiquette signalétique située sur le bord supérieur de la porte, avant de procéder aux raccordements électriques. Assurez-vous que la tension qui arrive à la base de la prise est bien celle qui figure sur l’étiquette. Lors de l’installation ou du transport du lavevaisselle, veillez à ne pas endommager le cordon d’alimentation. Le lave-vaisselle doit obligatoirement être raccordé à une prise de courant de 120 VCA, 15 ampères, 60 Hz.
4 INTÉGRATION Pour installer un lave-vaisselle intégrable : PLAN DE TRAVAIL a Si le plan de travail est en bois, disposez la protection en plastique du plan de travail du meuble, pour empêcher que l’action des buées n’endommage cette zone. b Disposez les équerres avant sur le lave-vaisselle pour le fixer au meuble. a b c d d e f g PIEDS-MISE À NIVEAU c Pour encastrer le lavevaisselle dans une rangée de meubles de cuisine avec une seule plinthe, dévissez la plinthe et retirez-la.
Français PORTE L’appareil est livré avec un gabarit informatif contenant les instructions de montage. h Disposez le gabarit correspondant (J-120:K110), tenez-le bien et marquez la position des trous. i Percez avec une mèche de ø 2,5 mm et vissez les supports (partie courbe en haut) au revêtement. j Prenez le Revêtement de la Porte et insérez les supports dans les logements de la porte. Tirez vers le haut jusqu’à ce qu’il touche le bandeau, en vous assurant qu’il est bien fixé.
Pour les modèles intégrables inoxydables, tenir compte des instructions d’installation. Intégrable en colonne 58 min.
Français 5 LAVAGE PRELIMINAIRE Après avoir bien installé le lave-vaisselle, nous vous recommandons de procéder à un lavage préliminaire a Ouvrez la porte du lavevaisselle. b Appuyez sur la touche ON du lave-vaisselle. c Sélectionnez le programme 1 (prélavage), sans vaisselle ni détergeant. d Fermer la porte et l’appareil se mettra en marche automatiquement.
LAVE-VAISSELLE UTILISATION DE L’APPAREIL ET CONSEILS PRATIQUES 1 LIQUIDE DE RINÇAGE ET DETERGENT Le liquide de rinçage facilite le séchage et évite à la vaisselle de sortir avec des gouttes d’eau après le lavage. Le distributeur de liquide de rinçage se trouve à l’intérieur de la porte, à proximité du distributeur de détergent.
Français Quand faut-il remettre du liquide de rinçage ? Le lave-vaisselle indique lui-même quand il faut remettre du liquide de rinçage. En fonction du modèle, il existe deux types d’indicateurs : indicateur optique ou voyant lumineux. VIDE PLEIN INDICATEUR OPTIQUE VOYANT LUMINEUX Oeilleton transparent à proximité du couvercle du distributeur de liquide de rinçage. Si l’œilleton présente un fond clair, il faut remettre du liquide. Si le fond est foncé, il y a assez de liquide de rinçage.
2 VAISSELLE. TYPES ET MISE EN PLACE Types de vaisselle Toute la vaisselle n’est pas apte pour être lavée au lave-vaisselle. Il n’est pas recommandé d’introduire des pièces en bois ou en terre cuite, ni en plastique nonrésistant à la chaleur. Les couverts inoxydables peuvent être lavés sans aucun problème; cependant, il convient de faire en sorte que les couverts en argent ne se touchent pas entre eux car ils peuvent apparaître avec des taches. Les pièces en aluminium peuvent se décolorer avec le temps.
Français c Les couverts, à l’exception des couteaux, doivent être mis dans le panier à couverts, en veillant à ce que les manches soient dirigés vers le bas. c d POUR 13 COUVERTS EN-50242 d Dans le panier supérieur sont placées les pièces les plus délicates, telles que les tasses, les verres, les pièces en porcelaine, ou en verre et les assiettes de taille standard. Il y a une zone réservée aux longs couverts.
Réglage des paniers Les paniers peuvent être réglés en fonction du chargement. 19 cm. Le panier supérieur peut être mis à deux hauteurs différentes, ce qui permet de laver des assiettes de différentes tailles. En position haute, vous pourrez laver dans le panier supérieur des assiettes normales de 19 cm et dans le panier inférieur de 31 cm. En mettant le panier supérieur en position basse, vous pourrez laver des assiettes de 24 cm en haut et de 26 cm en bas. a 31 cm.
Français 3 SELECTION DU PROGRAMME DE LAVAGE Voyants Voyant DÉPART DIFFÉRÉ FIN DE PROGRAMME PROG 161º 155º 150º 150º 130ºF Sélecteur CHARGEMENT EN HAUT ou EN BAS Touche ON/0FF Voyant LIQUIDE DE RINÇAGE Voyants PROGRAMMES Sélecteur DÉPART DIFFÉRÉ Sélecteur PROGRAMMES PROG Voyants CHARGEMENT EN HAUT ou EN BAS Visuel DISPLAY PROGRAMMES Pour sélectionner le programme de lavage, procédez comme suit : a Ouvrez la porte du lave-vaisselle. b Appuyez sur la touche ON du lave-vaisselle.
Vous disposez de plusieurs types de programmes en fonction du modèle de lave-vaisselle : Il est très important de bien choisir le programme en fonction de la saleté, de la quantité et du type de vaisselle.
Français 4 SELECTION DES FONCTIONS SUPPLEMENTAIRES Les fonctions de lavage doivent toujours être sélectionnées après avoir choisi le programme de lavage. Tout changement de programme pendant la sélection annulera les fonctions sélectionnées au préalable. Ces fonctions permettent d’ajuster au maximum la charge, les temps et les consommations du lavage. Les fonctions supplémentaires sont, suivant les modèles : Touche : Départ différé Permet de différer le commencement du lavage.
5 MISE EN MARCHE Une fois le programme de lavage sélectionné, ainsi que les fonctions additionnelles, fermez la porte du lave-vaisselle et ce dernier se mettra automatiquement en marche. Lorsque le lave-vaisselle est en marche et que ... - vous voulez introduire une pièce en plus dans le lave-vaisselle. - vous voulez modifier le programme de lavage.
LAVE-VAISSELLE MAINTENANCE ET ENTRETIEN DE L’APPAREIL Il est recommandé de réaliser habituellement les opérations d’entretien pour rallonger la vie de votre lavevaisselle. Réalisez tous les trois mois les opérations suivantes : 1 • Nettoyage du filtre. • Nettoyage des bras d’aspersion. • Nettoyage intérieur. • Nettoyage extérieur. Vous rallongerez ainsi la vie de votre lavevaisselle.
2 NETTOYAGE DES BRAS D’ASPERSION Le troisième bras d’aspersion (suivant le modèle), le bras d’aspersion supérieur et le bras d’aspersion inférieur doivent être nettoyés tous les trois mois. Démontage des bras d’aspersion : a Le troisième bras d’aspersion se démonte en faisant pression vers le haut et en le dévissant. b Le bras d’aspersion supérieur est monté sur le panier supérieur. Pour le démonter, il faut le dévisser complètement.
LAVE-VAISSELLE DIAGNOSTIC ET SOLUTION AUX PROBLEMES 1 PROBLEMES TECHNIQUES OU FONCTIONNELS Lorsque le lave-vaisselle détecte une dysfonction, il vous avertira à l’aide de signaux sonores ou visuels, suivant le modèle. Sur le bord supérieur de la porte du lave-vaisselle, il y a un tableau identifiant les incidences éventuelles. (F1) Modèles avec display. Sur ces modèles, la dysfonction est identifiée par la lettre "F" suivie d’un numéro (de 1 à 9). 1 Modèles sans display.
• Pourquoi le lave-vaisselle ne se met-il pas en route? Cause possible : – Il n’y a pas de tension au réseau électrique. – La prise n’est pas bien enfoncée. – Les fusibles de l’installation électrique ont "sauté". – Le lave-vaisselle n’est pas branché. – Vous n’avez pas appuyé sur la touche On / Off (l’indicateur lumineux de cette touche doit être allumé de façon permanente). – La porte du lave-vaisselle est mal fermée. – Vous n’avez pas appuyé sur la touche Départ.
Français 2 PROBLEMES AVEC L’EFFICACITE DU LAVAGE • Restes de saleté ou résidus d’aliments sur la vaisselle. Cause possible : – Le filtre de lavage est mal mis, sale ou bouché. – Les gicleurs des bras d’aspersion sont sales ou les bras d’aspersion sont bloqués avec une pièce de la vaisselle. – Le détergent n’est pas celui qui convient ou est insuffisant. – La vaisselle n’est pas bien mise. Il y a des pièces qui en touchent d’autres. – Les paniers sont trop chargés.
LAVE-VAISSELLE REMARQUES REMARQUE ECOLOGIQUE En vue de préserver l’environnement, portez votre appareil usagé à un centre officiel de ramassage ou de récupération de matériaux recyclables. Avant de vous débarrasser de votre appareil usagé, rendez-le inutilisable en coupant le cordon d’alimentation avec la fiche.
NORMAS DE SEGURIDAD IMPORTANTES PRECAUCIÓN.- Al utilizar el lavavajillas, siga las precauciones básicas, incluidas las siguientes: a) Lea las instrucciones antes de utilizar el lavavajillas. b) Utilice el lavavajillas para la función que ha sido diseñado. c) Utilice sólo detergentes o agentes recomendados para uso en lavavajillas y manténgalos fuera del alcance de los niños.
LAVAVAJILLAS INSTALACIÓN Y MONTAJE 1 DESEMBALADO DEL LAVAVAJILLAS DESEMBALADO Eliminar los elementos de protección interior: cuñas de poliestireno para fijar cestillos .
Español 2 CONEXIÓN A LA RED DE AGUA El lavavajillas está equipado con un tubo de toma de agua a alta presión con una rosca de tubo interna direccionable de 3/4 pulgada (1,905 cm) a temperatura y presión normales (NPT).
DESAGÜE Conecte el tubo de desagüe incorporado a un eliminador de residuos, a la espita de una tubería de desagüe o a u n e n t re h i e r ro dependiendo de la normas de fontanería vigentes. Existe la posibilidad de alargar el tubo de desagüe con un material resistente al agua caliente y al detergente. Mantenga siempre un diámetro interior de al menos 5/8 pulgada (1,5875 cm). Nunca supere la distancia máxima de 9 pulgadas (22,86 cm) hasta la tubería de desagüe.
Español 3 CONEXIÓN ELÉCTRICA Consulte la etiqueta de características situada en el canto superior de la puerta, antes de realizar las conexiones eléctricas. Asegúrese de que la tensión que llega a la base del enchufe es la que aparece en la etiqueta. Armarios metálicos: solicite un ojal especial al taller de servicio. Al instalar o trasladar el lavavajillas tenga cuidado de no dañar el cable de alimentación. El lavavajillas necesita una toma de corriente dedicada de 120 VCA, 15 amperios, 60 Hz.
4 INTEGRACIÓN Para instalar un lavavajillas integrable: ENCIMERA a Si la encimera es de madera, coloque la protección de plástico en la encimera del mueble, la cual impide que incidan los vahos y dañen esa zona. b Coloque las escuadras en la parte delantera del lavavajilllas con el fin de fijarlo al mueble. a b c d d e f g PATAS - NIVELACIÓN c Para empotrar en una fila de muebles con zócalo único suelte los suplementos base y retírelos.
Español PUERTA Dispone de una plantilla informativa con las instrucciones de montaje. h Colocar la plantilla correspondiente (J-120:K-110), sujetarla y marcar la posición de los agujeros. i Taladrar con broca de ø 2,5 mm y atornillar los soportes (parte curvada hacia arriba) al revestimiento. j Tome el Revestimiento Puerta y encaje los soportes en los alojamientos de la puerta. Tire hacia arriba hasta que toque con el panel de mandos, asegurándose de que ha quedado bien fijado.
Para los modelos integrables inoxidables, tenga en cuenta estas instrucciones de instalación. Integrable en columna 58 min.
Español 5 LIMPIEZA PREVIA Una vez instalado satisfactoriamente el lavavajillas, le aconsejamos la limpieza previa: a Abrir la puerta del lavavajillas. b Pulsar la tecla ON en el lavavajillas. c Seleccione el programa 1 (prelavado), sin vajilla ni detergente. d Cerrar la puerta y automáticamente se pone en marcha. Esto sirve para comprobar la instalación, las conexiones y el desagüe, además de limpiar completamente el interior antes de llevar a cabo un programa de lavado en el lavavajillas.
LAVAVAJILLAS USO DEL APARATO Y CONSEJOS PRÁCTICOS 1 ABRILLANTADOR Y DETERGENTE El abrillantador facilita el secado y evita que la vajilla tenga gotas de agua después del lavado. El depósito del abrillantador está en el interior de la puerta, junto al de detergente. El depósito dispone de un dosificador de 4 posiciones para poder ajustar la cantidad del abrillantador según la calidad del agua (de fábrica el dosificador sale en la posición 2).
Español ¿Cuándo ha de reponer el abrillantador? VACIO LLENO El propio lavavajillas señala cuándo hay que reponer el abrillantador. Dependiendo del modelo hay dos tipos de indicador: visor óptico o piloto. VISOR ÓPTICO PILOTO Mirilla transparente junto al tapón del depósito del abrillantador. Si la mirilla está con el fondo claro hay que reponer. Si el fondo está oscuro, hay suficiente abrillantador. Una señal luminosa en el frontal del lavavajillas señala cuándo hay que reponer el abrillantador.
2 VAJILLA. TIPOS Y COLOCACIÓN Tipo de vajilla No toda la vajilla es apta para los lavavajillas. No es recomendable introducir piezas de madera o barro, ni las de plástico no resistentes al calor. La cubertería inoxidable puede limpiarse sin ningún problema; sin embargo, hay que procu- rar que los cubiertos de plata no estén en contacto entre ellos, ya que pueden aparecerles algunas manchas. Las piezas de aluminio pueden decolorarse con el tiempo.
Español c Los cubiertos, a excepción de los cuchillos, han de ponerse en el cesto para los cubiertos cuidando que los mangos queden hacia abajo. c d PARA 13 CUBIERTOS EN-50242 d En el cestillo superior se colocan las piezas más delicadas, como tazas, vasos, porcelana o cristal y platos de tamaño estándar. Hay una zona destinada particularmente a los cubiertos largos. Asimismo, hay unos soportes que, puestos en posición vertical, sirven para colocar copas.
Regulación de los cestillos Los cestillos pueden regularse en función de la carga. 19 cm. 24 cm. El cestillo superior puede colocarse a dos alturas distintas de forma que se puedan lavar platos de diferentes tamaños. En la posición alta podrá lavar en el cestillo superior platos normativos de hasta 19 cm. y en el inferior de 31 cm. Colocando el cestillo superior en la posición baja podrá lavar platos de hasta 24 cm. arriba y de 26 abajo. a 31 cm.
Español 3 SELECCIÓN DEL PROGRAMA DE LAVADO Pilotos PROGRAMACIÓN DIFERIDA Piloto FIN DE PROGRAMA PROG 161º 155º 150º 150º 130ºF Pilotos PROGRAMAS Selector CARGA ARRIBA O ABAJO Tecla ON/OFF Piloto ABRILLANTADOR Selector RETARDO HORARIO Selector PROGRAMAS PROG Pilotos CARGA ARRIBA O ABAJO Visor DISPLAY PROGRAMAS Para seleccionar el programa de lavado, debe seguir los siguientes pasos: a Abrir la puerta del lavavajillas.
Dispone de varios tipos de programas en función del modelo del lavavajillas: Es muy importante escoger bien el programa de lavado en función de la suciedad, la cantidad, y tipo de vajilla.
Español 4 SELECCIÓN DE LAS FUNCIONES ADICIONALES Las funciones de lavado se deben seleccionar siempre después de elegir el programa de lavado. Cualquier cambio de programa durante la selección anula las funciones previamente seleccionadas. Estas funciones permiten ajustar al máximo la carga, los tiempos y los consumos del lavado. Las funciones adicionales son según modelos: Te c l a : R e t a r d o horario Permite retrasar el comienzo del lavado. Hay modelos que retardan el lavado 3, 6 ó 9 horas.
5 PUESTA EN MARCHA Una vez elegido el programa de lavado y seleccionado las funciones adicionales, cierre la puerta del lavavajillas y automáticamente se pone en marcha. Cuando el lavavajillas está en funcionamiento y... - Desee introducir una pieza más en el lavavajillas. - Desee modificar el programa de lavado.
LAVAVAJILLAS MANTENIMIENTO Y LIMPIEZA DEL APARATO Es recomendable que realice habitualmente las operaciones de limpieza con el fin de alargar la vida de su lavavajillas. Cada tres meses ha de realizar las siguientes operaciones: 1 • Limpieza del filtro. • Limpieza de los distribuidores. • Limpieza interior. • Limpieza exterior. De esta forma alargará la vida de su lavavajillas.
2 LIMPIEZA DE LOS DISTRIBUIDORES El tercer distribuidor (según modelo), el distribuidor superior y el distribuidor inferior han de limpiarse cada tres meses. Desmontaje de los distribuidores: a El tercer distribuidor se desmonta presionando hacia arriba y d e s e n ro s c á n d o l o . b El distribuidor superior va montado en el cestillo superior. Para desmontarlo hay que desenroscarlo del todo.
LAVAVAJILLAS LOCALIZACIÓN y SOLUCIÓN DE PROBLEMAS 1 PROBLEMAS TÉCNICOS O FUNCIONALES Cuando el lavavajillas detecte una malfunción, le avisará con señales acústicas o visuales, según modelo. En el canto superior de la puerta del lavavajillas hay una tabla indicativa con la identificación de las posibles incidencias. (F1) Modelos con display. En estos modelos, la identificación aparece con la letra “F” seguida de un número (del 1 al 9). 1 Modelos sin display.
• ¿Por qué el lavavajillas no se pone en marcha? Puede ser debido a: – No hay tensión en la red eléctrica. – No se ha introducido bien el enchufe. – Los fusibles de la instalación eléctrica están “saltados”. – El lavavajillas no está conectado a la red eléctrica. – No ha pulsado la tecla de On / Off (el indicador luminoso de esta tecla debe estar iluminado de forma fija). – La puerta del lavavajillas está mal cerrada. – No ha pulsado la tecla de arranque.
Español 2 PROBLEMAS CON LA EFICACIA DE LAVADO • Restos de suciedad o de alimentos en la vajilla Puede ser debido a: – El filtro de lavado está colocado incorrectamente, sucio u obstruido. – Los orificios de los distribuidores están sucios o los distribuidores están bloqueados con alguna pieza de la vajilla. – El detergente no es el adecuado o es insuficiente. – La vajilla no está colocada correctamente. Hay piezas en contacto con otras. – Hay un exceso de carga en los cestillos.
LAVAVAJILLAS ADVERTENCIAS NOTA ECOLÓGICA Con objeto de preservar el medio ambiente entregue su aparato usado en un centro oficial de recogida o recuperación de materiales reciclables. Antes de deshacerse de su aparato usado inutilícelo, cortando el cable de conexión con el enchufe.
06/05 V28F010I7
FAGOR AMERICA, INC. PO BOX 94 LYNDHURST, NJ 07071 Toll Free: 1.800.207.0806 Email: infoappliances@fagoramerica.com www.fagoramerica.com The manufacturer reserves the right to modify the items described in this manual. Le producteur se réserve le droit de modifier les articles décrits dans cette guide. El fabricante se reserva el derecho de modificar los productos descritos en este manual.