INSTRUCTION MANUAL MANUEL D’INSTRUCTION MANUAL DE INSTRUCCIONES FSV-144US BEFORE USE, PLEASE READ AND FOLLOW ALL SAFETY RULES AND OPERATING INSTRUCTIONS. AVANT D’UTILISER L’APPAREIL, VEUILLEZ LIRE ATTENTIVEMENT LES RÈGLES DE SÉCURITÉ ET LES INSTRUCTIONS. LEA Y SIGA TODAS LAS INSTRUCCIONES Y ADVERTENCIAS DE SEGURIDAD DE ESTE MANUAL ANTES DE UTILIZAR EL APARATO. FAGOR has a policy of continuous improvement on its products and reserves the right to change materials and specifications without notice.
TABLE OF CONTENTS IMPORTANT SAFETY INSTRUCTIONS 3 WINE COOLER SAFETY 3 IMPORTANT SAFEGUARDS 4 PARTS AND FEATURES 5 INSTALLATION INSTRUCTIONS 6 Before using your wine cooler 6 Installation of your wine cooler 6 Built-in cabinet instructions 6 Electrical connection 7 Extension cord 7 Surge protector 7 OPERATING YOUR WINE COOLER 8 Recommended temperature settings 8 ON/OFF power 8 Control panel lock 8 Setting the temperature control 8 Interior Light 8 Storage 9 Shelves 9 C
IMPORTANT SAFETY INSTRUCTIONS To reduce the risk of fire, electrical shock, or injury when using your appliance, follow WARNING these basic precautions: Read all instructions before using the wine cooler. DANGER or WARNING: To avoid the possibility of child entrapment, please take the following precautions before throwing out the appliance. - Remove all doors from the unit. - Leave the shelves in place so that children may not easily climb inside.
IMPORTANT SAFEGUARDS Before the appliance is used, it must be properly positioned and installed as described in this manual, so read the manual carefully. To reduce the risk of fire, electrical shock or injury when using the appliance, follow basic precaution, including the following: Plug into a grounded 3-prong outlet, do not remove grounding prong, do not use an adapter, and do not use an extension cord. Replace all panels before operating.
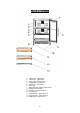
PARTS & FEATURES 1. 2. 3. 4. 5. 6. 7. 8. 9. 10. 11. 12. 13.
INSTALLATION INSTRUCTIONS BEFORE USING YOUR WINE COOLER Remove the exterior and interior packing. Before connecting this appliance to the power source, let it stand upright for approximately 2 hours. This will reduce the possibility of a malfunction in the cooling system from handling during transportation. Clean the interior surface with lukewarm water using a soft cloth. INSTALLATION OF YOUR WINE COOLER This appliance is designed to be for free standing installation or built-in (fully recessed).
The cutout dimension illustrated allows for a normal door opening clearance and access to the racks when installed as a built-in appliance. If installing between frameless cabinets, a ½” wide filler strip or side panel may be needed on the side with the hinge. This strip will act as a spacer between the appliance case and adjacent cabinet door. The width of the opening must include the filter panels. Note: The door should protrude at least 1” beyond the surrounding cabinets. The clearance is: 2”.
OPERATING YOUR WINE COOLER It is recommended you install the wine cooler in a place where the ambient temperature is between 19ºC-24ºC (66ºF-75ºF). If the ambient temperature is above or below recommended temperatures, the performance of the unit may be affected. For example, placing your unit in extreme cold or hot conditions may cause interior temperatures to fluctuate. The range of 4ºC-20ºC (39ºF-68ºF) may not be reached.
STORAGE Many bottles may differ in size and dimensions. As such the actual number of bottles you may be able to store may vary. You can place 44 standard bottles in this wine cooler. The upper zone can hold as many as 16 wine bottles (2 rows of 8 bottles) and the lower zone can hold as many as 28 wine bottles (2 rows x 8 bottles, plus 1 row x 12 bottles (6+6 stacked up)).
CARE AND MAINTENANCE DEFROST Any ice build-up on the inner back wall during compressor operation will be automatically defrosted in a compressor off cycle. When defrosting is in process, only the circulation fans for both zones run. Defrost water will drain into the drip pan (on the compressor), and the water will be evaporated by the compressor. CLEANING YOUR WINE COOLER Turn off the power, unplug the appliance, and remove all items including shelves.
TROUBLESHOOTING GUIDE You can solve many common Wine Cooler problems easily, saving you the cost of a possible service call. Try the suggestions below to see if you can solve the problem before calling the servicer. PROBLEM Cooler does not operate. Cooler is not cold enough. The compressor turns on and off frequently. The light does not work. POSSIBLE CAUSE SOLUTION Not plugged in. The appliance is turned off. The circuit breaker tripped or a blown fuse.
WIRING DIAGRAM 12
TABLE DES MATIÈRES CONSIGNES DE SÉCURITÉ IMPORTANTS 14 SÉCURITÉ RELATIVE À L‟APPAREIL 14 CONSEILS DE SÉCURITÉ IMPORTANTS 15 PIÈCES ET CARACTÉRISTIQUES 16 PRÉPARATION ET INSTALLATION DU CELLIER 17 Préparation du cellier 17 Installation du cellier 17 Encastrement 17 Branchement au réseau électrique 18 Rallonge 18 Parasurtenseur (Powerbar) 18 FONCTIONNEMENT DE L‟APPAREIL 19 Recommandations relatives à la température 19 Interrupteur Marche/Arrêt 19 Déverrouillage du tableau de comman
CONSIGNES DE SÉCURITÉ IMPORTANTES Pour diminuer les risques d‟incendie, d‟électrocution ou d‟accident pendant l‟utilisation de votre appareil, veuillez suivre les mesures de sécurité suivantes: Veuillez lire toutes les instructions avant d‟utiliser l‟appareil. DANGER ou AVERTISSEMENT: Les risques d‟enfermement ou de suffocation pour les enfants demeurent une réalité. Les appareils abandonnés ou jetés demeurent un danger, même s‟ils ne sont placés dans le garage que pour quelques jours.
CONSEILS DE SÉCURITÉ IMPORTANTS Avant toute utilisation, le cellier doit être convenablement positionné et installé comme il est décrit dans ce manuel, il est donc nécessaire de le lire attentivement.
PIÈCES ET CARACTÉRISTIQUES 1. 2. 3. 4. 5. 6. 7. 8. 9. 10. 11. 12. 13.
PRÉPARATION ET INSTALLATION DU CELLIER PREPARATION DU CELLIER Retirez l„emballage extérieur et intérieur. Lisez le mode d‟emploi. Placez l‟appareil à l‟endroit qui lui est réservé puis attendez environ deux heures avant de le brancher. Vous éviterez ainsi des troubles de fonctionnement au niveau du système de refroidissement possiblement occasionnés lors du transport. Nettoyez les surfaces intérieures avec un chiffon doux imbibé d‟eau tiède.
Si l'installation se fait entre des armoires sans cadre, une fourrure d‟un ½ " de large ou une bande panneau latérale pourra être nécessaire du côté charnière. La bande agira comme un espacement entre le boitier de l'appareil et la porte du cabinet adjacent. La largeur de l‟ouverture doit inclure le panneau ou la fourrure. Note: La porte doit excéder d‟au moins 1 "au-delà des armoires environnantes et il doit y a avoir au moins 2” de dégagement autour.
FONCTIONNEMENT DE L’APPAREIL Il est recommandé de placer l‟appareil dans un endroit où la température ambiante se situe entre 19° et 24°C (66°F-75°F). Si la température ambiante est supérieure ou inférieure à la température recommandée, il se peut que le fonctionnement de l‟appareil en soit affecté. Par exemple, exposer votre appareil à un froid extrême ou à de fortes chaleurs peut faire fluctuer les températures intérieures et empêcher l‟atteinte de l‟amplitude de 4° à 20°C (39°F-68°F).
ÉCLAIRAGE INTERIEUR S‟il est laissé allumer, l‟éclairage intérieur s‟éteindra automatiquement au bout de dix minutes. Vous devrez alors déverrouiller le panneau de contrôle et appuyer sur l‟icône pour le rétablir. représentant l‟éclairage CAPACITE D’ENTREPOSAGE Les bouteilles peuvent varier en taille et en dimension. Ainsi, le nombre réel de bouteilles qu‟il vous sera possible d‟entreposer variera également. Ce cellier à vin peut contenir 44 bouteilles de taille standard.
ENTRETIEN DE L’APPAREIL DECONGÉLATION L‟accumulation de glace sur le mur arrière intérieures ‟éliminera automatiquement quand le compresseur aura terminé son cycle. L'eau s'égouttera en passant par le sortie de vidange du mur arrière intérieure dans un contenant situé au-dessus du compresseur, à partir d‟ où elle s'évapore. NETTOYAGE DE L’APPAREIL Coupez le courant, débranchez l‟appareil et videz le contenu incluant les tablettes.
GUIDE DE DÉPANNAGE Vous pouvez facilement résoudre plusieurs des problèmes courants de votre appareil et vous épargner ainsi des frais de service. Essayez les suggestions ci-dessous qui s‟appliquent à votre situation avant de faire appel à un professionnel. PROBLÈME CAUSE POSSIBLE SOLUTION L‟appareil ne fonctionne pas. Il est débranché. Il est éteint. Le disjoncteur est éteint ou le fusible grillé. Vérifiez s‟il est bien branché.
SCHÉMA DE CÂBLAGE M IC R O - C O M P U T E R C O N T R O L L E R U PPER LO W ER E LE C T R IC VALVE E LE C T R IC LOW ER L IG H T U PPER L IG H T R t B LA CK B LA CK B LA CK B LA CK B LA CK R t R t D LOW ER U PPER FAN FAN VALVE RED B LA CK B LA CK B LA CK B LA CK RED B LA CK RED W HIT E W HIT E W HIT E W HIT E RED B LUE B LUE R t D RED B RO W N B RO W N TRANSFO RM ER LOW ER TEMP SEN SOR D EFR OST SEN SOR U PPER TEMP SEN SOR D EFR OST SEN SOR B LA CK B LUE L E
INDICE INSTRUCCIONES DE SEGURIDAD 25 SEGURIDAD DEL APARATO 25 MEDIDAS PREVENTIVAS 26 PIEZAS Y CARACTERISTICAS 27 INSTRUCCIONES DE INSTALACION 28 Antes de utilizar su armario bodega 28 Instalación de su armario bodega 28 Instalación integrada 28 Conexión eléctrica 29 Cable de extensión/Alargador 29 Protector de sobretensión 29 UTILIZACION DEL ARMARIO BODEGA 30 Temperatura recomendada para la conservación del vino 30 Encendido/Apagado 30 Bloqueo del panel de control 30 Modificar
INSTRUCCIONES DE SEGURIDAD Para evitar el riesgo de incendio, descargas eléctricas o daños al utilizar su aparato, tome las siguientes precauciones: Lea detenidamente este manual antes de su instalación y uso. PELIGRO O ADVERTENCIA: Para evitar la posibilidad de que los niños se queden atrapados, por favor tome las siguientes precauciones antes de deshacerse del aparato: - Retire la(s) puerta(s) de la unidad. - Deje las baldas en su sitio para evitar que los niños puedan acceder fácilmente al interior.
MEDIDAS PREVENTIVAS Antes de utilizar el aparato, lea atentamente estas instrucciones de seguridad y asegúrese de que el armario bodega se instala en una ubicación adecuada. Para evitar que se produzcan descargas eléctricas, fugas o fuego, tenga en cuenta los siguientes puntos: Asegúrese de conectar la unidad a un enchufe de tres puntas con toma a tierra. No quite la toma a tierra de la clavija y no use adaptadores ni alargadores. Quite todo el material de embalaje.
PIEZAS Y CARACTERISTICAS 1. 2. 3. 4. 5. 6. 7. 8. 9. 10. 11. 12. 13.
INSTRUCCIONES DE INSTALACION ANTES DE UTILIZAR SU ARMARIO BODEGA Retire el embalaje exterior e interior. Antes de conectar el aparato a la fuente de alimentación, déjelo en posición vertical aproximadamente 2 horas, esto evitará cualquier posible fallo del sistema de refrigeración debido a un manejo inapropiado durante su transporte. Limpie el interior con un agua tibia y un paño suave. INSTALACION DE SU ARMARIO BODEGA Este aparato ha sido diseñado para ser instalado de forma independiente o integrada.
La dimensión del corte que aparece en la ilustración establece el espacio necesario para abrir la puerta y tener acceso a las repisas extraíbles, cuando se instala como un aparato integrado. Si se instala entre armarios sin marco, en el lado de la bisagra podría ser necesaria una tira de relleno de ½" (1.27 cm) de ancho o un panel lateral. Esta tira servirá como separador entre la caja del aparato y la apertura de la puerta del armario adyacente. El ancho de la apertura debe incluir los paneles de filtro.
UTILIZACION DEL ARMARIO BODEGA Se recomienda colocar el armario bodega en un lugar donde la temperatura ambiente sea de entre 19° y 24°C (66°F-75°F). Si la temperatura ambiente no es la recomendada, el rendimiento del aparato puede disminuir. Si coloca el aparato en lugares muy fríos o calientes la temperatura interior puede variar. Puede que el armario bodega no alcance el rango de los 4° y 20°C (39°F-68°F).
CAPACIDAD Tal y como los tamaños y dimensiones de las botellas varían, la capacidad de almacenamiento de su armario bodega también. Puede conservar 44 botellas estándar en este armario bodega. La zona superior puede albergar hasta 16 botellas de vino (2 filas de 8 botellas) y la zona inferior puede albergar hasta 28 botellas de vino -2 filas x 8 botellas, además de una fila de 12 botellas (6 + 6 apiladas).
CUIDADO Y MANTENIMIENTO DESHIELO Cualquier acumulación de hielo en la pared trasera interna será automáticamente descongelada en un ciclo de descompresión. Cuando la descongelación se encuentra en proceso, sólo operan los ventiladores de circulación de las dos zonas. El agua descongelada se drena en la bandeja de goteo (en el compresor), y el compresor evapora el agua. LIMPIEZA DE SU ARMARIO BODEGA Apague y desconecte la unidad de la toma de corriente. Vacíe el armario bodega y saque las repisas/baldas.
SOLUCION DE PROBLEMAS Puede solucionar muchos problemas comunes del aparato fácilmente y eso le ahorrará el coste de una posible llamada al servicio de asistencia técnica. Antes de llamar al servicio técnico, revise los siguientes consejos prácticos de resolución de problemas. PROBLEMA El armario bodega no funciona. El armario bodega no enfría lo suficiente. El compresor enciende y apaga frecuentemente. La luz no prende. CAUSA PROBABLE No está conectada a corriente. El aparato está apagado.
DIAGRAMA ELECTRICO 34