Instruction Manual Interact QuickBooks Interface Module 51196 © 2008 by Fairbanks Scales All rights reserved Revision 1.
Amendment Record Interact QuickBooks Interface Module DOCUMENT 51196 Manufactured by Fairbanks Scales Inc. 821 Locust Kansas City, Missouri 64106 Created 07/2008 Revision 1.0 07/2008 07/08 First Draft Release 3 51196 Rev. 1.
Section 5: Programming © Copyright 2008 This document contains proprietary information protected by copyright. All rights are reserved; no part of this manual may be reproduced, copied, translated or transmitted in any form or by any means without prior written permission of the manufacturer. Disclaimer Every effort has been made to provide complete and accurate information in this manual.
Table of Contents Interact QuickBooks Interface Module ............................................................................ 1 Interact QuickBooks Interface Module ............................................................................ 3 Document 51196 ................................................................................................................ 3 TABLE OF CONTENTS .............................................................................................
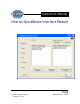
Section 1: General Information 1.1. DESCRIPTION The QuickBooks Interface Module is used to transfer transaction data from Interact SE or Professional to QuickBooks Pro. It can also be used to synchronize account, hauler, material, and tax tables between Interact and QuickBooks Pro. The QuickBooks Interface Module tool has been created and tested using QuickBooks Pro 2004. Fairbanks Scales will not guarantee or support the functionality of this tool with older versions of QuickBooks.
• • • • Base Charge Tax Freight Charges Transfer Date It is required that the following tables be synchronized between Interact and QuickBooks: • • • • Accounts Haulers/Vendors Materials Taxes This means that for every valid account, hauler, material, and tax in Interact, there must be a corresponding customer, vendor, item, and tax in QuickBooks. The QuickBooks Interface Module tool provides a table synchronization tool to aid you in performing this task. 1.2.
Section 2: Using the QuickBooks Interface Module 2.1. QUICKBOOKS AND INTERACT SETUP 2.1.1. Synchronizing the QuickBooks and Interact Databases Before any Interact data can be exported to QuickBooks, the account, material and tax tables must be synchronized between the two programs. This means that for every account, material, and tax in Interact, there must be a corresponding customer, item, and tax in QuickBooks. The QuickBooks Interface Module tool can be used to aid in this process.
2.2. CUSTOMERS Select the Customer bullet, and then click the Load List button. The QuickBooks Interface Module tool will attempt to match customer accounts from QuickBooks with customer accounts from Interact. To match, the QuickBooks customer name and Interact customer account name must be an exact match. When completed, the program will list all customers for which matches could not be found. Only those accounts that will have transaction data transferred from Interact to QuickBooks will need to match.
2.2.1. Add a New Interact Customer To add a QuickBooks customer to Interact, select a customer from the QuickBooks customer list and click the Add New Interact Customer button. Account information is automatically added. 2.2.2. Add a New QuickBooks Customer To add an Interact customer to QuickBooks, select a customer from the Interact customer list and click the Add New QuickBooks Customer button. Account information is automatically added. 2.2.3.
2.3. HAULERS Select the Haulers bullet, and then click the Load List button. The QuickBooks Interface Module tool will attempt to match vendor accounts from QuickBooks with hauler accounts from Interact. To match, the QuickBooks customer name and Interact customer account name must be an exact match. When completed, the program will list all customers for which matches could not be found. Only those accounts that will have transaction data transferred from Interact to QuickBooks will need to match.
2.3.1. Add a New Interact Hauler To add a QuickBooks vendor to Interact, select a vendor from the QuickBooks customer list and click the Add New Interact Hauler button. Hauler information is automatically added. 2.3.1. Add a New Interact Vendor To add an Interact hauler to QuickBooks, select a hauler from the Interact hauler list and click the Add New QuickBooks Vendor button. Vendor account information is automatically added. 2.3.1.
2.4. MATERIALS Select the Materials bullet, and then click the Load List button. The QuickBooks Interface Module tool will attempt to match items from QuickBooks with materials from Interact. To match, the QuickBooks item number/name must be an exact match to the Interact material description. When completed, the program will list all QuickBooks items and Interact materials for which matches could not be found. Mismatches can be resolved in one of two ways: 1. 2.
2.4.1. Add a New Interact Material To add a QuickBooks item as an Interact material, select an item from the QuickBooks item list and click the Add New Material to Interact button. The following window appears. Enter a ten character code to be used in Interact. Click the OK button. 2.4.1. Modify a Material in Interact To force a match between a QuickBooks item and an Interact material, select one item from the QuickBooks item list and one material from the Interact material list.
2.5. TAXES Select the Taxes bullet then click the Load List button. The QuickBooks Interface Module tool will attempt to match taxing authorities in QuickBooks and Interact. To match, the QuickBooks item number/name must be an exact match to the Interact tax authority description. When completed, the program will list all QuickBooks and Interact taxing authorities for which matches could not be found. } Mismatches can be resolved in one of two ways: 1. 2.
2.5.1. Add a New Tax Authority to Interact To add a QuickBooks tax authority to Interact, select the tax authority from the QuickBooks list and click the Add New Tax to Interact button. The following window appears. Enter a ten character code to be used in Interact. Click the OK button. 2.5.2. Modify Authorities in Interact To force a match between a QuickBooks tax authority and an Interact tax authority, select a tax authority from the QuickBooks list and Interact list.
2.6. MISC. SETUP 2.6.1. Combine Taxes on Invoice When checked, taxes for all transactions will be combined on each invoice. 2.6.2. Added Charges Account To add an Added Charge item to QuickBooks, select Lists | Item Lists. Select Item | New. A new item window appears. The new item will appear in the QuickBooks Interface Module when the Load Lists button is clicked. 2.6.3.
Use the above example to add an exempt tax item. Be certain to set Tax Rate% to 0.0%. Click the OK button to save changes. 2.6.4. Freight Payable Income Account To add a Freight Payable Income item to QuickBooks, select Lists | Item Lists. Select Item | New. A new item window appears. Setup a QuickBooks item in the Item List as a service and select the income account associated with freight. A separate Chart of Accounts can be added and used if desired but is not necessary.
appropriate QuickBooks G/L material account for Material Income Account, Material COGS Account, and Material Asset Account, from the drop-down lists. 2.6.7. QuickBooks Company File To run the QuickBooks Interface Module tool without having to first start QuickBooks, enter the path to the QuickBooks database. The path will look similar to the following: C:\Program Files\Intuit\QuickBooks Pro\sample.qbw.
Place checks next to... 1. 2. Allow this application to access this company file Allow this application to login automatically Select the login user from the Login As drop-down list. 07/08 20 51196 Rev. 1.
Section 3: Transferring Transaction Data to QuickBooks QuickBooks requires an invoice number when transferring transactions into accounts receivable. To assign invoice numbers to transactions, use the Invoice, Statement & Posting route in Interact Plus and the Post Transactions routine in Interact SE (With 3rd Party Accounting Interface). 3.1. INTERACT PROFESSIONAL Start Interact and select Accounting | Invoices, Statements & Posting. The Invoices, Statements & Posting Options table appears.
Select Export to QuickBooks from the Destination drop-down list. Click the Export button. Click the Yes button to perform the backup functions. Click the OK button to continue. The QuickBooks Interface Module tool will start automatically. It will verify the presence of all customers, items and taxes in QuickBooks prior to transferring invoice data. Messages and a progress bar will appear in the status bar showing the transfer status.
Once corrections have been made, return to the Transfer bullet and click the Transfer Transaction button. NOTE: Do Not select to post transactions until transactions have transferred correctly into QuickBooks. If changes are made to Interact transactions, it is will be necessary to go through the export/post process after changes have been made. Once transactions have been posted, they cannot be unposted unless a backup, prior to posting, is restored. 07/08 23 51196 Rev. 1.
3.2. INTERACT SE WITH THIRD PARTY ACCOUNTING INTERFACE Before posting transactions, it is recommended that a Detailed Tonnage and Charges report by Account be reviewed for transaction accuracy. Make transaction corrections prior to posting transactions. Once transactions have been posted, they cannot be reversed unless a database prior to posting is restored. Start Interact and select Accounting | Post Transactions. The Export Transaction Options table appears. Select a date range from the date section.
It will verify the presence of all customers, items and taxes in QuickBooks prior to transferring invoice data. Messages and a progress bar will appear in the status bar showing the transfer status. An error similar to the following appears when information is missing in a QuickBooks table. When synchronization errors occur, transactions are not transferred. To continue the verify process and find all mismatches, click the OK button. To cancel the verify process, click the Cancel button.
Once corrections have been made, return to the Transfer bullet and click the Transfer Transaction button. NOTE: Do Not select to post transactions until transactions have transferred correctly into QuickBooks. If changes are made to Interact transactions, it is will be necessary to go through the export/post process after changes have been made. Once transactions have been posted, they cannot be unposted unless a backup, prior to posting, is restored. 07/08 26 51196 Rev. 1.
3.3. CUSTOMIZING THE QUICKBOOKS INVOICE The transaction date is transferred to the Service Date field in QuickBooks. By default, this field is not active on in any of the QB default invoices. Follow the steps below to create a custom QuickBooks invoice and active the Service Date field. 1. 2. 3. 4. 5. 6. 7. 8. Start QuickBooks Open the Create Invoice table Click the Customize button above the invoice format drop-down list.
07/08 28 51196 Rev. 1.
Manufactured by Fairbanks Scales, Inc. 821 Locust Kansas City, Missouri 64106 www.fairbanks.