
Specification

Ref.: 02/DZP/SCH/14/92I
3 #&&#
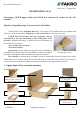
Depending on the model of the loft ladder and the height of the box,
the maximum thickness of the ceiling in which the upper hatch can be
installed is described in !&-. If the maximum thickness of the ceiling
prevents installation of the upper hatch, it is necessary to order box extension
(Figure 4) so as #%!".
%& ' &#
/
!'
"''&<##
1
1=!"
"#
0
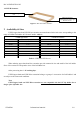
28cm/ 11'' 38cm/ 15''
>00,
31cm/ 12
1
/
4
'' 41cm/ 16
1
/
8
''
39cm / 15
3
/
8
'' 49cm/ 19
1
/
4
''
,?
- 41cm/ 16
1
/
8
''
* - mounting LXW upper hatch possible after installing LXN box extension
Table 2: Maximum ceiling thickness for installation of the upper hatch with
particular models of loft ladders.
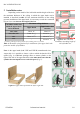
in the upper hatch (both LXW and LXW-B) manufactured since
August 2014 it is possible to choose a side to which the hatch will be
opened (Fig. 6). Additional openings allow to mount cylinder on the
right of left side of the upper hatch box. '#'<#
(& #' ##&%#(Fig. 5).
© FAKRO Informational material 3/4
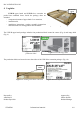
Figure 5: Proper installation of the
upper hatch
Figure 6: Upper hatch opened to the left or right side
Figure 4: Box extension
installation extending height of
the loft ladder box