Italiano English Deutsch Español на русском языке INSTRUCTIONS BOOKLET BEDIENUNGSSANLEITUNG LIVRET D’INSTRUCTIONS MANUAL DE INSTRUCCIONES àçëíêìäñàü èé ùäëèãìÄíÄñàà INSTRUKCJE OBSŁUGI Polska Cod. 110030268 (Cappe DIAMANTE/GLEAM) Français LIBRETTO ISTRUZIONI Ed.
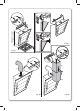
B A DIAMANTE hood: 525 mm GLEAM hood: 437 mm A C X Fig. 02 Fig. 01 L M M E H D E E D G Fig. 03 Fig.
Cappa GLEAM / GLEAM Hood - Fig.
Cappa DIAMANTE / DIAMANTE Hood - Fig.
I A LIBRETTO ISTRUZIONI AVVERTENZE È molto importante che questo libretto istruzioni sia conservato insieme all’apparecchiatura per qualsiasi futura consultazione. Se l’apparecchio dovesse essere venduto o trasferito ad un’altra persona, assicurarsi che il libretto venga fornito assieme, in modo che il nuovo utente possa essere messo al corrente del funzionamento della cappa e delle avvertenze relative.
SICUREZZA AVVERTENZE B CARATTERISTICHE TECNICHE I dati tecnici dell’elettrodomestico sono riportati su delle targhette, posizionate all’interno della cappa. C INSTALLAZIONE (parte riservata solo a persone qualificate per il montaggio della cappa) La distanza minima: distanza fra la parte più alta dell’apparecchiatura per la cottura e la parte più bassa della cappa da cucina.
D ALLACCIAMENTO ELETTRICO (parte riservata solo a persone qualificate per l’allacciamento) ATTENZIONE! Prima di effettuare qualsiasi operazione all’interno della cappa scollegare l’apparecchio dalla rete elettrica. Assicurarsi che non vengano scollegati o tagliati fili elettrici all’interno della cappa; nel caso si verifichino tali situazioni contattare il centro assistenza più vicino. Per l’allacciamento elettrico rivolgersi a personale qualificato.
Deviazione per la Germania: Quando la cappa da cucina e apparecchi alimentati con energia diversa da quella elettrica sono in funzione simultaneamente, la pressione negativa nel locale non deve superare i 4 Pa (4 x 10⁻⁵ bar). CAPPA DI VERSIONE A RICICLO INTERNO (filtrante) In questa versione l’aria passa attraverso i filtri di carbone attivo per essere purificata e viene riciclata nell’ambiente cucina.
Nota per cappa Diamante: La cappa diamante è già dotata di ricevitore radio per radiocomando. Il radiocomando è disponibile in acquisto come optional. Per utilizzare il radiocomando sulla cappa è sufficiente eseguire la seguente procedura di apprendimento: premere il tasto timer della pulsantiera per 2 secondi e all’accensione del led rosso della pulsantiera premere un tasto qualsiasi del radiocomando entro 10 sec. Con questa operazione viene registrato in nuovo codice di trasmissione.
Italiano I ILLUMINAZIONE MONTAGGIO E SOSTITUZIONE 1. LAMPADA FLUORESCENTE (DIAMANTE) Sostituzione del tubo fluorescente: a) Scollegare l’apparecchio dalla rete di alimentazione; b) Rimuovere i pannelli in acciaio e i filtri metallici (vedi punto H1). Svitare i 2+2 perni zigrinati di fissaggio sei supporti neon in acciaio. c) Togliere il tubo fluorescente ruotandolo di 90° e sostituirlo con uno di analoghe caratteristiche (Tubo T5 da 13W); d) Ripetere in senso inverso le operazioni del punto b.
La pulizia della cappa va eseguita usando un panno umido con detersivo liquido neutro o con alcool denaturato. Nel caso di materiale con trattamento antimpronta (Fasteel) eseguire la pulizia solo con acqua e sapone neutro utilizzando un panno morbido avendo cura di risciacquare e asciugare accuratamente. Non si devono utilizzare prodotti contenenti sostanza abrasive, panni con superfici ruvide o panni comunemente in commercio per la pulizia dell’acciaio.
Nel caso di montaggio con scarico posteriore vedi fig. A. Fase 4 (optional) - Posizionare il camino (G) e la prolunga (H) come indicato in fig. O4. - Infilare nell’elemento (G) la prolunga (H), facendola scorrere fino a raggiungere l’altezza desiderata. - Trovata la posizione ottimale, appoggiare alla parete la staffa (L), controllare con una bolla di livello l’allineamento orizzontale e segnare alle estremità n°2 punti di foratura.
GB A INSTRUCTIONS BOOKLET WARNINGS This instruction booklet must be kept together with the appliance for future reference. If the appliance is sold or consigned to other parties, check that the booklet is supplied with it, to ensure that the new user has the correct information on the operation of the range hood and is aware of the warnings. These warnings have been provided for the your safety and the safety of others. As a result, please read them carefully before installing and operating the appliance.
B TECHNICAL SPECIFICATIONS The technical data pertaining to the electric appliance The technical specifications of the appliance are shown on the rating plates located inside the range hood. C INSTALLATION (Section reserved for qualified installers of the range hood) Minimum distance between the higher part of the cooker and the lower part of the hood: usually, when a hood is fitted on a gas appliance, this distance must be at least 65 cm.(25,6”) see Fig. 01.
The connections must be performed in compliance with the legal standards in force. Check that the relief valve and the electrical system are able to support the load of the appliance (see the technical specifications in point B).
Note for Diamante hood: The Diamante hood is already equipped with a radio receiver for radio control. The radio control is available for purchase as an optional. To use the radio control on the hood complete the following learning procedure: press the push button control panel timer button for 2 seconds and when the red led of the push button control panel turns on press any button on the radio control within 10 seconds. This operation records a new transmission code.
push button control panel turns on press any button on the radio control within 10 seconds. This operation records a new transmission code. H FILTERS REMOVING AND REPLACING’S INSTRUCTIONS 1. METAL FILTERS To reach the metal filters one must remove the three frontal panels (see fig A1 and A2). To remove the metal filters use the handle. 2. CHARCOAL FILTERS To replace the charcoal filters, proceed as follows: remove the metal filters as described above.
These trap the fat and grease particles suspended in the air, and therefore should be washed every month in hot water and detergent, without bending them. Wait until they are completely dry before repositioning them. To remove and replace these filters, see the instructions in point H1. This operation should be performed at regular intervals. 2. CHARCOAL FILTERS These trap the odours present in the stream of air that passes through them.
Phase 2 - Hook the hood to the propping bar (fig. 02). - Check the hood’s alignment using the fixing screws.(fig. 02). The upper screw (B) set the distance from the wall, the lower (C) the vertical slide. Phase 3 To avoid any unhooking of the hood fix it to the wall with the screws and wall anchors supplied as follows: - through the holes on the back of the hood and any strap on the cover. - Insert in pipe union D pipe E (fig. 3) - Should the fixing include a rear flue see fig. A.
D A BEDIENUNGSANLEITUNG HINWEISE VORSICHT: Dieses Produkt muss am Ende seiner Lebensdauer gemäß den geltenden Vorschriften entsorgt werden. 19 Deutsch Diese Bedienungsanleitung muss unbedingt zusammen mit dem Gerät aufbewahrt werden, um in Zukunft nachgeschlagen werden zu können. Sollte das Gerät verkauft bzw.
SICHERHEITSBESTIMMUNGEN Die elektrische Anlage ist mit einer Erdung ausgestattet, die den internationalen Sicherheitsvorschriften entspricht; sie erfüllt außerdem die europäischen Entstörungsvorschriften. Das Gerät auf keinen Fall an die Ablassleitungen von Rauch, das durch Verbrennung entsteht (Heizkessel, Kamine, usw...), anschließen. Sich vergewissern, dass die Netzspannung mit den im Inneren der Dunstabzugshaube angegebenen Daten übereinstimmt.
In der absaugenden Ausführung darf der komplette Kamin für den Rauchluftabzug keinen kleineren Durchmesser, als die Rohrmuffe der Abzugshaube aufweisen. In den waagrechten Strecken muss das Rohr leicht nach oben geneigt (circa 10%) montiert werden, damit die Abzugsluft optimal nach außen befördert werden kann. So wenig Kurven wie möglich verwenden und überprüfen, dass die Rohre die Mindestänge einhalten. Die geltenden Vorschriften bezüglich des Luftablasses nach draußen beachten.
Germany (Feuerungsverordnung vom 31-01-1986 und DVGW-TRGI 1986, Amtsblatt G 600): Bei gleichzeitigem Betrieb der Dunstabzugshau-be im Abluftbetrieb und Feuerstätten darf im Aufstellraum der Feuerstätte der Unterdruck nicht größer als 4 Pa (4 x 10⁻⁵ bar) sein. F HAUBE MIT UMLUFTBETRIEB (filtrierend) Bei dieser Ausführung strömt die Luft durch Aktivkohlefilter, wo sie gefiltert und erneut an den Raum abgegeben wird.
Hinweis zur Abzugshaube Diamante: Die Abzugshaube Diamante ist bereits mit einem Funkempfänger für die Fernbedienung ausgestattet. Die Fernbedienung ist als optionales Zubehör erhältlich. Um die Fernbedienung an der Haube verwenden zu können, ist lediglich das folgende Anlernverfahren erforderlich: Die Timer-Taste an der Bedientafel 2 Sekunden drücken. Bei Einschalten der roten LED an der Bedientafel innerhalb von 10 Sekunden eine beliebige Taste an der Fernbedienung drücken.
NUR FÜR ITALIEN: Entsprechendes Formular von der Internetseite: www.falmec.com herunterladen (Zugriff über Pull-down-Menü). I BELEUCHTUNG MONTAGE UND ERSATZ FLUORESZIERENDE LAMPE (DIAMANTE) Austausch der Leuchtröhre: a) Das Gerät vom Stromnetz trennen; b) Die Stahlpaneelen und die Metallfilter entfernen (siehe Punkt H1). Die 2+2 gerändelten Befestigungsstifte und die sechs Neonhalter aus Edelstahl abschrauben.
3. AUSSENREINIGUNG Wir empfehlen, die äußeren Oberflächen der Hauben mindestens alle 15 Tage zu reinigen, um zu vermeiden, dass die öligen oder fettigen Substanzen die Oberflächen aus Stahl angreifen. Die Reinigung der Dunstabzugshaube wird mit einem feuchten Schwamm und einem neutralen Flüssigreiniger bzw. denaturiertem Alkohol durchgeführt.
ren (Abbildung O2). Die obere Schraube (B) reguliert den Abstand zur Wand, die untere (C) die senkrechte Gleitbewegung. Phase 3 - Um das Aushaken der Abzugshaube wegen einem von unten kommenden Druck zu vermeiden, muss die Abzugshaube an der Wand mit Spreizdübeln und den entsprechenden Schrauben befestigt werden, wobei folgendes zu beachten ist: - die vorgesehenen Lochungen (Abbildung O3) am Rückenteil der Abzugshaube oder die eventuell vorhandene Schelle am Deckel für die Montage verwenden.
F A LIVRET D’INSTRUCTIONS AVERTISSEMENTS ATTENTION : Ce produit doit être éliminé en fin de vie, conformément aux règles en vigueur. SÉCURITÉ AVERTISSEMENTS L’installation électrique est dotée d’un branchement à la terre comme reporté dans les normes de sécurité internationales; elle est par ailleurs conforme aux normes européennes sur les parasites radio. 27 Français Conserver cette notice avec l’appareil pour pouvoir la consulter en cas de besoin.
Ne pas relier l’appareil aux conduits d’évacuation des fumées dues à la combustion (chaudières, cheminées, etc.). Vérifier si la tension du réseau correspond à celle indiquée sur la plaque qui se trouve à l’intérieur de la hotte. La distance minimale de sécurité entre la table de cuisson et la hotte doit être d’au moins 65 cm. Ne pas faire cuire avec une flamme « libre » en dessous de la hotte. Vérifier les friteuses durant l’emploi: I’huile surchauffée pourrait prendre feu.
d’autres combustibles (chaudières, poêles, cheminées, etc.), s’assurer que le local où a lieu l’aspiration des fumées est bien aéré, conformément aux normes en vigueur. Instructions de montage: voir section “O” de la présente notice. D BRANCHEMENT ÉLECTRIQUE E HOTTE VERSION À ÉVACUATION EXTÉRIEURE (aspirante) Dans cette version, les fumées et les vapeurs de cuisine doivent être acheminées vers l’extérieur par un tuyau d’évacuation.
Indication spécifique pour l’Allemagne: Quand la hotte fonctionne en même temps que des appareils alimentés avec de l’énergie autre que celle électrique, la pression négative dans le local ne doit pas dépasser les 4 Pa (4 x 10⁻⁵ bar). F HOTTE VERSION À RECYCLAGE D’AIR (filtrante) Dans cette version, l’air passe à travers les filtres au charbon actif pour être purifié et recyclé dans la cuisine.
Remarque : sur la hotte diamant la fonction de signalisation de saturation des filtres n’est pas activée. Remarque pour la hotte Diamant : La hotte diamant est déjà équipée de récepteur radio pour radiocommande. La radiocommande est disponible à l’achat comme option.
Pour commander les nouveaux filtres à charbon s’adresser au distributeur/revendeur. UNIQUEMENT POUR L’ITALIE: Télécharger le bon de commande du filtre en question sur le site: www.falmec.com (y accéder par le menu déroulant d’assistance). I ÉCLAIRAGE MONTAGE ET REMPLACEMENT 1. LAMPE FLUORESCENTE (DIAMANTE) Remplacement du tube fluorescent: a) Débrancher l’appareil du réseau électrique; b) Enlever les panneaux en acier et les filtres métalliques (voir point H1).
Ne nettoyer qu’avec un chiffon souple trempé dans de l’eau contenant du savon neutre si la surface a subi un traitement anti-empreinte (Fasteel), en ayant soin de rincer et d’essuyer soigneusement. Ne pas utiliser de produits contenant des substances abrasives, un chiffon rêche ni le type de chiffon pour nettoyer l’acier que l’on trouve généralement dans le commerce car cela abîmerait irrémédiablement le traitement superficiel de l’inox.
Phase 4 (optionnelle) - Positionner la cheminée (G) et la rallonge (H) comme montré à la fig. O4. - Introduire la rallonge (H) dans l’élément (G) en la faisant coulisser jusqu’à atteindre la hauteur voulue. - Une fois que la position optimale a été trouvée, poser contre le mur le support (L), contrôler avec un niveau l’alignement horizontal et marquer aux extrémités les 2 points à forer. - Forer, insérer 2 chevilles à expansion ø 4mm et fixer le support (L) avec les vis prévues.
E A MANUAL DE INSTRUCCIONES ADVERTENCIAS SEGURIDAD ADVERTENCIAS La instalación eléctrica está equipada de toma de tierra de acuerdo a las normas internacionales de seguridad y conforme a la normativa Europea de compatibilidades electromagnéticas. No conectar el aparato a conductos de salida de humos derivados de combustión (calefacción, chimeneas, etc). Verificar que la tensión de la red eléctrica corresponde a la que indica la etiqueta localizada en el interior de la campana.
No cocinar a fuego “abierto” bajo la campana. Controlar las freidoras durante su uso, el aceite recalentado puede incendiarse. Asegurarse que haya una ventilación adecuada en la estancia si la campana se utiliza junto con otros aparatos que usan combustión a gas u otros. No encender fuego abierto bajo la campana. No conectar el aparato a conductos de salida de humos derivados de la combustión (calefacciones, chimeneas, etc).
D CONEXIÓN ELÉCTRICA E CAMPANA EXTRACTORA EN LA VERSIÓN CON EVACUACIÓN EXTERIOR (aspirante) En esta versión los humos y los vapores de la cocina son transportados hacia el exterior mediante un tubo de salida. El tubo de salida que sobresale por la parte superior de la campana extractora debe estar acoplado a un tubo que conduce los humos y los vapores hacia una salida exterior.
F CAMPANA EXTRACTORA EN LA VERSIÓN CON RECICLADO INTERIOR (filtrante) En esta versión el aire pasa a través de los filtros de carbón activo para ser purificado y ser reciclado en el ambiente de la cocina. Controle que los filtros de carbón activo estén montados en el motor, en caso contrario debe montarlos siguiendo las instrucciones del punto H. Si la capa está preparada para versión filtrante quitar la válvula antiretorno montada en la salida del motor.
cumplir el siguiente procedimiento de aprendizaje: presione la tecla temporizador del teclado durante 2 segundos y cuando se encienda el led rojo del teclado presione una tecla cualquiera del radiomando antes de 10 segundos. Con esta operación se registra un nuevo código de transmisión. ADVERTENCIA (versión con radiomando): Coloque el aparato lejos de fuentes de ondas electromagnéticas que podrían interferir con la electrónica de la campana. Distancia máxima de funcionamiento: 5 metros.
I ILUMINACIÓN MONTAJE Y SUSTITUCIÓN 1. LÁMPARA FLUORESCENTE (DIAMANTE) Sustitución del tubo fluorescente: a) Desconectar el aparato de la red de alimentación eléctrica; b) Retirar los paneles de acero y los filtros metálicos (ver punto H1). Desenroscar los 2+2 pernos moleteados de fijación en los soportes neón de acero. c) Extraer el tubo fluorescente girándolo 90º y sustituirlo con uno de las mismas características (Tubo T5 de 13W); d) Repetir las operaciones del punto b en sentido inverso.
3. LIMPIEZA EXTERIOR Se recomienda limpiar las superficies externas de las campanas al menos cada 15 días, para evitar que las sustancias aceitosas o grasosas puedan corroer las superficies de acero. La limpieza de la campana debe hacerse con un paño húmedo con jabón líquido neutro o con alcohol desnaturalizado. En el caso de material con tratamiento antihuellas (FASTEEL) la limpieza se debe efectuar sólo con agua y jabón neutro utilizando un paño suave, siendo importantísimo enjuagar y secar bien.
El tornillo superior (B) regula la distancia respecto de la pared y el inferior (C), el deslizamiento vertical. Fase 3 - Para evitar que la campana se desenganche debido a una presión ejercida desde abajo, fijar la campana a la pared con los tacos de expansión y los tornillos correspondientes utilizando: los orificios adecuados (fig. O3) realizados en el soporte trasero o el eventual soporte sobre la tapa. - Introducir en el racor del tubo (D), el tubo (E) fig. 03.
RUS A àçëíêìäñàü èé ùäëèãìÄíÄñàà åÖêõ èêÖÑéëíéêéÜçéëíà ВНИМАНИЕ: Данное изделие в конце своего срока службы должно утилизироваться в соответствии с действующими правилами. ÅÖáéèÄëçéëíú åÖêõ èêÖÑéëíéêéÜçéëíà ùÎÂÍÚ˘ÂÒ͇fl ÒıÂχ Ò̇·ÊÂ̇ ÍÓÌÚ‡ÍÚÓÏ Á‡ÁÂÏÎÂÌËfl Òӄ·ÒÌÓ ÏÂʉÛ̇ӉÌ˚Ï ÌÓÏ‡Ï ·ÂÁÓÔ‡ÒÌÓÒÚË; ÍÓÏ ÚÓ„Ó, Ó̇ ÒÓÓÚ‚ÂÚÒÚ‚ÛÂÚ Â‚ÓÔÂÈÒÍËÏ ÌÓÏ‡Ï Á‡˘ËÚ˚ ÓÚ ‡‰ËÓÔÓÏÂı.
ç ÔÓ‰Íβ˜‡ÈÚ ÔË·Ó Í ÚÛ·‡Ï, ÓÚ‚Ó‰fl˘ËÏ ‰˚Ï ÓÚ Ò„Ó‡ÌËfl ÚÓÔÎË‚‡ (ÍÓÚÎ˚, ͇ÏËÌ˚ Ë Ú.Ô.). ì·Â‰ËÚÂÒ¸ ‚ ÚÓÏ, ˜ÚÓ Ì‡ÔflÊÂÌË ‚ ÒÂÚË ÒÓÓÚ‚ÂÚÒÚ‚ÛÂÚ Û͇Á‡ÌÌÓÏÛ Ì‡ Ú‡·Î˘ÍÂ, ÔËÍÂÔÎÂÌÌÓÈ ‚ÌÛÚË ‚˚ÚflÊÍË. Ç ˆÂÎflı ·ÂÁÓÔ‡ÒÌÓÒÚË ‡ÒÒÚÓflÌË ÓÚ ‚‡Ó˜ÌÓÈ ÔÓ‚ÂıÌÓÒÚË ‰Ó ‚˚ÚflÊÍË ‰ÓÎÊÌÓ ÒÓÒÚ‡‚ÎflÚ¸ Ì ÏÂÌ 65 ÒÏ. çÂθÁfl „ÓÚÓ‚ËÚ¸ ÔË˘Û Ì‡ ÓÚÍ˚ÚÓÏ Ó„Ì ÔÓ‰ ‚˚ÚflÊÍÓÈ. ëΉËÚ Á‡ ÙËÚ˛Ìˈ‡ÏË: Ô„ÂÚÓ χÒÎÓ ÏÓÊÂÚ Á‡„ÓÂÚ¸Òfl.
Минимально уменьшить изгибы; проверить, чтобы длина труб была достаточной для соединения. Соблюдать действующие нормы о выводе воздуха во внешнюю среду. В случае использования других приборов (котлов, печей, каминов и т.д.) с питанием газом или другими видами топлива, предусмотреть соответствующую вентиляцию помещения, в котором происходит всасывание дымов, согласно действующим нормам. Инструкции по установке: См. раздел “O” настоящего руководства.
F ÇõíüÜçéÖ ìëíêéâëíÇé ë êÖñàêäìãüñàÖâ ÇéáÑìïÄ (Ò ÙËθڇˆËÈ) Ç ˝ÚÓÈ ÏÓ‰ÎË ‚ÓÁ‰Ûı ÔÓıÓ‰ËÚ ˜Á ÙËθÚ˚ Ò ‡ÍÚË‚ËÓ‚‡ÌÌ˚Ï Û„ÎÏ, „‰ Ó˜Ë˘‡ÚÒfl Ë ‚ÓÁ‚‡˘‡ÚÒfl ‚ ÔÓÏ˘ÌË ÍÛıÌË. ì·‰ËÚÒ¸, ˜ÚÓ Û„ÓθÌ˚ ÙËθÚ˚ ÛÒÚ‡ÌÓ‚ÎÌ˚ ̇ ÏÓÚÓ, ËÒ. 6, ‚ ÔÓÚË‚ÌÓÏ ÒÎÛ˜‡ ÛÒÚ‡ÌÓ‚ËÚ Ëı, Í‡Í Û͇Á‡ÌÓ ‚ ÔÛÌÍÚ F ËÌÒÚÛ͈ËË.
Кожух Diamante уже оснащен радио-приемником для дистанционного управления. Дистанционное управление не входит в комплект поставки и приобретается отдельно. Для использования дистанционного управления в отношении кожуха достаточно выполнить следующую процедуру: нажат кнопку таймера на кнопочной панели и удерживать приблизительно в течение 2-х секунд, после включения красного светодиода на кнопочной панели нажать любую кнопку на дистанционном управлении в течение 10 секунд.
ÑÎfl ÛÒÚ‡ÌÓ‚ÍË/Á‡ÏÂÌ˚ ÒÏ. Ç ‚˚ÚflÊ͇ı Ò ÏÓÚÓÌ˚Ï ÓÚÒÂÍÓÏ ÙËÎ¸Ú ‡ÒÔÓÎÓÊÂÌ ‚ ÌËÊÌÂÈ ˜‡ÒÚË ˝ÚÓ„Ó ÓÚÒÂ͇. ÑÎfl ÛÒÚ‡ÌÓ‚ÍË/Á‡ÏÂÌ˚ ÒÏ. Для заказа новых угольных фильтров обратитесь к дистрибьютору/продавцу. ТОЛЬКО ДЛЯ ИТАЛИИ: Загрузите специальный формуляр заказа фильтра с сайта: www.falmec.com (из выпадающего меню сервисного обслуживания). I éëÇÖôÖçàÖ ìëíÄçéÇäÄ à áÄåÖçÄ 1.
ÏÒflˆ‡ (Á‡‚ËÒËÚ ÓÚ ˜‡ÒÚÓÚ˚ ËÒÔÓθÁÓ‚‡ÌËfl). ÑÎfl Á‡ÏÌ˚ ÙËθÚÓ‚ Ò ‡ÍÚË‚ËÓ‚‡ÌÌ˚Ï Û„ÎÏ ÒΉÛÈÚ ËÌÒÚÛ͈ËflÏ, ÔÛÌÍÚ H2. 3. óàëíäÄ çÄêìÜçéâ ëíéêéçõ Рекомендуется очищать внешние поверхности вытяжек не менее чем каждые 15 дней, чтоы жирные вещества не повредили стальную поверхность. óËÒÚ͇ ‚˚ÚflÊÍË ‰ÓÎÊ̇ ÓÒÛ˘ÂÒÚ‚ÎflÚ¸Òfl Ò ÔÓÏÓ˘¸˛ ‚·ÊÌÓÈ Ú͇ÌË Ò ËÒÔÓθÁÓ‚‡ÌËÂÏ ÊˉÍÓ„Ó ÌÂÈڇθÌÓ„Ó ˜ËÒÚfl˘Â„Ó Ò‰ÒÚ‚‡ ËÎË ‰Â̇ÚÛ‡Ú‡.
Этап 2 - Надеть вытяжку на опорный кронштейн (рис. O2). - Отрегулировать выравнивание вытяжки с помощью винтов креплений (рис. O2). Верхний винт (В) регулирует расстояние от стены, нижний винт (С) - ход повертикали. Этап 3 - Во избежание отцепления вытяжки в результате давления снизу, прикрепить вытяжку к стене расширяющимися дюбелями и соответствующими винтами с использованием специальных отверстий (рис. 03), проделанных в задней панели вытяжки или возможной скобы в крышке.
PL A INSTRUKCJA OBSŁUGI OSTRZEŻENIA UWAGA: Niniejszy produkt po zakończeniu jego życia musi zostać usunięty , zgodnie z obowiązującymi przepisami. OSTRZEŻENIA BEZPIECZEŃSTWA Układ elektryczny i podłączenie uziemienia jest zgodnie z międzynarodowymi normami bezpieczeństwa; ponadto są one zgodne z normą europejską dla zgodności elektromagnetycznej. 51 Polska Ta instrukcja obsługi musi być przechowywana razem z urządzeniem w celu przyszłego wykorzystywania.
Nie podłączać urządzenia do przewodów kominowych (od bojlerów, kominków, itp.). Upewnić się, że napięcie sieci odpowiada wartościom podanym na tabliczce znamionowej umieszczonej wewnątrz okapu kuchennego. Minimalna odległość bezpieczeństwa pomiędzy płytą kuchenną a okapem kuchennym musi wynosić przynajmniej 65 cm. Pod okapem kuchennym nigdy nie gotować na „otwartych” płomieniach. Sprawdzać frytkownice podczas ich użytkowania: przegrzany olej może być palny.
budynku. W przypadku równoczesnego korzystania z innych urządzeń (kotłów, grzejników, kominków, itp.) zasilanych gazowo lub innymi paliwami, należy zapewni odpowiednią, zgodną z obowiązującymi przepisami, wentylację pomieszczenia, w którym powietrze zasysane jest przez okap. Instrukcje montażowe: zob. sekcja „O” niniejszej instrukcji obsługi. D PODŁĄCZENIA ELEKTRYCZNE (Rozdział zarezerwowany dla wykwalifikowanych instalatorów).
Sprawdzić, czy na silniku założone są filtry z węgla drzewnego, jeżeli nie, zainstalować je zgodnie z instrukcjami w punkcie H. Jeżeli okap jest typu filtrującego, wyjąć zawór jednokierunkowy założony na wylocie silnika. Dla maksymalnej wydajności, gdy występują silne zapachy lub duża ilość pary, powinna być używana prędkość trzecia, w normalnych warunkach prędkość druga, a prędkość pierwsza dla utrzymywania czystego powietrza przy minimalnym zużyciu energii.
Maksymalna odległość funkcjonowania - 5 metrów. Taka odległość może ulec zmianie, zależnie od zakłóceń elektromagnetycznych innych urządzeń. Lampka przycisku na pilocie zdalnego sterowania: on / off światło. Przycisk – i + zmniejszenie/zwiększenie prędkości (aby uruchomić silnik, wcisnąć przycisk + lub przycisk -. INSTRUKCJA ZMIANY KODU PILOTA (stosowana wyłącznie w przypadku awarii ze względu na zakłócenia) Odłączyć urządzenie od sieci elektrycznej.
I OŚWIETLENIE MONTAŻ I WYMIANA 1. LAMPA FLUORESCENCYJNA (DIAMANTE) Wymiana świetlówki: a) Odłączyć urządzenie od zasilania b) Zdjąć stalowe panele oraz filtry metalowe (zob. punkt H1). Odręcić 2+2mocujące kołki radełkowane stalowych oprawek świetlówki. c) Wyjąć świetlówkę obracając ją o 90° i wymienić na nową o analogiczny parametrach technicznych (Rura T5, 13W); d) Powtórzyć w odwrotnej kolejności czynności z punktu b e) Ponownie podłączy urządzenie do zasilania. 2.
Przechowywać te instrukcje wraz z instrukcjami użytkowania okapu. Producent nie ponosi żadnej odpowiedzialności za wszelkie uszkodzenia spowodowane nie przestrzeganiem powyższych instrukcji. 4. CZYSZCZENIE WNĘTRZA URZĄDZENIA Części elektryczne lub części zespołu silnika wewnątrz okapu kuchennego nie mogą być czyszczone płynami lub rozpuszczalnikami. Nie używać produktów ściernych. Wszystkie powyższe operacje muszą być wykonywane po odłączeniu urządzenia od zasilania sieciowego.
- Wsunąć element przedłużający (H) w element (G) aż do osiągnięcia żądanej wysokości. - Po ustawieniu w optymalnej pozycji, oprzeć o ścianę listwę (L), sprawdzić przy użyciu poziomnicy ampułkowej poziome ustawienie i zaznaczyć na jej końcach dwa miejsca, w których zostaną wywiercone otwory. - Wywiercić otwory, wsunąć w nie 2 kołki rozporowe ø 4 mm i przymocować listwę (L) przy użyciu śrub. - Przykręcić przy użyciu śrub (M) element przedłużający (H) do listwy (L).
Note
Decreto Legislativo del 30/06/2003 n. 196 - art. 7 Codice in materia di protezione dei dati personali. 1. L’interessato ha diritto di ottenere la conferma dell’esistenza o meno di dati personali che lo riguardano, anche se non ancora registrati, e la loro comunicazione in forma intelleggibile. 2.
Condizioni di garanzia 1) L’apparecchio è garantito dalla Casa costruttrice Falmec S.p.A (www.falmec.com) per un periodo di 24 mesi dalla data del suo acquisto comprovata da ricevuta fiscale o altro documento reso fiscalmente obbligatorio. 2) La garanzia sarà prestata con la sostituzione o riparazione gratuita delle parti che risultino difettose.
IMPORTANTE! La presente garanzia è valida solo per l’Italia (Guarantee conditions are valid only for Italy). Questo certificato di garanzia non deve essere spedito, ma conservato con la ricevuta fiscale, o altro documento reso fiscalmente obbligatorio, che comprovi la data d’acquisto della cappa.