
User Manual

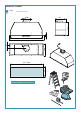
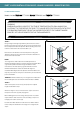


G
T1
F
1
V5 (x4)
2B
2A
V5
(x4)
S
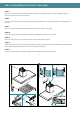
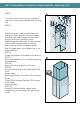
TEP 3
Insert the extension flue into the main piece
and secure at the required height with masking
tap.
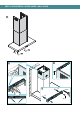
Slide the stainless steel chimney covers up
and secure to the bracket. You may need to
drill some new holes through the cover and
bracket to secure the chimney cover
depending on desired length. In order to avoid
streaking the steel during the installation
process do not remove the protective film
from the upper piece until all pieces are in the
correct position.
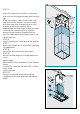
STEP 6:
Attach the hood unit to the base of the bracket.
STEP 7:
Secure the hood firmly to the wall by tightening
the hood hooks.
STEP 8:
Secure the chimney bracket to the wall.
STEP 9:
Attach the male plug of the rangehood unit to
mains
power supply.
Note to electricians: Standard 10 Amp General
Power
Outlet (GPO) required. Position GPO as close
to the hood
unit as possible.
STEP 10:
Connect the female power socket of the
rangehood to the male plug from the remote
motor.
G
H
T1
T
4
V3 (x4)