
Instructions


14
and should be replaced on average every 3-4 months (according to use). To
replace the charcoal filters, see the instructions in point H2.
3. CLEANING THE OUTSIDE OF THE APPLIANCE
It is advised to clean the external hood surfaces at least every 15 days in
order to avoid that oily or greasy substances affect the steel surfaces.
The ouside of the range hhod should be cleaned using a damp cloth and
neutral liquid detergent or denatured alcohol.
In case of fingerprint-less finish (fasteel) clean only with water and neutral
soap using clean with a soft cloth, rinse and wipe dry thoroughly. Do not
use products that contain abrasive substances, rough cloths or cloths spe-
cifically designed for cleaning steel. Using abrasive substances or rough
cloths will inevitably damage the finish of steel. The steel surface will be
irrevocably damaged if the instructions above are not complied with. Keep
these instructions together with the instructions for use of your hood.
The manufacturer accepts no liability for any damage caused by non-com-
pliance with the instructions above.
4. CLEANING THE INSIDE OF THE APPLIANCE
The electrical parts or parts of the motor assembly inside the range hood
must not be cleaned using liquids or solvents.
Do not use abrasive products. All the above operations must be performed
after having disconnected the appliance from the mains power supply.
WARRANTY
M
The new equipment is covered by warranty. The warranty conditions are pro-
vided by the distributor.
The manufacturer is not liable for any inaccuracies in this booklet resulting
from printing or transcription errors. The manufacturer reserves the right to
modify its products as it considers necessary or in the interests of the user,
without compromising their essential safety and operating characteristics.
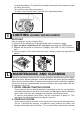
ASSEMBLY INSTRUCTIONS (fig. O)
N
WARNING: Failure to install the screws or fixing device in accordance with
these instructions may result in electrical hazards.
Step 1
- Remove the metal filters.
Step 2
- Screw off the 6 screws (A), the 2 knurled pins (B), then remove the bottom
part. For MASSIMO INSERT depth 23 ¾“ you must remove also the back
screws (A’).
Step 3
- Insert the hood into the cabinet hole fix the hood using 10 screws for wood
(C).
On MASSIMO INSERT depth 23 ¾“ are available also side holes to fix the hood
on the side panels of the cabinet.
Step 4
- Before making the electrical connections disconnect the power supply.
- Repeat step 1,2 to mount the botton part and the metal filters.