
Instructions

22
claims all liability for any damage that may be directly or indirectly caused
to people, things and animals due to the failure to follow all the instructions
provided in this booklet and above all the warnings relating to the installa-
tion, operation and maintenance of the appliance.
WARRANTY
N
The new equipment is covered by warranty.
The warranty conditions are provided by the distributor.
The manufacturer is not liable for any inaccuracies in this booklet resulting
from printing or transcription errors. The manufacturer reserves the right to
modify its products as it considers necessary or in the interests of the user,
without compromising their essential safety and operating characteristics.
O
MOUNTING INSTRUCTIONS, RANGE
HOODS WITH BOX
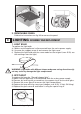
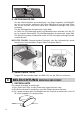
Step 1
- Rest the support bar against the wall (A-Fig. 1) at a height from the cooktop
determined by the sum of the distance X+Y+320 mm.
- Check the horizontal alignment with a spirit level and mark the 2 holes to be
drilled at the ends of the bar.
- Drill the holes, insert 2 x 8mm dia. screw anchors, and fasten the bar using
the corresponding screws.
Step 2
- Hook the range hood to the support bar (Fig. 2).
- Adjust the alignment of the range hood using the screws on the brack-ets
(Fig. 2). The top screw (B) adjust the distance from the wall, the bottom
screw (C) adjust the height.
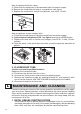
Step 3
- Fix the hood on the wall with an expansion anchor and with a screw, using
the holes on the back side of the hood or with the cover brackets, in order to
prevent it from detaching due to the pressure below.
In case of the suction version, connect the outlet fitting of the fan to the ex-
ternal discharge with appropriate pipes.
- Carry out the electrical connections after having disconnected the hood po-
wer supply.
Step 4
- Insert the extension cable (H) in the cook hood stack (G) and fix the assembly
on the hood body using the 8 screws as shown in (V1).
- Unfold the extension cable (H) until reaching the required length.
- Once the ideal position is reached, lay the bracket (L) on the wall and check
the horizontal alignment using a spirit level and mark 2 holes at the edges.
- Drill the holes and insert 2 expansion anchors with a diameter of 4mm and
fasten the bracket (L) with the screws.
- Tighten the extension cable (H) to the bracket (L) by means of the screws (M)
Power the hood in compliance with the regulations in force (section D).