
User Manual

3
Introduction....................................................................................................................................................3
Contents of Kit...............................................................................................................................................4
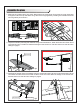
Assemble the plane.......................................................................................................................................5
Install the battery............................................................................................................................................6
Get your model ready to fly............................................................................................................................7
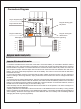
The transmitter and model setup...................................................................................................................8
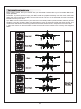
Check the control throws...............................................................................................................................9
Check the motor rotating direction.................................................................................................................9
Control Horn and Servo Arm Settings.............................................................................................................9
Install the propeller and spinner...................................................................................................................10
Check the C.G.(Center of Gravity)................................................................................................................10
Before flying the model ................................................................................................................................11
Flying course.................................................................................................................................................12
Troubleshooting............................................................................................................................................13
Spare parts list of contents..........................................................................................................................14
ESC instruction............................................................................................................................................15
Table of Contents
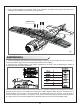
Overview
The FMS 1400mm T28 is going to get its fourth remarkable upgrade after it was launched three years
ago. The 1400mm T28 V4 is coming!
No matter whether you had an FMS T28 or not before, the coming V4 is full of surprises. First of all, the
foam ratio has been upgraded from EPO 40 to the lighter and larger EPO 52, which alleviates the
airplane's weight, without weakening the airplane. Moreover, the original oil paint which has an
unavoidable negative side effect of corrosion has been replaced by the latest environmental water-based
paint.
Let’s take a look at more upgrades below. The latest FMS multi-connector is also used for V4, which
makes the assembly easy and simple while leaving the wires orderly and user-friendly. The 1400mm T28
V4 adopts the new design of ball linkage to remove the clearance and hit an accurate flight. The updated
4258 motor drives the power and speed around 30% higher. In addition, it could work with 4S, 5S, and 6S
batteries to satisfy different customer requirements. Both front and rear landing gears are metal, with a
shock absorption function for hard landings. In terms of construction and performance, the 1400mm T28
V4 is totally different to the old versions. It is certain that the latest version greatly enhances flight appeal.
Don't miss out on this thrilling experience.
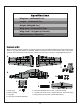
New feature
• New upgraded 4258-KV650 motor and 70A ESC
• New technology lighter EPO foam
• New water painting for environmental protection
• Shock absorbing metal oleo front and main landing gear struts
• No more foam hinges! Nylon hinge material on control surfaces
• Screw-in servo pockets. No more glued in servos! A bad servo can be replaced with 2 screws
• Digital metal gear servos throughout
• Ball links on all control surfaces
• Easy, single wire quick connectors to remove the wings
• Slide out battery tray for easy battery changes
Introduction