
Installation Guide


12
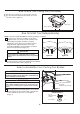
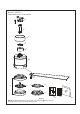
How to Assemble Your Light Kit Assembly or Cap
Motor
Assembly
Motor
Assembly
Figure 1
1. Remove one of the three screws in the support
bracket at the bottom of the motor assembly. Retain
the screw for later and slightly loosen the remaining
two screws. (Figure 1)
2. Assemble the light kit to the support bracket using
the two key slots in the light kit. Replace the previously
removed screw and securely tighten all three screws.
(Figure 2)
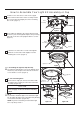
3. Remove one of the three screws in the light kit.
Retain the screw for later and slightly loosen the
remaining two screws. (Figure 3)
Figure 4
Figure 5A
4. If installing the light kit, skip this step.
Assemble the light kit wire cover to the light kit using
the two key slots. Replace the removed screw and
secure all three screws. (Figure 4)
Light Kit
Figure 3
Figure 2
Light Kit
Light Kit
Figure 5B
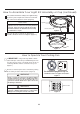
Connect the 2 single pin connectors from the LED
assembly to the 2 single pin connectors from motor
assembly. (Figure 5A)
To reduce the risk of electric shock, disconnect the
electrical supply circult to the fan before installing
light kit.
CAUTION
5A. For use with light kit.
5B. For use with light cover.
If you want to install the light cover and not the light
kit. Assemble the light cover to the light
kit
by twisting
in a clockwise direction. (Figure 5B)
NOTE:
If you have installed your fan with the light
cover, skip Steps 6 and 7.
Light Kit
Wire Cover
LED
Assembly
Light Cover
Light Kit