
Installation Guide
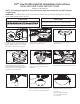

1. Slide the switch to "RC" if you are using
remote control or wall control with the
light kit. Slide the Switch to "CH" if you
are using pull chain with the light kit.
F6** Low Profile Light Kit Installation Instructions
READ AND SAVE THESE INSTRUCTIONS
Weight: 1.17 lbs (0.53 kgs)
NOTE: This ceiling fan light kit is only meant to be used with ceiling fans. Do NOT install as
a light fixture.
WARNING:
To reduce the risk of fire or electric shock, do not use this fan/light kit with any
solid-state speed control device.
2. Remove cover switch housing and
retain the screws for Step 6.
To reduce the risk of fire and electric shock, this kight kit
should be used only with the fan model listed below:
CAUTION CAUTION
at the main fuse box to the fan before installing the light
kit.
Fan Model: Windpointe
®
Series
Cover Switch
Housing
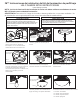
5. Connect the 2 single-pin connectors
from the low profile light kit to the 2
single-pin connectors from motor
assembly.
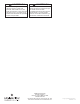
8. Assemble glass to the low profile light
kit by twisting in a clockwise direction.
Don’t force or over-tighten the glass.
low profile
light kit
Glass
6. Assemble low profile light kit to motor
assembly with previously removed screws.
7. Insert light bulb into socket.
Bulb
4. Route wires from light kit through the
supplied large rubber washer, then
through the switch housing and secure
cover switch housing to light kit with
lockwasher and nut provided.
Cover Switch
Housing
Light Kit
3. Remove threaded plug from cover
switch housing.
9. Check the operation of the light kit
by gently pulling on the pull chain.
• 1
st
Pull= On
• 2
nd
Pull= Begins dimming
• 3
rd
Pull= Stops dimming
• 4
th
Pull= Off