
Installation Guide


13
How to Operate Your Ceiling Fan
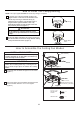
1. Restore electrical power to the outlet box by turning
the electricity on at the main fuse box. (Figure 1)
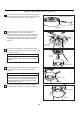
3. The 5-button hand-held remote transmitter includes
buttons for high, medium and low fan speeds as
well as fan off and light on/off. (Figure 3)
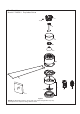
4. If airflow is desired in the opposite direction, turn
the fan off and wait for the blades to stop turning.
Slide the reverse switch on top of motor assembly
to the opposite position and turn fan on again. (Figure 4)
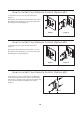
Check to see that all connections are tight, including
ground, and that no bare wire is visible at the wire
connectors, except for the ground wire. Do not
operate fan until the blades are in place. Noise and
fan damage could result.
WARNING
Reverse Switch Information
Season Rotation Direction Switch Position
Summer Counter-Clockwise Left
Winter Clockwise Right
2. To make fan operational, install two 3-volt batteries
(included) in the hand-held remote transmitter. If not
using for long periods of time, remove battery to prevent
damage to transmitter. Store the remote away from
excessive heat or humidity. (Figure 2)
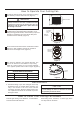
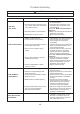
Maintenance
1. Periodic cleaning of your new ceiling fan is the only
maintenance that is needed. When cleaning, use
only a soft brush or lint free cloth to avoid
scratching the finish. Abrasive cleaning agents are
not required and should be avoided to prevent
damage to finish.
Do not use water when cleaning your ceiling fan.
It could damage the motor or the finish and create
the possibility of electrical shock.
CAUTION
Periodic light dusting of the blades is recommended.
A feather duster will work best.
How to Clean Your Ceiling Fan Blades
Avoid using water, cleansers, or harsh rags, which
can warp and ruin the finish.
MAIN FUSE BOX
Figure 1
Figure 2
REMOTE
3V, CR2032
BATTERY
2 PCS
CONTROL
Figure 3
5-BUTTON
REMOTE
CONTROL
Reverse
Switch
Figure 4