
Installation Guide


13
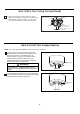
5A. Insert light bulbs into sockets. (Figure 24A)
5B. Don’t install the light bulbs if you want to install
the steel cap in Step 6A. (Figure 24B)
Figure 24A Figure 24B
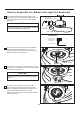
How to Assemble the Blades and Light Kit Assembly (continued)
CAUTION
To reduce the risk of fire, use 50-watt max. type
T4-minican JD E11 tungsten halogen bulb. Turn off
the wall switch and allow the bulb to cool for 10
minutes before relamping.
Bulb is pressurized and may shatter. DO NOT
TOUCH BULB WITH BARE HANDS. Fingerprints
may result in shorter bulb life. Remove fingerprints
with alcohol prior to use.
6A. Assemble the glass to the light plate assembly
by twisting in a clockwise direction.
Do not overtighten. (Figure 25A)
6B. Assemble the steel cap to the light plate assembly
by twisting in a clockwise direction.
Do not overtighten. (Figure 25B)
Figure 25A Figure 25B
Steel cap
Glass
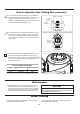
How to Operate Your Ceiling Fan
1. Restore electrical power to the outlet box by turning
the electricity on at the main fuse box (Figure 26).
Check to see that all connections are tight, including
ground, and that no bare wire is visible at the wire
connectors, except for the ground wire. Do not
operate fan until the blades are in place. Noise and
fan damage could result.
WARNING
MAIN FUSE BOX
Figure 26
Figure 27
For illustrative purposes only-not
intended to cover all types of controls
Do not operate this fan with a variable (Rheostat) wall
controller or dimmer switch. Doing so could result in
damage to the ceiling fan's remote control unit.
WARNING
2. IMPORTANT: Using a full range dimmer switch
(not included) to control fan speed will damage the fan.
To reduce the risk of fire or electrical shock, do not use
a full range dimmer switch to control the fan speed.
(Figure 27)