
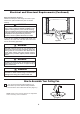
Installation Guide

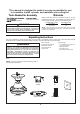
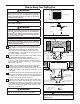


x 6
x 6
FLAT WASHER
1/4˝-20
SCREWS
HARDWARE USED:
Do not connect fan blades until the fan is completely
installed. Installing the fan with blades assembled
may result in damage to the fan blades.
CAUTION
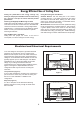
1. Secure the three blades using the 1/4˝-20 screws
with flat washers and blade plate assembly through
the holes located on the bottom of the motor assembly.
(Figure 1)
Figure 1
1/4˝-20
Blade Plate Assembly
Motor Assembly
Screw and
Flat Washer
(2 each per blade)
Blade
(not included)
9
How to Assemble the Ceiling Fan Blades
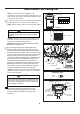
Installing the Canopy Housing
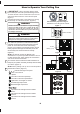
2. Securely attach and tighten the canopy screw cover
over the shoulder screws in the hanger bracket utilizing
the keyslot twist-lock feature. (Figure 2)
NOTE: This step is applicable after the neccessary wiring
is completed.
Ceiling Canopy
Figure 2
Canopy Screw
Cover
1. Remove one of the two shoulder screws in the
hanger bracket. Loosen the second shoulder screw
without fully removing it. Assemble canopy by
rotating key slot in canopy over shoulder screw in
hanger bracket. Tighten shoulder screw. Fully
assemble and tighten second shoulder screw that
was previously removed. (Figure 1)
WARNING
To avoid possible fire or shock, make sure that the
electrical wires are completely inside the canopy
housing and not pinched between the housing and the
ceiling.
Figure 1
Figure 2
NOTE: You will find the fan blade set packed in its own
carton and hardware bag in the fan box.
Blade Plate Assembly
NOTE: Trim cover is not included with fan.
2. Position the trim cover onto the blade plate assembly
bottom. (Figure 2)
Trim Cover
(not included)