™ The Levon 8-Bladed Ceiling Fan Net Weight 12.0 kg (26.5 lbs) Model No.
Important Safety Instructions WARNING: To avoid fire, shock and serious personal injury, follow these instructions. 1. Read your owner’s manual and safety information before installing your new fan. Review the accompanying assembly diagrams. 2. Before servicing or cleaning unit, switch power off at service panel and lock service panel disconnecting means to prevent power from being switched on accidentally.
This Manual is Designed to Make it as Easy as Possible for You to Assemble, Install, Operate, and Maintain Your Ceiling Fan Tools Needed for Assembly • One Phillips head screwdriver • One stepladder • One ¼˝ blade screwdriver Materials • One wire stripper • Three wire connectors (supplied) Wiring outlet box and box connectors must be of type required by local code.
Energy Efficient Use of Ceiling Fans Ceiling fan performance and energy savings rely heavily on the proper installation and use of the ceiling fan. Here are a few tips to ensure efficient product performance. Using the Ceiling Fan Year Round Summer Season: Use the ceiling fan in the counterclockwise direction. The airflow produced by the ceiling fan creates a wind-chill effect, making you “feel” cooler. Select a fan speed that provides a comfortable breeze, lower speeds consume less energy.
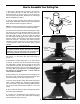
How to Assemble Your Ceiling Fan 1. Remove the Hanger Ball by loosening the setscrew in the Hanger Ball until the ball falls freely down the Downrod. (Figure 1) Remove the Pin from the Downrod, then remove the Hanger Ball. Retain the Pin and Hanger Ball for reinstallation in Step 5. Pin Hanger Ball 2. The fan comes with blue, black, white 80˝ wires and safety cable. Separate & untwist the three wires and safety cable. Route the wires through the downrod.
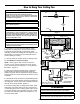
How to Hang Your Ceiling Fan ▲WARNING Ceiling To avoid possible electrical shock, be sure electricity is turned off at the main fuse box before hanging. NOTE: If you are not sure if the outlet box is grounded, contact a licensed electrician for advice, as it must be grounded for safe operation.
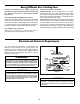
How to Wire Your Ceiling Fan - Pull Chain If you feel that you do not have enough electrical wiring knowledge or experience, have your fan installed by a licensed electrician. ▲WARNING Black Fan Wire Green Wire (Ground) To avoid possible electrical shock, be sure electricity is turned off at the main fuse box before wiring. NOTE: If you are not sure if the outlet box is grounded, contact a licensed electrician for advice, as it must be grounded for safe operation.
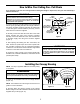
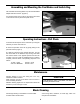
Assembling and Mounting the Fan Blades and Switch Hsg INSTALLATION NOTE Do not connect fan blades until the fan is completely installed. Installing the fan with blades assembled may result in damage to the fan blades. ▲WARNING To reduce the risk of personal injury, do not bend the blade holders when installing, balancing the blades or cleaning the fan. Do not insert foreign objects in between the rotating blades. Figure 1 1. Remove and discard the (rubber) motor “stops” by removing the screws.
Assembling and Mounting the Fan Blades and Switch Hsg 10. Assemble the Housing Switch Cup onto the assembled Adapter with three screws. (Figure 6) 11. Restore Power and your fan is now wired to be turned on and off from the fan pull chain speed control. Figure 6 Operating Instructions - Pull Chain 1. Restore electrical power to the outlet box by turning the electricity on at the main fuse box. 2. Check the operation of the fan by gently pulling on the pull chain switch. (Figure 1) 3.
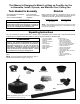
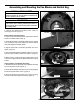
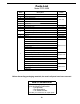
Parts List Model FP7910OB Ref # Description 1 Hanger Bracket Assembly 2 Downrod/Hanger Ball Assembly Containing: 2a Hanger Ball Assembly 2b Downrod 2c Clevis Pin Part # APG610OB ADR1-6OB 2d Hairpin Clip 3 Ceiling Canopy 4 Motor Coupling Cover AP1115OB 5 Fan Motor Assembly AMA7910OB 6 PG165OB Switch Cup Housing/Adapter Assembly Wiring Harness (part of Switch Cup Housing/Adapter assembly) AP5005OB AP5006 7 Blade Holder (4) AP880001OB 8 Blade (8) AP880003WL HDWFP7910SS Hardwa
The Levon™ – FP7910OB Exploded-View 1 2a 2b 2 2c 2d 3 4 5 7 9 6 8 Figure 1 NOTE: The illustration shown is not to scale or its actual configuration or finishes may vary 11
Trouble Shooting ▲WARNING For your own safety turn off power at fuse box or circuit breaker before trouble shooting your fan. Trouble 1. FAN WILL NOT START Probable Cause Suggested Remedy 1. Fuse or circuit breaker blown. 1. Check main and branch circuit fuses or circuit breakers. 2. Loose power line connections to the fan, or loose switch wire connections in the switch housing. 2. Check line wire connections to fan and switch wire connections in the switch housings.
Copyright 2009 Fanimation 10983 Bennett Parkway Zionsville, IN 46077 Toll Free (888) 567-2055 FAX (866) 482-5215 Outside U.S. call (317) 733-4113 Visit Our Website @ www.fanimation.