
User Manual


7
To avoid possible fire or shock, be sure electricity is
turned off at the main fuse box before hanging.
WARNING
7. Cut off excess lead wire approximately 6 to 9
inches above top of the top of the downrod. Strip
insulation off 1/2-inch from the end of each lead
wire (Figure 7).
1. Securely attach the hanger bracket to the outlet
box using the outlet box screws and washers
supplied with the outlet box (Figure 2).
Figure 2
How to Assemble Your Ceiling Fan (continued)
How to Hang Your Ceiling Fan
NOTE:
If you are not sure if the outlet box is grounded,
contact a licensed electrician for advise, as it must be
grounded for safe operation.
NOTE:
All set screws must be checked, and retightened
where necessary, before installation.
The outlet box must be securely anchored. Hanger
bracket must seat firmly against outlet box. If the outlet
box is recessed, remove wall board until bracket
contacts box. If bracket and /or outlet box are not
securely attached, the fan could wobble or fall.
WARNING
DOWNROD
6 TO 9
INCHES
Figure 7
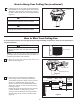
Figure 1
NO
LESS THAN
2.3 M
FLOOR
CEILING
The fan must be hung with at least 2.3 M of clearance
from floor to blades (Figure 1).
WARNING
OUTLET BOX
SCREW (2)
WASHER
(Supplied with
Outlet Box)
TAB
6. Reinstall the hanger ball on the downrod as
follows.Route the three 80-inch wires through the
hanger ball. Position the pin through the two holes
in the downrod and align the hanger ball so the pin
is captured in the groove in the top of the hanger
ball. Pull the hanger ball up tight against the pin.
Securely tighten the set screw in the hanger ball.
A loose set screw could create fan wobble
(Figure 6).
CANOPY
HANGER BALL
DOWNROD
PIN
Figure 6
SET SCREW
GROOVE