
User Manual


9
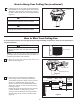
CANOPY
SHOULDER
SCREWS (2)
Figure 1
CANOPY COVER
Figure 2
1. Remove one of the two shoulder screws in the
hanger bracket. Loosen the second shoulder screw
without fully removing it. Assemble canopy by
rotating key slot in canopy over shoulder screw in
hanger bracket. Tighten shoulder screw. Fully
assemble and tighten second shoulder screw that
was previously removed (Figure 1).
2. Securely attach and tighten the canopy screw
cover over the shoulder screws in the hanger
bracket utilizing the keyslot twist-lock feature
(Figure 2).
How to Install Your Canopy Housing
To avoid possible fire or shock, make sure that the
electrical wires are completely inside the canopy
housing and not pinched between the housing and
the ceiling.
WARNING
How to Wire Your Ceiling Fan (Continued)
3.
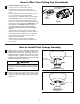
LEARN MODE PROCESS: (Figure 4)
Control and receiver have been factory
programmed. If replacing the ransmtitter or
receiver, the learn mode process will need to be
used.
After installing the unit and restoring power to your
fan, open the battery cover (with battery,
DC12V/A23 1pc, installed) and press and hold the
”LEARNING BUTTON” 1~3 seconds with a ball-
point pen or similar object. FAN will turn off and
then turn to medium speed, which indicates that the
learning process has completed. IMPORTANT: You
must press the “LEARNING BUTTON” within 30
seconds of restoring power to the fan. Remote
does not need to be re-learned when replacing the
battery.
If light kit has CFL bulbs, please slide the “light
dimmer function select switch” to on/off position. If
installed incandescent light bulbs onto ceiling fan,
please slide the “light dimmer function select
switch” to dimmer position.
Please note, the remote can learn multiple
receivers. 30 second time limit should eliminate
need for this.
•
•
•
•
Figure 4
LEARNING
BUTTON
DIMMER
ON/OFF
LIGHT DIMMER FUNCTION
SELECT SWITCH