
Owner Manual

11
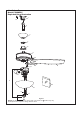
How to Assemble Your Ceiling Fan Blades (Continued)
How to Assemble Your Switch Cup Assembly/Light Kit Assembly
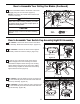
NOTE: Periodically check blade holder hardware and
resecure if necessary.
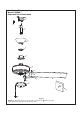
3. Secure the blade holders to the bottom of the motor
assembly using the 1/4˝-20 screws. (Figure 3)
To reduce the risk of personal injury, do not bend the
blade holders when installing, balancing the blades
or cleaning the fan. Do not insert foreign objects in
between the rotating blades.
WARNING
!
To reduce the risk of electric shock, disconnect the
electrical supply circult to the fan before installing
light kit.
CAUTION
Blade Holder
Switch Cup Assembly
Light Kit
Assembly
Light Kit Assembly
Adapter Switch Housing
(2 per assembly)
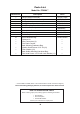
HARDWARE USED:
x 10
SCREWS
Figure 3
Screws
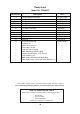
Figure 1A Figure 1B
FP6284** FP6285B**
Figure 3A Figure 3B
FP6284** FP6285B**
Figure 2
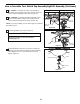
2. Remove one of the three screws in the support
bracket. Slightly loosen the remaining two screws.
Assemble the adapter-switch housing to the housing
support bracket using the two key slots in the adaper
switch housing. Replace the third screw and securely
tighten all three screws. (Figure 2)
Switch Cup Assembly
Motor
Assembly
Motor
Assembly
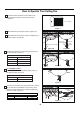
3A—FP6284**. Securely attach the 9-pin connector from
the motor assembly to the wire harness socket within the
switch cup assembly. (Figure 3A)
3B—FP6285B**. Securely attach the 9-pin connector from
the motor assembly to the wire harness socket within the
light kit assembly. (Figure 3B)
1A—FP6284**. Remove the three screws in the switch
cup assembly. Retain the screws for Step 4. (Figure 1A)
1B—FP6285B**. Remove the three screws in light kit
assembly. Retain the screws for Step 4. (Figure 1B)