
Dryer Accessories User Manual


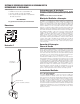


Attach Mounting Bracket to
stud using screws provided.
Attach Fan to Mounting
Bracket using screws provided.
Illustration 2
Correct Mounting of Diaphragm Switch
Horizontal Vertical Angled
Illustration 3
Illustration 4
Switch mounted
properly
above and
below
duct.
Incorrect Mounting of Diaphragm Switch
Electrical Supply fr
om
Breaker Panel
Switch Cir
cuit
Step 2. Mount Bracket
Using the wood screws provided, attach the mounting bracket to a sup-
port beam at the selected location. Bracket is provided with grommets
i
n order to isolate any vibration and prevent the transmission of sound
through the structure. Be careful not to overtighten. Fan mounting can
b
e in any angle (see ill. 2), however, vertical mounting is recommended
to reduce condensation buildup in the fan. If a horizontal installation is
n
ecessary and condensation buildup may pose a problem, a
¹
|₄
"
hole
d
rilled in the bottom of the housing (along with an NPT insert [by oth-
ers] and drain tubing) will allow condensation to drain.
S
tep 3. Mount Fan
For proper operation, the switch diaphragm must be positioned verti-
c
ally. (Illustrations below show diaphragm position for horizontal, verti-
cal and ducts installed at an angle.) Wiring box should be positioned for
easy access. Attach fan to the mounting bracket with the self tapping
screws provided. Care should be taken not to strip the plastic housing.
Although screw pilot holes are not required,
³|₃₂" (or smaller) pilot holes
are recommended.
NOTE: Steps 2 & 3 may be reversed.
Electrical Connection
DO NOT CONNECT POWER SUPPLY UNTIL FAN IS COMPLETELY INSTALLED.
MAKE SURE ELECTRICAL SERVICE TO THE FAN IS LOCKED IN "OFF" POSI-
TION.
1. This unit has rotating parts and safety precautions should be exer-
cised during installation, operation and maintenance.
2.
CAUTION: "For General Ventilation Use Only. Do Not Use To Exhaust
Hazardous Or Explosive Materials And Vapors."
3.
WARNING: TO REDUCE THE RISK OF FIRE, ELECTRIC SHOCK, OR
INJURY TO PERSONS - OBSERVE THE FOLLOWING
:
a. Use this unit only in the manner intended by the manufac-
turer. If you have questions, contact the factory.
b. Before servicing or cleaning, switch power off at service
panel and lock service panel to prevent fan from being
switched on accidentally. When the service disconnecting
means cannot be locked, securely fasten a prominent warn-
ing device, such as a tag, to the service panel.
c. Installation work and electrical wiring must be done by qual-
ified person(s) in accordance with all applicable codes and
standar
ds, including fire-rated construction.
d. The combustion airflow needed for safe operation of fuel
burning equipment may be affected by this unit's operation.
Follow the heating equipment manufacturer's guidelines and
safety standards such as those published by the National
Fire Protection Association (NFPA), the American Society of
Heating, Refrigeration, and Air Conditioning Engineers
(ASHRAE) and the local code authorities.
e. When cutting or drilling into wall or ceiling, do not damage
electrical wires or other hidden utilities.
f. Ducted fans must always be vented to the outdoors.
g. Install fan at least five feet above the floor.
4. WARNING! Check voltage at the fan to see if it corresponds to the
motor nameplate.
GUARDS MUST BE INSTALLED WHEN FAN IS WITHIN REACH OF PERSON-
NEL OR WITHIN SEVEN (7) FEET OF WORKING LEVEL OR WHEN DEEMED
ADVISABLE FOR SAFETY.
Switch mounted
properly above
duct.