
Install Instructions


7
fantech
Deshumidificador industrial
Requisitos eléctricos
Para operar el deshumidificador a 115V, es preciso el uso de un enchufe normal con toma de tierra y circuito de 15 amp. Es preciso utilizar un
interruptor ade escape a tierra si la unidad se va utilizar en un área especialmente húmeda.
Sistema integrado de seguridad eléctrica
Para proporcionarle mayor seguridad, este electrodoméstico está fabricado con una clavija con toma a tierra incluida en el cable de toma de corriente.
El cable debe enchufarse a un receptáculo de corriente adecuado y con toma a tierra. Un electricista acreditado deberá instalar un enchufe con toma
de tierra si no dispone de uno. No corte ni elimine la patilla de toma a tierra de la clavija si ésta viniera incluida en el equipo. Le recomendamos que el
circuito eléctrico o enchufe opere bajo un cortacircuitos o fusible aparte.
En caso de que necesite un cable de extensión, el cable deberá contar con conductores de calibre mínimo de 14 gauge si es de 25 pies o más corto,
y de calibre 12 gauge si es más largo de 25 pies (sección de 3.31 y 2.08 milímetros cuadrados respectivamente).
Limitación de la utilizació
Temperatura: 4°C a 35°C (40°F a 95°F)
Humeda relativa: 20 a 80%
Extracción de agua
El deshumidificador incluye una bomba interna de condensación que elimina el agua sustraída del aire. Este sistema permite evacuar el agua hasta a
20 pies de distancia utilizando la manguera incluida. En caso de que necesite evacuar el agua a una distancia mayor a 20 pies, deberá instalar otra
bomba capaz de evacuar el agua a partir de este punto. La bomba de condensación evacua el agua de manera automática cada cuatro minutos y durante
20 segundos.
Figura 1
Built in Electrical Safety
For your safety and protection this appliance is manufactured
with a grounded plug on its power cord. The power cord must
be plugged into a properly grounded receptacle. If a ground-
ed receptacle does not exist, have one installed by a certified
electrician. Do not cut or remove the grounding prong on the
power cord plug if equipped. We recommend that this electri-
cal circuit/receptacle operate under a separate breaker or
fuse.
If an extension cord is required, it must have a minimum of
14 gauge conductors if 25 feet long or less and 12 gauge
conductors if greater than 25 feet long.
Electrical Requirements
For 115V operation, a common grounded outlet on a 15 amp
circuit is required. The dehumidifier draws approx. 8 amps at
80°F, 60% RH. If used in a wet area, a ground fault inter-
rupter (GFI) is required.
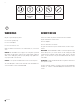
Power Button (Fig. 1)
The dehumidifier is turned on or off by
pressing the power button. When the
dehumidifier is started, the hour meter will
display the cumulative hours.
Pump Purge Button (Fig. 2)
In normal operation, the pump will automat-
ically empty the reservoir. Pressing this but-
ton allows manual emptying of the reservoir.
Press once, and the pump will operate for
20 seconds. Press and hold the button and
the pump will activate for 30 seconds.
Always manually purge the water reservoir
before transport or storage. Turn off the
power and allow the plugged in dehumidifier
to rest 5 minutes before the final purge.
Electrical Shock Hazard
Plug into a grounded 3 prong outlet.
Do not remove ground prong.
Do not use an adapter.
Do not use an extension cord.
Failure to follow these instructions can result in death,
fire, or electrical shock.
WARNING
Place dehumidifier inside area to be dried. Make sure all win-
dows and doors are closed to the outside and seal off the wet
area from any unaffected areas. Route condensate hose into
a drain, or a very large container. Press the On/Off button
(Fig. 1) to activate the dehumidifier.
OPERATION
Fig. 1
Fig. 2
Digital Hour Counter (Fig. 3)
The counter will accumulate and display the total running hours
of the unit in 1/10 of an hour.
Hour Button (Fig. 4)
Press the HOURS button when the dehu-
midifier cannot be plugged in and the hour
meter needs to be read. The digital hour
meter will display the last saved cumulative
time for ten seconds.
Defrost Indicator (Fig. 5)
The defrost indicator will light to indicate the
dehumidifier is in defrost cycle. During this
period, the compressor is not running.
Defrost Cycle
When ice builds up on the coils, a thermistor activates the elec-
tronic control and defrost light. The compressor is turned off by
the thermistor temperature measurement. The blower will contin-
ue to run, causing air to flow through the evaporator coil and melt
the ice. When the ice is melted, the thermistor will end the defrost
cycle and the compressor will be started.
Disconnect dehumidifier from power supply. The hour meter uses
a battery backup for display when the dehumidifier is unplugged
and the hour button is depressed. To change the battery, it is nec-
essary to remove the four (4) screws from the control panel.
Disconnect the old battery and replace with new battery. Replace
control panel and screws. Do not overtighten screws.
Water Removal
The dehumidifier is equipped with an internal condensate pump
to remove the water that is collected from the air. This allows the
water to be pumped 20 feet with the attached hose. If the water
needs to be pumped more than 20 feet above the unit, a second
pump must be added to relay the water. The condensate pump
automatically purges for 20 seconds every four minutes.
Fig. 3
Fig. 4
Fig. 5
Electrical Shock Hazard
Plug into a grounded 3 prong outlet.
Do not remove ground prong.
Do not use an adapter.
WARNING
Disconnect power supply before replacing battery.
Failure to follow these instructions can result in death,
fire, or electrical shock.
Battery Replacement
(1)
Coloque el deshumidificador en el área en la que quiera reducir la humedad. Compruebe que las puertas
y ventanas están cerradas al exterior, y aísle la zona húmeda de cualquier otra zona no afectada.
Introduzca la manguera de condensación en un desagüe o en un contenedor de grandes dimensiones.
Presione el interruptor On/Off para activar el deshumidificador. (figura. 1)
Modo de arranque
Puede prender o apagar el deshumidificador apretando el botón de corriente. (figura 1). Cuando se inicie
el deshumidificador, el contador de horas mostrará brevemente el número de versión de software,
seguido de las horas acumuladas.
Si se pulsa el botón de encendido durante el primer minuto, la unidad entrará en modo apagado
inmediatamente.
Modo de funcionamiento
Durante el modo de funcionamiento el compresor está funcionando, lo que hace que se enfríe el
evaporador dando como resultado la formación de condensación en la bobina.
La unidad permanecerá en modo de funcionamiento durante una cantidad variable de tiempo dependiendo
de las condiciones ambientales.
Si se pulsa el botón de encendido (figura 1) se enviará la unidad a modo de apagado (ver a continuación)
Modo de descongelamiento
Durante el modo descongelamiento, el indicador luminoso se encenderá (figura 2), el compresor estará
apagado y el ventilador seguirá funcionando. La purga de la bomba se activará automáticamente.
El ciclo de descongelamiento se ejecuta cada 45 minutos a temperatura ambiente fría, menos seguido
a temperatura ambiente cálida y la cantidad de tiempo en descongelamiento variará según
corresponda
Debe esperarse un congelamiento intenso en la bobina durante condiciones ambientales bajas pero
esto no afectará el funcionamiento de la unidad.
Built in Electrical Safety
For your safety and protection this appliance is manufactured
with a grounded plug on its power cord. The power cord must
be plugged into a properly grounded receptacle. If a ground-
ed receptacle does not exist, have one installed by a certified
electrician. Do not cut or remove the grounding prong on the
power cord plug if equipped. We recommend that this electri-
cal circuit/receptacle operate under a separate breaker or
fuse.
If an extension cord is required, it must have a minimum of
14 gauge conductors if 25 feet long or less and 12 gauge
conductors if greater than 25 feet long.
Electrical Requirements
For 115V operation, a common grounded outlet on a 15 amp
circuit is required. The dehumidifier draws approx. 8 amps at
80°F, 60% RH. If used in a wet area, a ground fault inter-
rupter (GFI) is required.
Power Button (Fig. 1)
The dehumidifier is turned on or off by
pressing the power button. When the
dehumidifier is started, the hour meter will
display the cumulative hours.
Pump Purge Button (Fig. 2)
In normal operation, the pump will automat-
ically empty the reservoir. Pressing this but-
ton allows manual emptying of the reservoir.
Press once, and the pump will operate for
20 seconds. Press and hold the button and
the pump will activate for 30 seconds.
Always manually purge the water reservoir
before transport or storage. Turn off the
power and allow the plugged in dehumidifier
to rest 5 minutes before the final purge.
Electrical Shock Hazard
Plug into a grounded 3 prong outlet.
Do not remove ground prong.
Do not use an adapter.
Do not use an extension cord.
Failure to follow these instructions can result in death,
fire, or electrical shock.
WARNING
Place dehumidifier inside area to be dried. Make sure all win-
dows and doors are closed to the outside and seal off the wet
area from any unaffected areas. Route condensate hose into
a drain, or a very large container. Press the On/Off button
(Fig. 1) to activate the dehumidifier.
OPERATION
Fig. 1
Fig. 2
Digital Hour Counter (Fig. 3)
The counter will accumulate and display the total running hours
of the unit in 1/10 of an hour.
Hour Button (Fig. 4)
Press the HOURS button when the dehu-
midifier cannot be plugged in and the hour
meter needs to be read. The digital hour
meter will display the last saved cumulative
time for ten seconds.
Defrost Indicator (Fig. 5)
The defrost indicator will light to indicate the
dehumidifier is in defrost cycle. During this
period, the compressor is not running.
Defrost Cycle
When ice builds up on the coils, a thermistor activates the elec-
tronic control and defrost light. The compressor is turned off by
the thermistor temperature measurement. The blower will contin-
ue to run, causing air to flow through the evaporator coil and melt
the ice. When the ice is melted, the thermistor will end the defrost
cycle and the compressor will be started.
Disconnect dehumidifier from power supply. The hour meter uses
a battery backup for display when the dehumidifier is unplugged
and the hour button is depressed. To change the battery, it is nec-
essary to remove the four (4) screws from the control panel.
Disconnect the old battery and replace with new battery. Replace
control panel and screws. Do not overtighten screws.
Water Removal
The dehumidifier is equipped with an internal condensate pump
to remove the water that is collected from the air. This allows the
water to be pumped 20 feet with the attached hose. If the water
needs to be pumped more than 20 feet above the unit, a second
pump must be added to relay the water. The condensate pump
automatically purges for 20 seconds every four minutes.
Fig. 3
Fig. 4
Fig. 5
Electrical Shock Hazard
Plug into a grounded 3 prong outlet.
Do not remove ground prong.
Do not use an adapter.
WARNING
Disconnect power supply before replacing battery.
Failure to follow these instructions can result in death,
fire, or electrical shock.
Battery Replacement
(1)
Figura 2
Funcionamiento