
Install Instructions

3
fantech
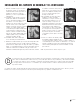
1. When selecting fan mounting location, the
following criteria should be considered: a)
mounting to minimize noise generated by
fan operation; b) service accessibility
a) Mounting the fan as far as possible from
the intake point will minimize fan operating
noise from being transmitted back through
the duct work. If the fan is to be used as a
booster for moving the air between two rooms, a central point along
the duct may be optimal. Insulated flexible
type duct work (recommended for all
bathroom exhaust applications) will result
in much quieter operation. Fantech
recommends minimum 8' of insulated
flexible duct between any exhaust grill and
fan for low noise level.
b) Fan location should allow sufficient
access for service.
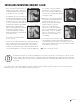
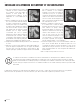
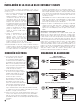
2. Using the wood screws provided, attach the mounting bracket (NB or
MB) to a support beam at the selected location. Fan mounting can
be at any point along the duct and in any angle, however, vertical
mounting is recommended to reduce condensation buildup in the fan.
If a horizontal installation is necessary and condensation buildup may
Mount Bracket (NB).
Mount Fan.
INSTALLING MOUNTING BRACKET & FAN
pose a problem, either wrap insulation
around the fan or drill a 1/4" hole in the
bottom of the housing (along with an NPT
insert [by others] and drain tubing) allowing
condensation to drain.
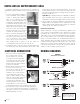
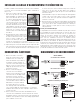
3. Attach fan to the mounting bracket with the
sheet metal screws provided. Wiring box
should be positioned for easy access.
Bracket is provided with rubber vibration
isolation grommets to prevent the
transmission of sound through the
structure. Be careful not to overtighten.
Also, care should be taken not to strip the
plastic housing. Screws are self tapping
and do not require pilot holes. However,
pilot holes (no larger than 3/32" ) are
recommended.
4. Connect duct work to inlet and outlet of fan
using CB clamps or duct tape. When using insulated duct, it is
recommended that the inner vinyl core be clamped or taped to the
inlet and outlet and that the vapor barrier surrounding the insulation
be duct taped to the fan housing.
NOTE: Steps 2 & 3 may be reversed.
Mount Bracket (MB).
Mount Fan.
The ducting from this fan to the outside of the building has a strong effect on the air ow, noise and energy use of the fan. Use the
shortest, straightest duct routing possible for best performance, and avoid installing the fan with smaller ducts than recommended.
Insulation around the ducts can reduce energy loss and inhibit mold growth. Fans installed with existing ducts may not achieve their
rated air ow.
Duct sealant, caulk, or tape should be applied to all seams, including around the opening in the wall or ceiling on the interior and around exterior
building penetrations, to prevent air leakage and maximize air performance.