
Install Instructions

Article #: 301036
Item #: 401818
Rev Date: 102604
Installation Instructions for
Model RSK Backdraft Damper
READ & SAVE THESE INSTRUCTIONS!
Installation
Step 1
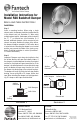
Select a mounting location. When using a single
exhaust point, the damper should be installed directly
to the exhaust vent (see illustration 1). When using
multiple exhaust points, the damper can be located at
the "Y", "T" or collector box (see illustration 2). If
desired, additional dampers can be mounted at each
exhaust view point. Based on the plane of the airflow,
the damper should be mounted in a 180˚ radius above
a horizontal axis. Mounting the damper in an inverted
position may prevent the blades from closing com-
pletely. Preferred installation is vertical (illustration 1
is a vertical installation).
Step 2
Important: Dampers must always be installed so that
the airflow direction will open the butterfly blades. If
the damper is installed between the exhaust vent point
and the fan, the blades will open toward the fan. If the
damper is installed between the fan and the discharge
point, the blades will open away from the fan. Insert
the damper into the ducting at the selected locations.
The damper will easily fit inside wire helix type flexible
ducting. Secure using CB or FC clamps and/or duct
tape. When installing the damper into rigid type duct-
ing. FC clamps or duct tape should be used.
Airflow
Direction
RSK Damper
Grill Collar
Ceiling
Illustration 1
Airflow Direction
RSK Damper
RSK Damper
Airflow
Direction
Airflow
Direction
Airflow
Direction
"Y" or "T"
Exhaust Air
Collector Box
Illustration 2
United States
1712 Northgate Blvd.
Sarasota, FL. 34234
Phone: 800.747.1762; 941.309.6000
Fax: 800.487.9915; 941.309.6099
www.fantech.net; info@fantech.net
Canada
50 Kanalflakt Way
Bouctouche, NB E4S 3M5
Phone: 800.565.3548; 506.743.9500
Fax: 877.747.8116; 506.743.9600
www.fantech.ca; info@fantech.ca