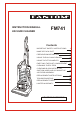
INSTRUCTION MANUAL VACUUM CLEANER FM741 Contents IMPORTANT SAFETY INSTRUCTIONS 1 NAME OF EACH PART 3 PREPARATION BEFORE USE 4 USING THE VACUUM CLEANER 6 USING THE ATTACHMENTS 8 EMPTYING THE DUST COMPARTMENT 9 CLEANING THE FILTERS 10 CLEARING BLOCKAGES IN THE SUCTION HOSE AND CLEANING THE AGITATOR ASSEMBLY 11 REPLACEMENT INSTRUCTIONS 12 TROUBLESHOOTING 16 REPLACEMENT PARTS 16 LIMITED WARRANTY 17 HOUSEHOLD USE ONLY
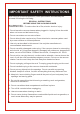
IMPORTANT SAFETY INSTRUCTIONS When using an electrical appliance, basic precautions should always be followed, including the following. READ ALL INSTRUCTIONS BEFORE USING THIS VACUUM CLEANER WARNING - To reduce the risk of fire, electric shock or injury: 1. Do not leave the vacuum cleaner when plugged in. Unplug it from the outlet when not in use and before servicing. 2. Do not use outdoors or on wet surfaces. 3. Do not allow it to be used as a toy.
16. Do not touch the agitator while it is spinning. 17. Do not place any heavy items on top of the vacuum cleaner. 18. Do not step on the hose or pull it too strongly. 19. Do not pick up items such as pieces of waste paper or cloth which look as though they may cause the hose to become blocked. 20. Do not clean or store the vacuum cleaner in places where there are high temperatures. 21. Store the vacuum cleaner away from excessive humidity. 22.
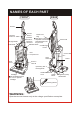
NAMES OF EACH PART REAR FRONT Handle Release Button C Carrying Handle Duster Handle Suction Hose A Power Cord Plug Release Plug shown in figure Button A may differ from actual Release plug attached to unit Button B for your area. ON/OFF Switch Cord Storage Power Cord Hooks Dust Compartment Crevice Tool Hose Holder Filter Cover Wand Suction Hose B Upholstery Tool & Dusting Brush Headlight Set the ON/OFF switch to " ON " to light the headlight.
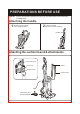
PREPARATIONS BEFORE USE Caution: Do not connect the power cord plug to the wall outlet until assembly is completed. Attaching the handle vacuum cleaner 1 toSetthetheupright position. the handle 2 lnsert as shown in the illustration.
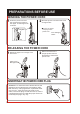
PREPARATIONS BEFORE USE WINDING THE POWER CORD Hook the power cord over 1 the clip which is located on the power cord around the cord 2 Wind storage hooks. the upper cord storage hook as shown. Secure the power cord plug on the power cord. Cord Storage Hooks Plug Side Clip RELEASING THE POWER CORD Rotate the upper cord storage hook 1 downward. Return the hook to the 2 upright position before attempting to rewind the power cord.
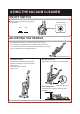
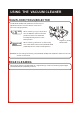
USING THE VACUUM CLEANER ON/OFF SWITCH Start or stop vacuum cleaner by pushing on the switch. OFF ON/OFF Switch ON ADJUSTING THE HANDLE The handle of this vacuum cleaner can be set to one of three positions -Upright, Normal, Parallel. Place your foot on handle release lever as shown and pull back on the handle until it releases from its upright position. Handle Release Lever Upright position Normal position The handle is normally locked in this position for storage or when using the attachments.
USING THE VACUUM CLEANER RUG/FLOOR (TOOLS)SELECTOR The RUG/FLOOR(TOOLS)selector should only be adjusted while the vacuum cleaner is turned on and in the upright position. 1 2 RUG FLOOR When cleaning a rug or carpet,first turn the ON/OFF switch to the ON position,and then set the RUG/ FLOOR(TOOLS)selector to the RUG position. When cleaning a bare floor or when using one of the attachments,set the RUG/FLOOR (TOOLS)selector to the FLOOR position.
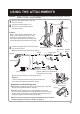
USING THE ATTACHMENTS Caution: When using one of the attachments during cleaning,set the vacuum cleaner to the upright position. the attachments from the 1 Remove vacuum cleaner. Press the release button C to 2 disconnect the handle from the Wand Crevice Tool Release Button C vacuum cleaner. Caution: When removing the attachments, pull them in the directions shown in the illustration.Pulling them in the wrong direction or pulling them forcefully may cause damage to the attachment clamp.
EMPTYING THE DUST COMPARTMENT Caution: Be sure to turn the ON/OFF switch to the "OFF" position and disconnect the power cord from the wall outlet before cleaning. 1 Empty the dust compartment when contents reach the MAX mark. 2 Press the release button A meanwhile press the release button B to remove the dust compartment. Release Button A MAX mark 3 3 Release Button B Turn the duster handle several times in the 4 direction shown to empty the dust Press the release lever to open the trapdoor.
CLEANING THE FILTERS 1 Remove the dust compartment.(refer to page 9) the dust compartment to the parallel 2 Set position.Open the trapdoor,then push the release button E and pull out the main filter. Release Button E The main filter and prefilter will be removed at the same time. Caution: Do not push the release button E at the upright position. As this may drop or damage the main filter and prefilter. 3 the main filter and prefilter with a soft-bristled brush and rinse with cold water.
CLEARING BLOCKAGES AND CLEANING THE AGITATOR ASSEMBLY Caution: Be sure to turn the ON/OFF switch to the "OFF" position and disconnect the power cord from the wall outlet before clearing any blockages in the suction hose and cleaning the agitator assembly. Cleaning blockages in the suction hose A, B 1 Set the vacuum cleaner to the upright position. Remove the hose cuff from the suction inlet and 2 then remove any blockages from the hose.
REPLACEMENT INSTRUCTIONS Caution: Be sure to turn the ON/OFF switch to the"OFF" position and disconnect the power cord from the wall outlet before replacing any of the parts below. REPLACING THE HEADLIGHT LAMP 1 Set the vacuum cleaner to the parallel position. 2 Loosen the screws to remove the lens. Screw Lens 3 When removing the headlight lamp, be careful not to pull on the headlight lamp wiring.
REPLACEMENT INSTRUCTIONS Caution: Be sure to turn the ON/OFF switch to the"OFF" position and disconnect the power cord from the wall outlet before replacing any of the parts below. REPLACING THE FLAT BELT 1 2 Remove the bottom plate. (refer to page 14) Lift out the agitator assembly,and then remove the flat belt from the motor shaft and the agitator pulley. Motor Shaft Flat Belt Agitator Assembly 3 Place a new flat belt onto the motor shaft and pulley.
REPLACEMENT INSTRUCTIONS REMOVING THE BOTTOM PLATE Set the vacuum cleaner to the 1 parallel position and turn it over. the latch in the direction 2 ofSlide the arrow. Pull here Latch Press Press Remove the bottom plate by pulling 3 the tabs as illustrated. Bottom Plate REATTACHING THE BOTTOM PLATE shown. the projection on the bottom plate 1 Insert 2 Push the bottom plate asPress into the groove on the nozzle housing and set the bottom plate in place.
REPLACEMENT INSTRUCTIONS REPLACING THE FILTER Under normal usage, the HEPA Filter will not require replacement; however, vacuuming large amounts of extremely fine dust, powder or similar material over a long period of time may decrease airflow performance through the filter. If this occurs, it may become necessary to replace the HEPA Filter. Only use genuine FANTOM replacement filters. Filter Cover Press the release button D at points 1 and pull the filter cover away from the 1 vacuum cleaner.
TROUBLESHOOTING If there is a problem with the vacuum cleaner, carry out the following checks to find the cause. If the problem still persists after the checks have been made, do not use the vacuum cleaner to prevent the possibility of an accident occurring. Turn the ON/OFF switch to the "OFF" position, disconnect the power cord from the wall outlet, and contact FANTOM Customer Service at 1-800-275-9251. Or visit our website at www.fantom.
ONE (1) YEAR LIMITED WARRANTY FANTOM warrants this product to be free from defects in material and workmanship for a period of one (1) year from the date of the original purchase, when utilized for normal household use, subject to the following conditions, exclusions and exceptions. If your appliance fails to operate properly while in use under normal household conditions within the warranty period, return the complete appliance and accessories, freight prepaid to In US: FANTOM , 178 West Service Rd.