
- FARGO Electronics Fargo CardJetTM Professional Series 410 Card Printer/Encoder and Persona CardJetTM C7 Printer User Guide


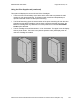

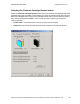

Table Of Contents
- Introduction to CardJet
- Section 1: Technician Overview
- Reviewing the CardJet Printers (410 and C7)
- Technician Review of Printer Features
- Technician Review of Printer Features (continued)
- Technician Review of Printer Features (continued)
- Technician Review of Printer Features (continued)
- Technician Review of Printer Features (continued)
- Technician Review of Printer Features (continued)
- Technician Review of Printer Features (continued)
- Technician Review of Printer Features (continued)
- Technician Review of CardJet Specifications
- Technician Review of CardJet Card Printer Setup
- Technician Review of Ink and Card Cartridges
- Technician Handbook for CardJet Card Printers
- Technician Handbook for CardJet Card Printers (continued)
- Technician Handbook for CardJet Card Printers (continued)
- Technician Handbook for CardJet Card Printers (continued)
- Technician Handbook for CardJet Card Printers (continued)
- Technician Handbook for CardJet Card Printers (continued)
- Technician Handbook for CardJet Card Printers (continued)
- Technician Handbook for CardJet Card Printers (continued)
- Technician Handbook for CardJet Card Printers (continued)
- Technician Handbook for CardJet Card Printers (continued)
- Technician Handbook for CardJet Card Printers (continued)
- Technician Handbook for CardJet Card Printers (continued)
- Technician Handbook for CardJet Card Printers (continued)
- Technician Handbook for CardJet Card Printers (continued)
- Technician Handbook for CardJet Card Printers (continued)
- Technician Handbook for CardJet Card Printers (continued)
- Technician Handbook for CardJet Card Printers (continued)
- Technician Handbook for CardJet Card Printers (continued)
- Technician Handbook for CardJet Card Printers (continued)
- Technician Handbook for CardJet Card Printers (continued)
- Technician Handbook for CardJet Card Printers (continued)
- Technician Handbook for CardJet Card Printers (continued)
- Technician Handbook for CardJet Card Printers (continued)
- Technician Handbook for CardJet Card Printers (continued)
- Technician Handbook for CardJet Card Printers (continued)
- Technician Handbook for CardJet Card Printers (continued)
- Technician Handbook for CardJet Card Printers (continued)
- Technician Handbook for CardJet Card Printers (continued)
- Technician Handbook for CardJet Card Printers (continued)
- Technician Handbook for CardJet Card Printers (continued)
- Technician Handbook for CardJet Card Printers (continued)
- Section 2: Troubleshooting Guidelines
- Safety Messages (review carefully)
- Interpreting the LED Lights
- Reviewing the Fargo Controller error types
- Reviewing the Error Messages for Printer Drivers
- Reviewing the Status Monitor dialog box and buttons
- Reviewing the Error Messages Windows 98Se/Me/2000/XP Printer Drivers
- Reviewing the Error Messages Windows 98Se/Me/2000/XP Printer Drivers (continued)
- Reviewing the Error Messages Windows 98Se/Me/2000/XP Printer Drivers (continued)
- Reviewing the Error Messages Windows 98Se/Me/2000/XP Printer Drivers (continued)
- Reviewing the Error Messages Windows 98Se/Me/2000/XP Printer Drivers (continued)
- Reviewing the Error Messages for Windows 98Se/Me/2000/XP Printer Drivers (continued)
- Reviewing the Error Messages for the Magnetic Encoding Module
- Troubleshooting with Printer Components
- Troubleshooting with the Card and Ink LED Indicators
- Troubleshooting with the Printer Driver Ink Fuel Gauges
- Troubleshooting with the normal Printer Driver Preference Options
- Troubleshooting with the Magnetic Encoding Module (both 410/C7 models)
- Troubleshooting with the Error Messages
- Troubleshooting with the Printer connections
- Troubleshooting the Card Jam
- Troubleshooting with the Host Driver Download Software
- Troubleshooting with an open Printer Top Cover
- Resolving the CardJet Card Printer problems
- Section 3: Printer Adjustments
- Safety Messages (review carefully)
- Installing the Windows Printer Driver
- Setting up the Printer Driver
- Printer Driver Options
- Selecting the Card tab window
- Selecting the Image Color tab
- Selecting the Image Position tab
- Selecting the Magnetic Encoding tab (both 410/C7 models)
- Using the Verification option under Magnetic Encoding
- Using the Magnetic Track Selection option under Magnetic Encoding
- Using the Magnetic Track Options under Magnetic Encoding
- Using the Bit Density radio buttons under Magnetic Encoding
- Using the Character Size radio buttons under Magnetic Encoding
- Using the ASCII Offset under Magnetic Encoding
- Using the LRC Generation radio buttons under Magnetic Encoding
- Using the Character Parity radio buttons under Magnetic Encoding
- Reviewing the Shift Data Left under Magnetic Encoding
- Using the Default button under Magnetic Encoding
- Reviewing the ISO Track Locations
- Reviewing the Sample String
- Reviewing the ASCII Code and Character Table
- Sending the Track Information
- Selecting the Print Supplies tab
- Section 4: Cleaning and Maintenance
- Safety Messages (review carefully)
- Using the Required Supplies
- Cleaning the Printer's Exterior
- Cleaning the Ink Cartridges
- CardJet Maintenance Kit Instructions
- Section 5: Fargo Technical Support
- Section 6: Reviewing the Spare Parts List
- Glossary of Terms
- Glossary of Terms (continued)
- Glossary of Terms (continued)
- Glossary of Terms (continued)
- Glossary of Terms (continued)
- Glossary of Terms (continued)
- Glossary of Terms (continued)
- Glossary of Terms (continued)
- Glossary of Terms (continued)
- Glossary of Terms (continued)
- Glossary of Terms (continued)
- Glossary of Terms (continued)
- Glossary of Terms (continued)
- Index

RESTRICTED USE ONLY Fargo Electronics, Inc.
CardJet 410 Card Printer/Encoder and Persona CardJet C7 Printer User Guide (Rev. 5.0)
132
Sending the Track Information
Magnetic track data is sent in the form of text strings from the application software to the
Printer Driver. Specific characters are added to the magnetic data (to be encoded) in order
for the Printer Driver to differentiate between magnetic track data and the rest of the printable
objects. (Note: These specify the data and the tracks to encode and indicate the Start and
Stop Sentinels and the Field Separators. The Start Sentinels are the “%” and the “;”. The End
Sentinel is the “?”) See the previous page.
• Automatic: In specific cases, these specific characters are automatically added to the
string of track data by ID software applications.
• Manual: In most cases, the Operator must manually add these characters to the string
of magnetic track data. (Note: If these characters are not added to the track data, the
text intended for the magnetic track will appear as printed text on the card.)
To avoid this, track information is entered as described below.
Step Procedure
1 When entering track data, the "~" (tilde) character is entered first, followed by the
track number (1, 2 or 3) on which the data should encode. This is followed by the
data to be encoded.
• Start Sentinel and End Sentinel: The first character of this data string is
the track's specific Start Sentinel (SS) and the last character is the specific
End Sentinel (ES). (Note: The characters or data in between the SS and ES
can include all of the valid characters specific to each track.)
• Maximum Character Capacity: The number of these characters, however,
is limited by each track's maximum character capacity.
• Field Separator: When segmenting track data, the appropriate Field
Separator (FS) is used. (Note: See the table on the next page, which
displays the SS, ES, FS and the valid characters defined for each track.)