
Installation Guide
The large indentations in the styles, Traditional 3, Art Deco, Rosette, Coffer
and Dome, prevent them from being cut in the middle and resting properly
at the border areas. Accordingly, these styles look best when the Border Fill
style panels are used on the perimeter of the room. The remaining Fasade
panel styles look best when full-size panels are cut for the border. If the
existing border panel width is less than 12", two border panels can be cut
from one full-sized panel.
Install border panels. Using the chalk line layout and dimensions you
determined above, measure and cut the border panel by scoring the nish
side of the panel with a utility knife and straight edge. Bend the panel at the
score mark to snap apart. Another option for cutting the panels is to use
a tin snip and cut along a marked line. After cutting the panel to size and
before applying glue, remove the protective lm on both sides of the panel (if
applicable). Clean the back surface of the panel by wiping with a clean cloth
and rubbing alcohol. Refer to manufacturer's directions. Use rubbing alcohol
in a well-ventilated area away from ignition sources.
The preferred method for installing
Glue-Up panels is to use a notched
trowel and apply the adhesive
directly to the back of the ceiling
panels using Loctite
®
PL Premium
tube adhesive in a 1/4 inch diameter
bead as shown to the right.
Keep adhesive about 1/2" from the outside edges to prevent leakage.
Carefully read and follow manufacturer’s directions for the adhesive.
Lightly spray the adhesive with a ne mist of clean water before applying
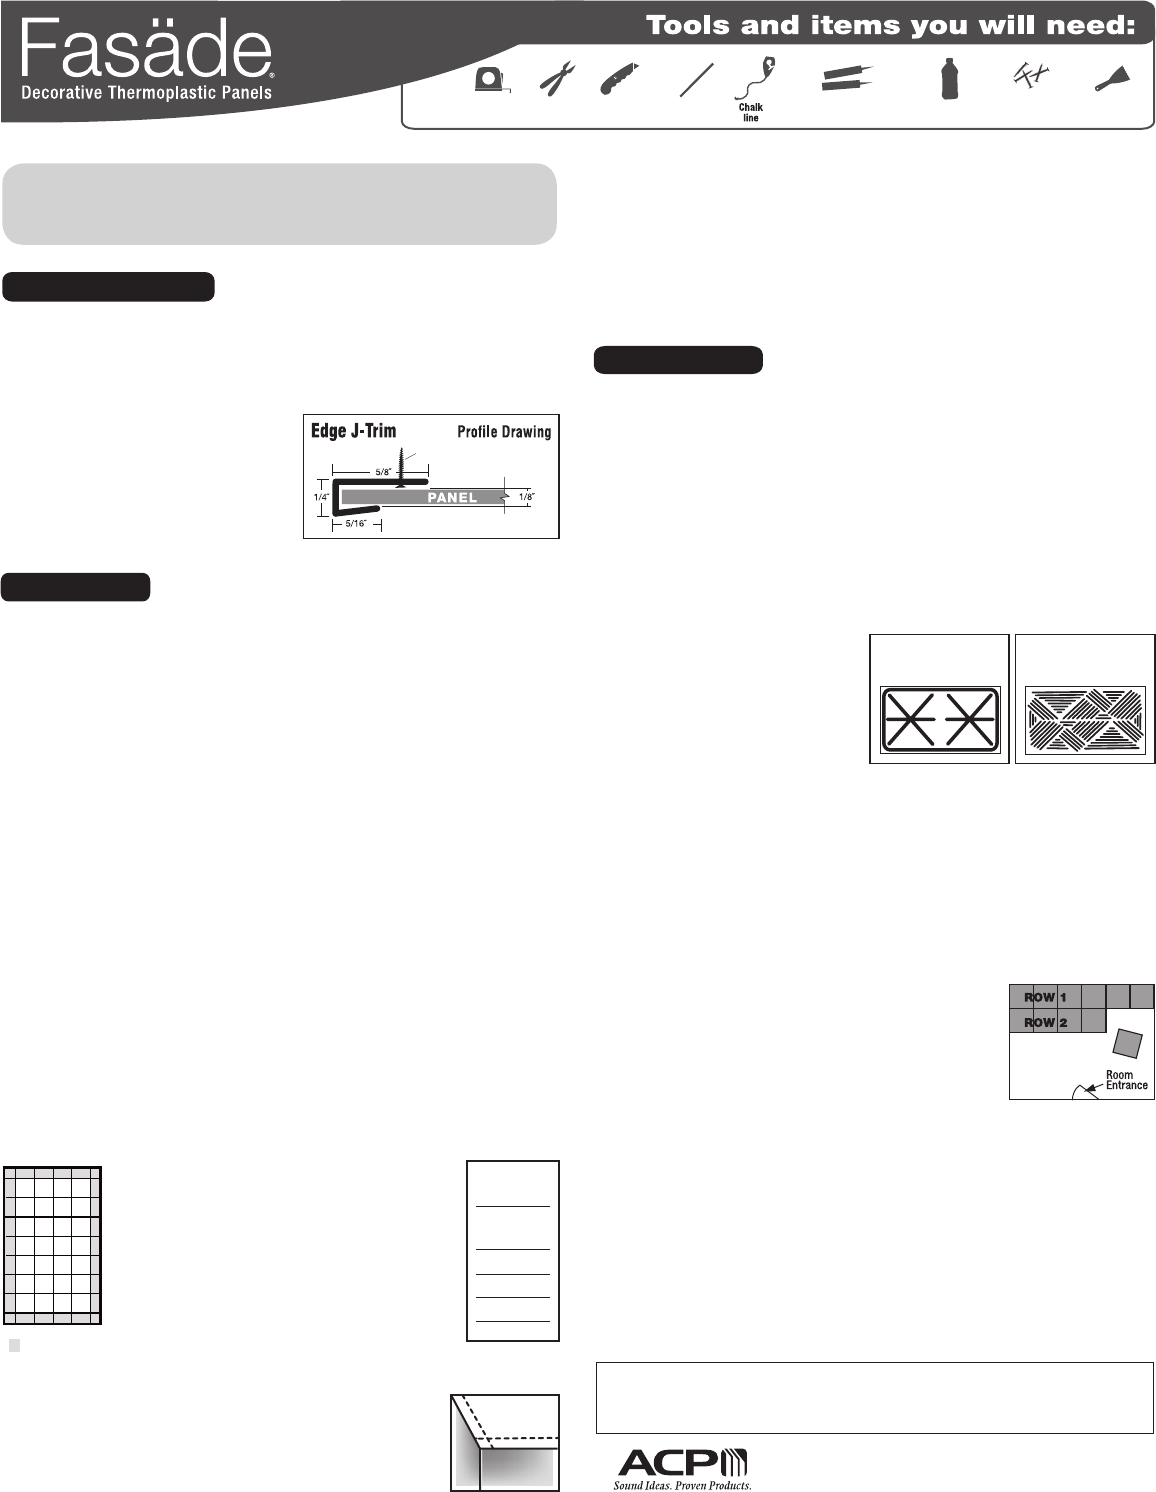
to wall. This will help adhesive cure. Insert panel into the Edge J-Trim if
applicable. Overlap the rst 3/8" of the subsequent border panels where the
ridges and dots align.
Install full panels. Install full panels. Start at the
corner farthest from the main entrance of the room,
and working in rows across the room, install the full
panels by overlapping each new row over the previous
row. Complete each row by cutting and installing the
remaining border panels, if applicable.
Tip: You must remove any adhesive that gets on the nished side of the
panel before it dries. Using a cloth or paper towel, clean off any residue with
Mineral Spirits.
One hour after the ceiling has been completed, rmly press on ALL the
ceiling panels you’ve installed to ensure proper bonding and adhesive set-up.
Once you have your ceiling installed, the panels can be cleaned with
warm, soapy water. Never use abrasive cleaners, scour pads or anything with
harsh chemicals.
INSTALLATION
PREPARATION
Tape
measure
Tin snip
or scissors
Utility knife Straight edge
Loctite
®
PL Premium
®
or LePage
®
PL Premium
®
adhesive
1/4" tooth
V-notch trowel
1" drywall
screws for J-Trim
ACP PO Box 1581, Appleton, WI 54912-1581 • Made in USA
Cust Service:1-800-434-3750 • Tech Support: 1-800-558-0615
For all Adhesive Technical Information, Please Call (800) 624-7767
CAUTION: Even though these panels are “Class A” re rated, they can be deformed with excessive heat.
Never expose to heat over 140˚F.
Never use abrasive materials such as scouring pads to clean surface; use only a soft cloth or sponge with
mild soap and water.
Isopropyl
alcohol
www.fasadepanels.com
INSTALLATION TIPS
Glue Up Ceiling
for Direct Surface Mount Application
Drywall screw (or staple)
Edge J-Trims are available to purchase for nishing off the wall edges. If using
the Edge J-Trim, attach the trim up to the ceiling before installing the ceiling
panels. The trim can be bonded to the wall using PL Premium adhesive
by applying a 1/8" bead to the back
of the trim and pressing rmly into the
drywall. Staples can be used to tack
trim in place until adhesive is cured
(24 - 48 hours). Alternatively, drywall
screws can also be used to attach trim
to wall. Do not over-tighten screws.
Clean Surfaces. Previously painted surfaces must be thoroughly cleaned
of dirt, grease, etc., using a solution of TSP (trisodium phosphate) or other
degreaser. Remove any loose paint and thoroughly rinse the surface with
clean water. Glossy surfaces must be sanded to remove any gloss and
thoroughly cleaned.
Determine the room layout. To ensure the room looks balanced, the
panels should be centered in the room.
Map your ceiling on graph paper before beginning installation. Locate and
draw any light xtures, heating vents, intersecting hallways, closets, and
doorways. Occasionally these features can inuence starting points, tile
placement, and nished ceiling design.
If there are no obstructing elements, then simply place a chalk line on the
ceiling from the center of each opposite wall, forming a cross in the ceiling’s
center. Place your rst ceiling tile in the corner created by your two chalk lines.
Then continue installing your tiles from the center to the outer edges of your
ceiling. Please keep in mind that ceilings are often not perfectly square and
chalk lines may need to be adjusted before you begin installing your tiles.
To ensure professional looking results, the room layout should be balanced with
equal size border panels used on opposite sides of the room, as shown below.
Formula: Example
• Measure room in one direction 17' 6"
• Round down to closest even
number of feet 16'
• Subtract those numbers 1' 6" or 18"
• Add 24" 42"
• Divide by 2 to get border tile size 21"
Repeat these same steps for the other direction.
Put chalk lines along the midpoints that work best with
the above variables. These lines should be parallel with
the walls and will help you align the rst tile edges.
Tub and Trowel
Adhesive Application
Tube Adhesive
Application
Your Project
= Border Panels