
Instructions / Assembly


GLD Products RENO II 7.5’ Pool Table
Item 64-0126
10 1-800-225-7593
www.gldproducts.com
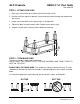
STEP 4 - ATTACH THE LEGS
1. Each leg is held in place by four bolts (#15) with washers (#19).
2. Position the leg on top of the bracket. Insert a bolt with washer through the bracket and
into the leg.
3. Finger start all four bolts, then hold the leg in its final position.
4. Tighten the bolts using the wrench (#23). Repeat for the other 3 legs.
5. Screw the leveler (#21) half-way into the bottom of each leg.
STEP 5 - TURN BASE OVER
The base assembly is ready to be turned over.
USE AT LEAST TWO PEOPLE TO LIFT THE BASE ASSEMBLY AND TURN IT OVER TO
REST ON THE LEGS.
DO NOT ROLL THE TABLE OVER. This will place a sideways force on the legs. The legs
should be off the floor until the base assembly is rotated completely. Set the base assembly
down.
If visually the leg positions need adjusting, loosen the bolts, adjust, and retighten.
#19
#15
#21
DO THIS
NOT THIS