AudioCodes Fax Connector For NET SatisFAXtion SBE / EE Installation Guide Revision 1.
REQUIREMENTS – The following are required to install the Fax Connector Supported Microsoft Windows Operating System o Windows XP o Windows Server 2003 o Windows 7 /8 (Except Home Versions) o Windows Server 2008 SP2 o Windows Server 2008 r2 o Windows Server 2012 Note: If you are installing on Windows Server 2008 SP2 or Windows 2008 r2 you need to install dotNET Framework v3.51 before installing the Fax Connector Live connection to the internet NET SatisFAXtion version 8.7r3 (8.7.6001.
Configuration Options The following list shows your configuration options based on your product key.
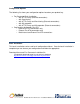
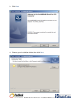
Installation Walkthrough: 1. Find and run the ATA Connector Setup.exe program 2. Click Install AudioCodes Fax Connector – Installation Guide rev 1.
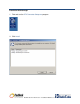
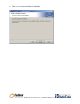
3. Click Next 4. Choose your installation folder then click Next AudioCodes Fax Connector – Installation Guide rev 1.
5. Click Install to start the Basic Installation AudioCodes Fax Connector – Installation Guide rev 1.
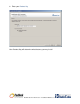
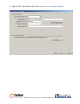
6. Enter your Product Key Your Product Key will determine what features you may install. AudioCodes Fax Connector – Installation Guide rev 1.
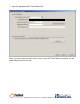
7. Enter the appropriate NET SatisFAXtion URL Note: If you are installing it on the same server as your NET SatisFAXtion installation, this will automatically be filled in for you. AudioCodes Fax Connector – Installation Guide rev 1.
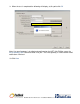
8. With the NET SatisFAXtion URL filled in, click on Test and detect Gateway AudioCodes Fax Connector – Installation Guide rev 1.
9. When the test is completed the following will display, at this point click OK Note: If an email gateway is installed and configured on the NET SatisFAXtion server the Email Gateway URL field will be filled in for you. The email gateway is used to deliver email notifications if desired. 10. Click Next AudioCodes Fax Connector – Installation Guide rev 1.
At this point the Basic Installation is complete. 11. Click OK AudioCodes Fax Connector – Installation Guide rev 1.
The installation will then write the basic configuration: AudioCodes Fax Connector – Installation Guide rev 1.
The installation will start the Audiocodes ATA Connector and appropriate services: AudioCodes Fax Connector – Installation Guide rev 1.
The last step the installation will do is launching the ATA Administration webpage: This concludes the Basic Fax Connector installation. You are now ready to configure and use the Fax Connector For basic configuration, see the next page. AudioCodes Fax Connector – Installation Guide rev 1.
AudioCodes Fax Connector For NET SatisFAXtion SBE / EE Basic Fax ATA Configuration Guide Revision 1.1 AudioCodes Fax Connector – Installation Guide rev 1.
GETTING HELP – Use the following resources to get help with using the Fax Connector Fax Connector – Send an e-mail to support@faxback.com The complete configuration technical reference can be downloaded from FaxBack’s web site at the following link. Installation Videos – Basic Installation Video http://www.youtube.com/watch?v=jffa7nGhT1M&feature=youtu.
Basic Configuration The following covers how to create accounts and manually configuring the Fax ATA for that account. Start the Fax Connector Administration Web User Interface - (Start, All Programs, ATA Connector, Administration) Login to the Fax ATA Connector Administration page o This is same as the Net SatisFAXtion Admin username and password AudioCodes Fax Connector – Installation Guide rev 1.
Administration page - Click on the Accounts link on the left Accounts page - Click the Add button on the upper right, this will open a configuration window. AudioCodes Fax Connector – Installation Guide rev 1.
Account Creation Screen - Enter the ATA Serial Number Enter the Account Name Enter the Account Password Next, click the Line 1 tab AudioCodes Fax Connector – Installation Guide rev 1.
Account Creation Screen - Enter the DID: o The Caller ID and CSID will automatically be filled in Next, scroll down to seem more options in the Line 1 tab AudioCodes Fax Connector – Installation Guide rev 1.
Options in the Line 1 tab - These options are discussed in detail in the Technical document AudioCodes Fax Connector – Installation Guide rev 1.
Accounts screen after configuring a Fax ATA Account - The initial status will be offline (red) until a Fax ATA is configured and is able to log in The next step is to configure a Fax ATA AudioCodes Fax Connector – Installation Guide rev 1.
Fax ATA Login Screen The Fax ATA can be administered from its WAN port over your network. Connect the WAN port to your network and wait about a minute for it to obtain an IP address from your DHCP Server. Connect an analog phone of the handset of your fax machine to Phone 1 on the back of the Fax ATA. Go off hook and listen for dial tone. Dial *2* and wait several seconds. The Fax ATA will play the IP address back to you. Write down this IP address.
Configure the Line Settings - Click on Voice Over IP menu choice on the left Next, click on the Line Settings tab This is the initial Line Settings o Uncheck the checkmark next to the line 2 o Next, click on the icon under the action section in the Line 1 row AudioCodes Fax Connector – Installation Guide rev 1.
Configure the User ID, this is the same as the DID - Please refer to Appendix B Enter in the User ID: - this will match the DID in the Fax Connector Account Line 1 Settings AudioCodes Fax Connector – Installation Guide rev 1.
This is what the initial Line Settings should look like - This configuration is for only 1 fax machine to be connected to Line 1 o Please see the technical documentation on adding a second line AudioCodes Fax Connector – Installation Guide rev 1.
Configue the HTTPS settings - Click on the HTTPS Fax Connections tab o Please refer to Appendix A o Enter the User Name: - this is the same as the Account Name o Enter the Password: - this is the same as the Account Password o Enter the Server Logon URL: - this can be found of the front page of the Fax Connector Admin page Once it is configured, the Fax ATA will show online (green) and it is ready for faxing. AudioCodes Fax Connector – Installation Guide rev 1.
Appendix A – Diagram of corresponding fields between the Fax ATA HTTPS settings and Fax Connector AudioCodes Fax Connector – Installation Guide rev 1.
Appendix B – Diagram of corresponding fields between the Fax ATA Line settings and Fax Connector AudioCodes Fax Connector – Installation Guide rev 1.