Microsoft Fax Connector Configuration Guide For Windows Server 2008 R2 © 2011 FaxBack, Inc. All Rights Reserved. NET SatisFAXtion and other FaxBack products, brands and trademarks are property of FaxBack, Inc. Other products, brands and trademarks are property of their respective owners/companies.
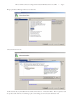
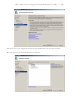
Microsoft Fax Connector Configuration Guide for Windows Server 2008 R2 — Page 2 Bring up the Server Manager and choose to add a role. Choose the Fax Server role. It will automatically try and add the Print and Document Services – Print Server Role. This is required as well. Accept those and click next. It will bring up the screen telling you more about the Fax Server role.
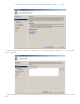
Microsoft Fax Connector Configuration Guide for Windows Server 2008 R2 — Page 3 Click next again to move on to select fax users. This lets you choose who will be allowed to use the fax services. You can add any user or group here. After choosing the users you want to be able to use the fax services, click next. This screen allows you to choose who can see the inbox.
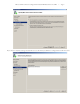
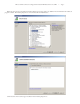
Microsoft Fax Connector Configuration Guide for Windows Server 2008 R2 — Page 4 If you choose to only have routing assistants able to access the inbox you will have to configure that on the next screen.
Microsoft Fax Connector Configuration Guide for Windows Server 2008 R2 — Page 5 After the fax services are configured it will start the Print and Document services install. Click next. The only print service you need is the Print Server. Click Next.
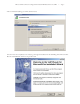
Microsoft Fax Connector Configuration Guide for Windows Server 2008 R2 — Page 6 When the roles have been installed, the Desktop Experience feature needs to be added to have the Windows Fax and Scan program available. The Desktop Experience can be found under the Add Features.
Microsoft Fax Connector Configuration Guide for Windows Server 2008 R2 — Page 7 After it is finished installing, you will be asked to reboot. Once the reboot has completed you are ready to go through the installation for the VoIP Plug-In for Microsoft-Fax. Run the install MSI and click next to begin the install.
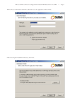
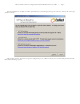
Microsoft Fax Connector Configuration Guide for Windows Server 2008 R2 Fill in the user information and who is allowed to use the application and click next. After choosing the installation directory, click next.
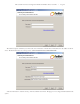
Microsoft Fax Connector Configuration Guide for Windows Server 2008 R2 — Page 9 Once the installation is complete you will be presented with a screen asking for the type of connection. Choose the correct type and click continue. After clicking continue, click next to begin the configuration process. When it asks for your user name and password, click the “Show advanced settings” option.
Microsoft Fax Connector Configuration Guide for Windows Server 2008 R2 — Page 10 The advanced options will allow you to fill out the server information. The Fax Server field will be the web address of the fax server. The Fax Domain must be in all caps and is \\NETSATISFAXTION\ After the information is entered correctly, click next and then click finish. The plug-in is now configured and installed on the system.
Microsoft Fax Connector Configuration Guide for Windows Server 2008 R2 The final step is Windows Fax and Scan. Test sending a fax to verify functionality.