7007 SW Cardinal Lane, Ste 105 Tigard, OR 97224 USA 800.329.2225 (+1.503.597.5350) FaxBack.com | info@faxback.com NET SatisFAXtion 9.0 Installation Guide Enterprise Edition Small Business Edition Last Edited August 15, 2014 Author Duane Appelman Proprietary FaxBack, Inc.
Table of Contents Table of Contents Overview Small Business Edition Enterprise Edition Fax Hardware Installing Fax Hardware Drivers AudioCodes Media Gateways Brooktrout TR1034 and Lead-Free (RoHS) TruFax Brooktrout TR114 and TruFax Eicon Diva Server Mainpine RockForce and RockForce IQ Express Installing NET SatisFAXtion Server Installation Wizard IP Fax Only HTTPS Trunk Proprietary FaxBack, Inc.
Overview The main server install for NET SatisFAXtion 9.0™ is a straightforward process. Please insure you have a “full download” from our web site, www.faxback.com/software Please disable all anti-virus, anti-spyware, popup blocking applications and anything that may interfere with installing NET SatisFAXtion or prevent it from running scripts. Prior to installing please confirm your server meets the following minimum system requirements: Small Business Edition CPU 2.
Fax Hardware AudioCodes VoIP Media Gateways AudioCodes MediaPack series: MP114, MP118 AudioCodes TrunkPack 260 AudioCodes Mediant series: 800, 1000, 2000, 3000 Dialogic Brooktrout Diva Server E1/T1/PRI PCI and PCI Express cards Dialogic Eicon RockForce IQ Express series. RockForce series DUO+, QUATRO+, OCTO+. Other Other devices are not supported. However, Class 1 or Class 2 devices not specifically listed will work, provided they are fully Class1 or Class 2 compliant. Proprietary FaxBack, Inc.
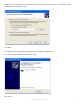
Installing Fax Hardware Drivers AudioCodes Media Gateways No additional drivers are required for IP Fax. Please continue to “2. Installing NET SatisFAXtion.” Brooktrout TR1034 and Lead-Free (RoHS) TruFax Power off your server and install the TR1034 or TruFax card. Power the server on. The Windows Found New Hardware wizard will start. The Brooktrout drivers cannot be installed at this time. Click Cancel. Click Cancel. You are now ready to install NET SatisFAXtion. Proceed to “2.
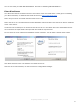
Power the server on. The Windows Found New Hardware wizard will start. The Windows Found New Hardware wizard will be able to successfully install the Brooktrout drivers. Windows Update does not have the appropriate drivers, so select “No, not this time” when prompted. Click Next. Select “Install from a list or specific location.” Click Next. You will need to specify the location where the Brooktrout drivers are stored.
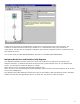
installing from a download, the path will be where the CD image was extracted to, for example C:\NET SatisFAXtion CD Image\bfax_pnp. Click Next. The Windows Found New Hardware Wizard will now install the required files. You are now done installing the Brooktrout driver. Click Finish. Proprietary FaxBack, Inc.
You are now ready to install NET SatisFAXtion. Proceed to “Installing NET SatisFAXtion.” Eicon Diva Server Your Eicon Diva Server hardware will have come with a driver CD. Please have it ready prior to installing your Eicon hardware, or download the latest drivers from http://www.eicon.com/. Power off your server and install the Eicon Diva Server card. Power the server on. The Windows Found New Hardware wizard will start. This cannot be used to install the driver. Click Cancel. Locate and run the Setup.
Configure the card and line as appropriate. Configure a fax modem pool as the top-most device. The number of modems should be equal to the number of T1 or PRI channels. Save, then activate the configuration. The Diva Server Configuration Manager will create the requested number of modem devices, then reboot the server. You are now ready to install NET SatisFAXtion. Proceed to “2. Installing NET SatisFAXtion.
Click Next. If you have the Mainpine driver CD in the CDROM drive, you can choose to “Install the software automatically.” If you have downloaded the drivers from Mainpine’s site, you will need to choose “Install from a list or specific location.” Click Next. If you have the Mainpine driver CD, please skip to the next step. If you have downloaded the drivers from Mainpine’s site, select “Include this location in the search” and Proprietary FaxBack, Inc.
specify the folder where you extracted the driver ZIP file to. Click Next. You will likely see a warning alerting you that the driver you are installing has not passed Windows Logo testing. This is normal. Click “Continue Anyway.” Proprietary FaxBack, Inc.
The Windows Found New Hardware Wizard will now install the required files. Click Finish. You are now done installing the primary RockForce Fax Board device. You will next be prompted to install one device for each fax port on the board, as well as the RockForce SideBand device. Repeat the above Proprietary FaxBack, Inc.
steps for each device. You are now ready to install NET SatisFAXtion. Proceed on to the next section. Installing NET SatisFAXtion Download: Run the downloaded file. It will prompt for a directory, to which it will then extract the installer. Once the extraction completes, it will open up a file browser window displaying the “NET SatisFAXtion CD Image” folder. Double-click Setup.exe. First, Setup will verify that the server has Microsoft .NET Framework 3.5 SP1 installed.
Click Next. Setup will ask which directory to install NET SatisFAXtion. It is recommended you accept the default. Click Next. Setup will then allow you to enable the monitoring service. Monitoring allows the NET SatisFAXtion server to notify an email address of server loads or unloads. This is an option, you may uncheck “Enable Monitoring” to disable it. Proprietary FaxBack, Inc.
If you would like to use monitoring, enter a mail server and an email address. CAUTION: the mail server you enter here must either be the server that hosts the email address entered, or be configured to relay mail on behalf of the NET SatisFAXtion server. Also note, if you will later on be using the POP3 email gateway, do not enter the fax email account, this may lead to a mail loop. Click Next. Proprietary FaxBack, Inc.
Next, Setup will check to see if the server has Microsoft SQL Server Express. If not, Setup will install Microsoft SQL Server 2008 R2 SP2 Express. Server Installation Wizard Setup will now launch a wizard to configure your fax ports. This wizard can be accessed again later (for example, to add new fax hardware) from the Start menu under All Programs > NET SatisFAXtion > Re-detect Fax Devices. Proprietary FaxBack, Inc.
Setup will next need to know what types of fax devices you would like to configure NET SatisFAXtion for. You may choose one or more types of devices, as appropriate. If you do not select any devices, the NET SatisFAXtion installation will complete but it will not be able to send or receive any faxes until you run this wizard again from the Start menu under All Programs > NET SatisFAXtion > Re-detect Fax Devices Click Next. Proprietary FaxBack, Inc.
IP Fax Only If you are not configuring an AudioCodes device or other VoIP device or service, please skip to the next step. To configure a new AudioCodes device, select the option “ AudioCodes VoIP Gateway,” click Next and reboot the AudioCodes device. For other VoIP devices or VoIP service, click the “Show Advanced Settings” option, and enter the required information. Proprietary FaxBack, Inc.
xx Now Setup will detect all selected fax devices. Please note that detecting certain kinds of modems may take a while. Click Next when it becomes available. HTTPS Trunk If you are not configuring an HTTPS Trunk, please skip to the next step. You will have received an account name, password, and URL from your trunk provider. Enter this information and click Next. Proprietary FaxBack, Inc.
Setup will now ask you for a Called Subscriber Identification (CSID). A CSID is how your fax server will identify itself to other fax devices. It is also typically printed at the very top of all faxes it sends out. It may be set to anything. Most users will set this to their fax number or their company name. Setup will also give you the option to specify a digit to get an outbound line. For example, if calls go through a PBX phone system that requires a “9” to get an outside line.
You will now see a list of all detected ports. You will be given the option of configuring certain ports for inbound faxes only or outbound faxes only. It is generally fine to allow all ports to send and receive. Click Next. Setup is nearly ready to run NET SatisFAXtion for the first time. Click Finish. Setup will now create the NET SatisFAXtion service. The service must be configured to log on as a Proprietary FaxBack, Inc.
Windows user account. Setup will now ask for the Windows user name, password, and domain to use for the service. The account used must have local Administrator permissions and a password. The window will default to your current user name and domain. It is recommended that you use a local Administrator account. Set the user name to “Administrator,” and the domain the same as this server’s name. Enter the corresponding password. Click OK.
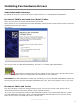
The LaunchPad will present a post-install checklist to help you finish your fax server installation. This is what the Launchpad looks like after the installation is complete and you’re viewing it from the shortcut. Proprietary FaxBack, Inc.