INHALTSVERZEICHNIS Garantie ........................................................................................................................ 5 Fehler vermeiden! ........................................................................................................ 5 Allgemeiner Warnhinweis ............................................................................................ 5 Aktualitäts-Hinweis ................................................................................................
INDEX Warranty......................................................................................................................32 General warning ......................................................................................................... 34 Trouble-shooting........................................................................................................ 34 Ongoing changes .......................................................................................................
Deutsch 4
GARANTIE Das Gerät wurde nach den modernsten Produktionsverfahren hergestellt und geprüft. Ausgesuchte Komponenten und eine sorgfältige Produktion sorgen für eine einwandfreie Funktion und lange Lebensdauer. Sollte Ihr Gerät dennoch einen Defekt innerhalb der Garantiezeit aufweisen, wenden sie sich bitte direkt an faytech. Die Garantiezeit beträgt 24 Monate, gerechnet von dem Tag des Kaufes, zu nachfolgenden Bedingungen: Der Garantieanspruch erlischt bei Eingriffen durch den Käufer oder durch Dritte.
AKTUALITÄTS-HINWEIS faytech produziert seine Displays in China mit deutschem EntwicklungsKnow-how und deutschem Qualitätsmanagement vor Ort. Ihr Feedback fließt direkt in die Weiterentwicklung unserer Produkte mit ein. Die stetige Produktions- und Produktverbesserung ist unser oberstes Ziel. Aus diesem Grund kann es in unseren Produkten bereits Verbesserungen geben, die noch nicht in den jeweiligen Bedienungsanleitungen enthalten sind.
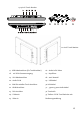
12.1 Inch Touch Monitor: LIEFERUMFANG 22 Inch Touch Monitor: 15 Inch bis 19 Inch Touch Monitore: 22 Inch Touch Monitor: 08. INPUT: schaltet die Eingangssignale VGA, DVI, HDMI, AV1, AV2 durch – bitte stellen Sie unbedingt den richtigen Kanal ein, sonst haben Sie kein Signal! 09. CH-:markiert Werte und ändert Werte im OSD-Menü 10. CH+:markiert Werte und ändert Werte im OSD-Menü 11. MENU: öffnet das Menü, bestätigt Vorgänge im 15 Inch bis 19 Inch Touch Monitore: 01.
15-19 Inch Touch Monitor 22 Inch Touch Monitor 12.1 Inch Touch Monitor 17. USB Kabelanschluss (für Touchfunktion) 26. Audio-In für Video 18. 27. Kopfhörer 12V DCIN Stromversorgung 19. VGA Kabelanschluss 28. 220V Netzteil 20. Audio-PC-IN 29. USB Kabel 21. COM für seriellen Touch-Anschluss 30.VGA Kabel 22. HDMI-Anschluss 31. 3,5mm-3,5mm Audio Kabel 23. DVI-Anschluss 32. Touchstift 24. S-Video-In 33. Treiber- CD für Touchfunktion mit 25.
ANSCHLUSS DES DISPLA YS Um Ihr faytech Display ordnungsgemäß in Betrieb zu nehmen müssen Sie es mit mindestens einer Signalquelle, einer Stromversorgung und für den Gebrauch der Touchfunktion optional mit dem USB-Port Ihres PCs verbinden. ANSCHLUSS SIGNALQUELLE Sie haben folgende Möglichkeiten: An PC: Verbinden Sie das VGA- Kabel Ihres faytech-Monitors mit dem VGAAusgang ihrer PC-Grafikkarte.
MENU zur Änderung des Wertes drücken. Der angesteuerte Menüpunkt erhält nun eine neue Farbmarkierung, über +/ – verändern Sie nun seinen Wert. Drücken Sie erneut MENU werden die Änderungen gespeichert und Sie navigieren mit +/- wieder innerhalb der Registerkarte. Kehren Sie zum Hauptmenüpunkt zurück in dem Sie jeweils den Punkt EXIT im Untermenü an navigieren und MENU drücken.
Bildeinstellungen Menü Einstellungen Horiz. Position: Sprache Verschieben Sie die Position des Displaybildes nach links (-) oder rechts (+). Ändern Sie hier die Sprache des OSD-Menüs. Vertik.Position: Verschieben Sie die Position des Displaybildes nach unten (-) oder oben (+). OSD Horiz. Position: Verschieben Sie die Position des OSD-Menüs nach links (-) o. rechts (+). OSD Vertik-Position: Phase: Verschieben Sie die Position des OSDMenüs nach unten (-) o. nach oben (+).
Soundeinstellungen Änderungen, die Sie gemacht haben, werden gelöscht. Exit: Sie können hier ins Haupt- oder Submenü zurückkehren. Exit Schalten Sie hier das OSD Menü aus. Lautstärke: Verändern Sie die Lautstärke der eingebauten Lautsprecher. Mit verringern Sie die Lautstärke, mit + erhöhen Sie diese. Stumm: Schalten Sie die Lautstärke an/aus. Exit: INSTALLATION TOUCH-DISPLAY UNTER WINDOWS Sie können hier ins Haupt- oder Submenü zurückkehren. 1.
Bitte beachten Sie! Der Installationsvorgang ist auf Englisch, im späteren Programm wird die Sprache aber automatisch auf Ihre gewählte Landessprache eingestellt. konstant bleibt, ist dieses Vorgehen unnötig. Bei der Aktivierung des Kästchens „Next system boot up“ wird die Kalibrierung beim nächsten Systemneustart durchgeführt. Sie können jederzeit eine Kalibrierung im später installierten TouchKit-Programm durchführen, siehe auch Einstellen der Touch-Software. Drücken Sie dann „Next“. 6.
9.„Select Program Folder“: Geben Sie dem Programm einen Namen oder nutzen Sie die Standardeinstellung und drücken Sie „Next“. 10.„Setup Status“: Die Installation wird automatisch mit den ausgewählten Einstellungen durchgeführt. Warten Sie einfach die Fertigstellung ab. 11. Die Installation ist erfolgreich abgeschlossen wenn folgendes Fenster erscheint: Wird kein USB Controller angezeigt, ziehen Sie bitte einmal das USB-Kabel aus Ihrem PC und verbinden Sie es erneut, ggfls. müssen Sie den PC neu starten.
Entsprechendes gilt auch für die Doppelklick-Position. Wählen Sie kleiner<<, müssen Sie für einen erfolgreichen Doppelklick die gleiche Fläche zwei Mal sehr genau treffen, wählen Sie >>groesser wird auch ein Doppelklick ausgeführt, wenn Sie beim Klick beim Loslassen: Konträr zur Funktion Klick bei Berührung wird ein Klick beim Loslassen des Displays erzeugt.
Zusammenfassen mehrerer Touch-Panel Berührungen (Druckabweichungen) zu einem Mausklick. Aktiviert die automatische right KlickFunktion: schaltet den automatischen Doppelklick bei längerem Drücken des Displays ein.
Sie im Programm festlegen, ob Sie eine 25-Punkte-Linearisierung oder eine 9Punkte-Linearisierung an dieser Stelle durchführen möchten. Ist die Mehrfach-Monitor-Funktion NICHT aktiviert, wird stets der primäre Monitor als Touch-Screen-Monitor gesetzt. Aktivieren Sie die Funktion, Mit Hilfe der Applikation Zeichen-Test können Sie sich mit der Nutzung des Touchscreens vertraut machen.
Über die Funktions-Modus Einstellungen können Sie die Größe der Touch- Fläche auf Ihrem faytech Touch-Monitor einstellen bzw. begrenzen. Wählen Sie z.B. die Funktion „rechter Bildschirm“ aus funktioniert nach einer neuen Kalibrierung nur noch die rechte Seite als Touchfläche. Unter „anders“ und dann auf ->> können Sie weitere Modi einstellen oder individuell eine Touch- Fläche definieren. 6.Registerkarten (die) Hardware, Infos 5.
Zusätzlich können Sie mit der Funktion „Schalter anzeigen“ eine Maus in der rechten, unteren Bildschirmhälfte einblenden. Die rote Markierung zeigt, welcher Mausknopf beim Berühren des Touch-Displays simuliert wird. das Display vom Strom und überprüfen Sie die einzelnen Stifte in den Kabeln auf Unversehrtheit. Gerne tauschen wir ihnen ein defektes Kabel aus, schicken Sie deswegen nicht das Display zurück.
Anschluss von einem zusätzlichen Display an ein Notebook entstehen häufig Komplikationen, die in der Hardund Software des PCs begründet sind. Schließen Sie das Display am besten immer zunächst einzeln bei einer Auflösung von 1024x768 bei 60Hz an. Testen Sie von dieser Auflösung ausgehend die für Sie beste Konfiguration. Beachten Sie, dass erweiterte Desktops zunächst häufig schwarz sind – entsprechend ist auch das Display zunächst schwarz, wenn Sie es als erweiterten Desktop konfigurieren.
TECHNISCHE DATEN Änderungen im Sinne des technischen Fortschritts vorbehalten 12.1 INCH TOUCH MONITOR Displaygehäuse (cm): 29,30 x 21,00 x 3,15 Bildschirmdiagonale (inch /cm): 12,1/30,73 Display (cm): 26,11 x 16,32 Befestigung: VESA-75 on the back Brutto-Gewicht (inkl.
Druckstärke (g): 20 ~ 150 Anschlüsse, Bild: 1xHDMI, 1xDVI-D, 1x VGA, 1xVideo-In, 1xS-Video Anschlüsse, Audio: 1 x Audio-In, Audio-In for video, Audio-PC-IN Stromversorgung (im Lieferumfang): 100-240V ACDC, 12V OSD-Menü, Lautsprecher, Touchstift, Treiber-CD, Anleitung zur Weitere Eigenschaften: Inbetriebnahme, Fernbedienung Dot Clock: 170MHZ Analog Scanning Frequency (H, V) 24~94KHZ, 50~75HZ 22
15 INCH TOUCH MONITOR Displaygehäuse (cm): 37,00 x 28,70 x 5,67 Bildschirmdiagonale (inch /cm): 15/38,1 Display (cm): 30,40 x 22,80 Befestigung: VESA-100-Bohrung / VESA-400-Bohrung Brutto-Gewicht (inkl.
Stromversorgung (im Lieferumfang): 230V, 12V OSD-Menü, Lautsprecher, Touchstift, Treiber-CD, Anleitung zur Weitere Eigenschaften: Inbetriebnahme Dot Clock: 45~82MHZ Analog Scanning Frequency (H, V) 37.9~74.
17 INCH TOUCH MONITOR Displaygehäuse (cm): 38,00 x 30,80 x 5,25 Bildschirmdiagonale (inch /cm): 17/43,18 Display (cm): 33,79 x 27,04 Befestigung: Standard-Standfuß, VESA-100-Bohrung / VESA-400-Bohrung Brutto-Gewicht (inkl.
Druckstärke (g): 20 ~ 150 Anschlüsse, Bild: 1 x VGA, 1 x DVI-D Anschlüsse, Audio: 1x Audio-In Stromversorgung (im Lieferumfang): 230V, 12V OSD-Menü, Lautsprecher, Touchstift, Treiber-CD, Anleitung zur Weitere Eigenschaften: Inbetriebnahme Dot Clock: 40~69,3MHZ Analog Scanning Frequency (H, V) 37,9~74,6KHZ, 60~85HZ 26
19 INCH TOUCH MONITOR Displaygehäuse (cm): 44,80 x 29,00 x 5,30 Bildschirmdiagonale (inch /cm): 19/48,26 Display (cm): 40,82 x 25,52 Befestigung: Standard-Standfuß, VESA-100-Bohrung / VESA-400-Bohrung Brutto-Gewicht (inkl.
Druckstärke (g): 20 ~ 150 Anschlüsse, Bild: 1 x VGA, 1 x DVI-D Anschlüsse, Audio: 1 x Audio-In Stromversorgung (im Lieferumfang): 230V, 12V OSD-Menü, Lautsprecher, Touchstift, Treiber-CD, Anleitung zur Weitere Eigenschaften: Inbetriebnahme Dot Clock: 34,8~75,6MHZ Analog Scanning Frequency (H, V) 37,9~74,6KHZ, 60~85HZ 28
22 INCH TOUCH MONITOR Displaygehäuse (cm): 51,40 x 33,90 x 6,70 Bildschirmdiagonale (inch /cm): 22/55,88 Display (cm): 47,38 x 29,61 Befestigung: Standard-Standfuß, VESA-100-Bohrung / VESA-400-Bohrung Brutto-Gewicht (inkl.
Druckstärke (g): 20 ~ 150 Anschlüsse, Bild: 1 x VGA, 1 x DVI-D Anschlüsse, Audio: 3x Audio-In, 1 x Kopfhöhrer out Stromversorgung (im Lieferumfang): 230V, 12V OSD-Menü, Lautsprecher, Touchstift, Treiber-CD, Anleitung zur Weitere Eigenschaften: Inbetriebnahme Dot Clock: 50~82MHZ Analog Scanning Frequency (H, V) 37,9~74,6KHZ, 60~85HZ 30
English 31
WARRANTY faytech touch displays are produced following the most modern production and test processes. Carefully selected components and accurate production ensure reliable operation and long life. faytech warrants to the original purchaser that each faytech touch display delivered shall be free from defects in material or workmanship at time of shipment, and that each such module delivered will meet the published specifications for a period of 24 months as measured from the date of original shipment.
SELLER'S LIABILITY FOR DAMAGES SHALL NOT EXCEED THE PAYMENT, IF ANY, RECEIVED BY SELLER FOR THE UNIT OF PRODUCT OR SERVICE FURNISHED OR TO BE FURNISHED AS THE CASE MAY BE WHICH IS THE SUBJECT OF CLAIM OR DISPUTE. IN NO EVENT SHALL SELLER BE LIABLE FOR INCIDENTAL, CONSEQUENTIAL OR SPECIAL DAMAGES.
Any warranty claim must be accompanied by proof of purchase (receipt or invoice). improvements. If you have any questions or suggestions, please contact our support team or visit our website at www.faytech.com GENERAL WARNING Avoid all contact with dirt, oil, dust or water. Never open the unit. Do not drop the unit. If you notice a burning smell or hear the device making unusual sounds, please disconnect it immediately from the power source.
12.1 Inch Touch Monitor: COMPONENTS 22 Inch Touch Monitor: 15 Inch to 19 Inch Touch Monitor: 22 Inch Touch Monitor: 08. INPUT: switches the input signal sequentially from VGA to DVI to HDMI to AV1 to AV2. Make sure the input source is correct or you will not see any image on your screen. 09. CH-: change the highlighted values in the menu 15 Inch to 19 Inch touch monitors: 01. Auto-display setting: the display is 10.
15-19 Inch Touch Monitor 22 Inch Touch Monitor 12.1 Inch Touch Monitor 17. USB interface for touch connection 26. Audio-In for Video 18. 27. Headset 12V DCIN 19. VGA cable connector 28. 220V power supply 20. Audio-PC-IN 29. USB cable 21. COM for serial touch connection 30.VGA cable 22. HDMI interface 31. 3.5mm-3.5mm Audio cable 23. DVI interface 32. Touch pen 24. S-Video-In 33. Driver CD with User's guide 25.
supply with min. 2.5A and ensure that the polarity is right (+ on the inside pole). DISPLAY CONNECTION To operate your faytech display properly, there must be at least one signal source and a power source connected. To use the touch function please connect the USB cable to your PC. USING THE TOUCH FUNCTION TO CONNECT THE SIGNAL SOURCE The touch-screen series also supports the use of touch through the serial port (15" to 19" touch-monitors).
Color settings Picture Settings Horizontal position: Move the position of the image on the display to the left (-) or the right (+). Vertical position: Move the position of the image on the display down (+) or up (- ). Auto calibration: The display is automatically adjusted to the current resolution of your graphics card. If you are not satisfied with the auto setting, you can optimize it manually. Auto color: This function will optimize the color of the faytech displays.
Return to the main menu or submenu. Language: To change the language of the menu. Menu H. Position: To move the position of the menu to the left (-) or the right (+). Menu V. Position: To move the position of the menu up (-) or down (+). Settings Menu Timeout: Reset: Determines how many seconds the OSD menu is displayed before it is automatically switched off, if there are no more operations. You can also select “off” to remove the OSD menu from the screen.
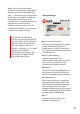
Driver, then the right operation system) to open the installation file setup.exe directly. Now you will see the following window: Select the Windows driver 2000/XP/Vista/Windows7 in the upper right. If a security warning pops up, click “Run”,“Continue” or "Execute". Under Vista you must confirm the UserAccount Control with "Continue". Some further warnings may be given depending on installed security programs. Always click the button to continue the operation.
If the USB controller icon is not showing, please disconnect the USB cable from your PC and connect it again. For more help, Please go to the “Troubleshooting” section. If you plan to use multiple monitors, please choose this box. (See “Setting up the faytech Touch software”.) SETTING UP THE FAYTE CH TOUCH SOFTWARE 9. "Select Program Folder": Give the program a name or use the default setting and press "Next". Start the administration program by going to “Start - Programs -TouchKit – Configure Utility”.
Double Click Time. You can set how fast you need to click on the same object to make a double click. If you choose Shorter <<, then you need to tap faster. If you choose >> Longer, then you can tap the screen more slowly.. a new mouse-click, the display must be released and re-pressed. The same applies to Double Click Area. If you choose Smaller <<, your taps must be in a relatively small area in order for a double click to be recognized.
the driver will generate a mouse right button click if this function is enabled. Enable Touch: Be careful! If you don't check this box, the touch function will not work! Enable Cursor Stablization: A software filter exists inside the driver to filter some noise to stabilize and smooth the touch points. When activated, the user will experience a more stable cursor. You can adjust the parameter for the Constant Touch Area function.
The Linearization ( 25 or 9 points calibration ) function is used to compensate the touch screen linearity. terminate this draw test. Display-Multi-Monitor Setting tab: If you selected “Support Multi-Monitor System” when you installed the Touch driver, you will see a Display tab when you run the Touchkit Configure utility. If you did not select this option, you will not see a Display tab.
If the function "The touch sensor is automatically connected to the main system" is activated, the program automatically puts the touch function on the primary monitor, if only one monitor is connected. The Operation mode settings allow you to set the size of the touch area on your faytech touch-screen. E.g. if you select the "right screen“, after a new calibration only the right side of the monitor will work as a touch area.
On the context menu, if you select the option Display Button, you will see a mouse animation displayed in the lower right half of the screen. The red mark indicates which mouse button will be simulated the next time you touch the screen. By clicking on the left or right pointer of the animation you change the behavior of the touch panel accordingly.
TIPP IT IS BEST TO USE THE 15”DISPLAY AT A RESOLUTION OF 1024X768, THE 17” DISPLAY AT 1280X1024, THE 19" DISPLAY AT 1440X900, THE 22" AT 1680X1050 AT 60HZ. Power supply error: If the display has no signal input, there might be an error with the power supply. First please check the connection with another power supply before you return the display. We're happy to exchange the defective power supply if necessary.
TECHNICAL DATA Changes in the sense of technical progress reserved. 12.1 INCH TOUCH MONITOR Display case (cm): 29.30 x 21.00 x 3.15 Screen diagonal (Inch/cm): 12.1/30.73 Display (cm): 26.60 x 16.80 Mounting: VESA-75 on the back Gross weight (inclusive cartonage, kg): 2.60 Net display weight (kg): 1 Aspect ratio: 16:10 Physical resolution: 1280x800 Maximum showable resolution: 1920 x 1200 Colours displayed: 16.
Response time touch-panel (ms): < 10 Surface hardness: 3H Input force (g): 20 ~ 150 Connectors, video: 1xHDMI, 1xDVI-D, 1x VGA, 1xVideo-In, 1xS-Video Connectors, audio: 1 x Audio-In, Audio-In for video, Audio-PC-In Power-supply (included in delivery): 100-240V ACDC, 12V OSD-Menu, Loudspeaker, Touchpen, Driver-CD, Short Additional features Installation Manual, Remote Controller Dot Clock: 170MHZ Analog Scanning Frequency (H, V): 24~94KHZ, 50~75HZ 49
15 INCH TOUCH MONITOR Display case (cm): 37.00 x 28.70 x 5.67 Screen diagonal (Inch/cm): 15/38,1 Display (cm): 30.40 x 22.80 Standard stand, VESA-100 on the back / VESA-400 on the Mounting: back Gross weight (inclusive cartonage, kg): 5 Net display weight (kg): 3 Aspect ratio: 4:3 Physical resolution: 1024 x 768 Maximum showable resolution: 1920 x 1200 Colours displayed: 16.
Connectors, audio: 1x Audio-In Power-supply (included in delivery): 230V, 12V OSD-Menu, Speaker, Touchpen, Driver-CD, Short Additional features Installation Manual Dot Clock: 45~82MHZ Analog Scanning Frequency (H, V): 37.9~74.
17 INCH TOUCH MONITOR Display case (cm): 38.00 x 30.80 x 5.25 Screen diagonal (Inch/cm): 17/43.18 Display (cm): 33.8 x 27 Standard stand, VESA-100 on the back / VESA-400 on the Mounting: back Gross weight (inclusive cartonage, kg): 5.85 Net display weight (kg): 3.85 Aspect ratio: 4:3 Physical resolution: 1280x1024 Maximum showable resolution: 1920x1200 Colours displayed: 16.
Connectors, video: 1x VGA, 1 x DVI-D Connectors, audio: 1x Audio-In Power-supply (included in delivery): 230V, 12V OSD-menu, Speaker, Touchpen, Driver-CD, Short Installation Additional features Manual Dot Clock: 40~69.3MHZ Analog Scanning Frequency (H, V): 37.9~74.
19 INCH TOUCH MONITOR Display case (cm): 44.80 x 29.00 x 5.30 Screen diagonal (Inch/cm): 19/48,26 Display (cm): 40.82 x 25.52 Standard stand, VESA-100 on the back / VESA-400 on the Mounting: back Gross weight (inclusive cartonage, kg): 6.6 Net display weight (kg): 4.35 Aspect ratio: 16:10 Physical resolution: 1440 x 900 Maximum showable resolution: 1920 x 1200 Colours displayed: 16.
Connectors, video: 1x VGA, 1 x DVI-D Connectors, audio: 1x Audio-In Power-supply (included in delivery): 230V, 12V OSD-menu, Speaker, Touchpen, Driver-CD, Short Installation Additional features Manual Dot Clock: Analog Scanning Frequency (H, V): 34.8~75.6MHZ 37.9~74.
22 INCH TOUCH MONITOR Display case (cm): 51.40 x 33.90 x 6.70 Screen diagonal (Inch/cm): 22/55.88 Display (cm): 47.6 x 29.61 Standard stand, VESA-100 on the back / VESA-400 on the Mounting: back Gross weight (inclusive cartonage, kg): 7.90 Net display weight (kg): 4.75 Aspect ratio: 16:10 Physical resolution: 1680 x 1050 Maximum showable resolution: 1920 x 1200 Colours displayed: 16.
Connectors, video: 1x VGA, 1 x DVI-D Connectors, audio: 3x Audio-In, 1x Headphone out Power-supply (included in delivery): 230V, 12V OSD-menu, Speaker, Touchpen, Driver-CD, Short Installation Additional features Manual Dot Clock: 50~82MHZ Analog Scanning Frequency (H, V): 37.9~74.
KONTAKT Kontaktdaten, RMA-Bearbeitung Support-Nummer: +49 (0) 551 82098660 Global-Support: +86 755 89580612 Support-E-Mail: support@faytech.de Hersteller-Internetseite: www.faytech.com Internetseite: http://rma.faytech.de Europäische Support- und Versandlager: faytech Service GmbH Karl-Grüneklee-Str. 23-27, 37077 Göttingen, Deutschland RMA-Bearbeitung Wenden Sie sich bei einem mutmaßlichen Defekt bitte immer zunächst an uns. Unsere ausgebildeten Fachkräfte helfen Ihnen gerne weiter.
CONTACT Contact, RMA service (in English): Support Number: +1 720 251 4158 Global Support: +86 755 89580612 Support E-Mai: support@faytech.com Homepage: www.faytech.com Webpage of RMA: http://rma.faytech.com RMA Service: If you think your faytech product has a defect please always contact us directly. Our trained after sales service specialists can help you resolve your problems.