
Instructions / Assembly


DOC1INSF 10/18 | © 2018 Trinity Glass International, Inc.
- 1 -
BEFORE YOU BEGIN:
1. Do not remove the plastic door plug until instructed to do so.
It keeps the door closed and aligned during shipping. The door plug
is in the hole for the door lock set. If the door unit has handles on the
latch and hinge jambs, remove them.
2. Make sure that the new door will properly fit in your frame
opening. The recommended frame opening is 3/4" wider and 1/2"
higher than the door unit. Resize the opening if needed. It is important
that the floor is level without any bumps. Use the two foot long level
to make sure floor is within 1/16" of perfectly flat. Use a carpenter’s
square and six foot long level to check the frame opening for square
and plumb. Minor (less than 1/4") out of plumb and square conditions
at the sides and top can be corrected by using shims. Larger
misalignments must be corrected before installation. Diagonal
measurements must be equal to within 1/4" (as shown in Figure B).
WEATHER BARRIER INSTALLATION
An installation that is resistant to air and water leaks depends
upon properly flashing the frame opening and installing a sill pan
before installing the door unit. Building codes vary as to actual
requirements. Also, different siding types require different flashing
details. Please check with local building professionals for best
flashing practices and regional code requirements.
STORM DOORS
Non-Vented Storm Doors will void the Feather River Door warranty.
A Non-Vented Storm Door will build up enough heat to permanently
warp the door. Our doors are energy efficient and storm door
protection is not necessary. If installing a storm door, it must be
ventilated to reduce the amount of heat buildup. Installing a
Non-Vented storm door in an area with sun exposure will cause
issues due to extreme heat (UV deterioration, color fading, warping,
caulk/sealant oozing).
FIBERGLASS DOOR SYSTEM
Installation Instructions
Thank you and congratulations! You have just purchased a premier fiberglass entry door system. If you have an unfinished door
system, we recommend that you paint/stain before installation. Refer to the Finishing Instructions section. Please read all the
instructions before beginning installation. CAUTION: Some door units are heavy and may require two people to lift and install.
Use proper lifting techniques and follow safe working practices.
Visite nuestra página web para esta información en español.
TOOLS AND MATERIALS NEEDED:
• Tape Measure
• Hammer
• Carpenter Square
• Two and Six foot long Levels
• Wooden Shims
• #2 Phillips Screwdriver
• #10 (#8 minimum) x 3"
Exterior Grade Flathead
Screws For #2 Phillips
• Power Drill With 3/16" (0.188")
Diameter Drill Bit
• Safety Glasses
• Caulking Gun
• Quality Clear Exterior Sealant
• Putty
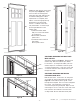
Equal
Equal
Figure B
Figure A
PARTS OF A DOOR SYSTEM
Latch
Jamb
Latch
Brickmould
Square
Door Sill
Door Sweep
Head Jamb
Head Brickmould
Hinge
Brickmould
Hinge
Jamb
Plumb
Level