
Installation Guide


©2015 Trinity Glass International, Inc.
DOC1INSF 6/15
2
INSTALLATION:
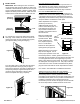
IMPORTANT: Before setting the door unit into the
rough opening, apply generous beads of caulk to the
underside of the door sill at locations shown in Figure
1a/1b, including the bottom of jambs (or plastic jamb
adapters as shown) and brickmolds. Make sure that
at least 4 lines of bead seal the full width of the sill.
1
Figure 1a
(In-swing)
Caulk
Figure 1b
(Out-swing)
Caulk
These jambs are shipped with predrilled counterbores. To
install the door unit to a door opening, simply predrill for #8
countersink holes through the counterbores per Figure 2c.
Temporarily secure the door unit by driving 3" wood screws
at top and bottom counterbores of each jamb.
Permanently fasten 3" exterior grade wood screws (not
included) through the jambs into the shim and the frame. Do
not over tighten the screws. Over tightening may cause
jambs to bow. Remove excess shims. Do not shim or fasten
the head jamb of the single door unit. Use putty to hide the
screw head. For a door unit with hand stained PVC jambs,
plug the screw holes with the screw caps that are included.
PVC Jambs – See addendum for additional information.
Additional Anchoring for Single Door with Sidelites
Shim above mullion per Figure 2d. Predrill 1/8" holes and
permanently fasten 3" exterior grade wood screws (not
included) through head jamb into the shim and the frame. For
hand stained PVC jambs, use the provided counterbores for
predrilling countersink holes for #8 wood screws as
mentioned in previous section and plug the screw holes with
the screw caps that are included. Remove excess shim.
Figure 2d
Shim
Inside
Figure 2b
Shim
Inside
For a single door, remove the bolt from the plastic
door plug. From outside, set the door unit into the
opening per Figure 2a. For a heavier door system,
get help when lifting, setting and aligning.
2
Figure 2a
Outside
From the inside, place a solid shim directly behind
each hinge between the hinge jamb (or approx.
same level as hinges on lock jamb or sidelite jamb)
and opening frame per Figure 2b. Keep the door
unit level, square and plumb on all four sides.
Remove the plastic door plug completely.
Make sure weatherstrip
contact and margin are
equal all around. Make
further adjustments for
level, square and plumb.
When adjustments are complete,
predrill 2 (3 for 8ft door)
additional equally spaced 1/8"
holes for each side of jamb. For
hand stained PVC jambs, use
the provided counterbores for
predrilling countersink holes for
#8 wood screws.
Door unit with wood or PVC jambs:
Predrill 1/8" holes at about 8" from the top and bottom of
each jamb next to a door opening. Temporarily secure the
door unit to the opening by driving 3" wood screws.
However do not drive the screws all the way at this time.
Additional shims may be used to
keep the door aligned. Test to
ensure proper operation of the door
Figure 2c
Single/Double Door
Shim
Predrill
Use 3 or 4 solid shims
between the latch jamb and
opening frame per Figure 2b.
Door unit with Hand Stained PVC jambs:
Hand
Stained
PVC
Jamb
Door with Sidelite(s)
Shim
Predrill