
Technical Specifications

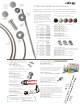


TOOL CHECKLIST
Safety Glasses
Work Gloves
Pencil
Measuring
Tape
Electric
Drill
1/4”, 5/16”
& 3/8”
Drill Bits
Hammer
Cable Cutters
or Cut-Off disk
Vice-Grip
Pliers
7/16”
Wrench
Electric
Grinder & Disk
Hacksaw
Cable Lacing
Needle
Recommended
cable tensioning
sequence
11
9
7
5
3
1
2
4
6
8
10
12
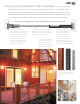
Cables can terminate or run through corner posts
Installing the Standard 1/8'' Cable System is easy. Just follow these simple steps:
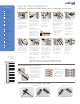
Step by Step Installation
Terminating Continuous
Mark drill hole locations
on posts.
To minimize cable de-
flection, space cables
no more than 3 inches
apart and have a post or
vertical spacer at least
every 3 feet.
(Wood Posts Only)
Insert Protector Sleeves
at necessary locations.
Tap in until flush.
See Special Parts
section below.
Insert the Threaded Ter-
minal through the
Terminal end post and
attach a flat washer and
Snug-Grip
®
Washer-
Nut. Spin nut so the
threads engage (2-3 full
turns).
For angled terminations,
use Beveled Washers.
See Special Parts
section below.
Lace the free end of
the cable through the
intermediate posts and
Quick-Connect
®
end
post. Slide-on a flat
washer and Quick-
Connect
®
fitting until
they rest against the
face of the post.
Use a Lacing Needle
if snagging becomes
a problem.
Drill 5/16" holes in one
end post for the Threaded
Terminal fitting, 3/8" holes
in the other end post for
the Quick-Connect
®
fitting, and 1/4" holes in
all other posts.
If desired the Quick-Con-
nect
®
posts may be
through-drilled with a
1/4" bit and then counter-
bored to 1-1/2" deep with
a 3/8" bit to
countersink the fitting.
Hold the Quick-Connect
®
fitting with one hand and
pull the cable tight with
the other. The fitting
automatically locks when
you release the cable.
Tension the cables by
holding the Threaded Ter-
minal shaft with Vise-Grip
pliers and spinning the
Snug-Grip
®
washer-nuts
with a wrench. A Feeney
Tension Gauge may be
used to check uniform
tension.
See tensioning sequence
diagram at left.
Use hacksaw, reciprocating
saw, or electric grinder
with cut-off disk to saw
off the excess threads as
close to the Snug-Grip
®
Washer-Nut as possible.
Touch-up with electric
grinder. The special
Snug-Grip
®
threads
prevent the nut from loos-
ening.
Use cable cutters or
electric grinder with
cut-off disk to trim the
excess cable. Grind
flush the exposed
cable ends with an
electric grinder.
Snap on end caps
over the exposed
Quick-Connect
®
fittings and the
Snug-Grip
®
washer-nuts.
You’re done.
1 2
3
4
5
6
7
8 9
10
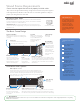
Special parts for special situations
SINGLE WOOD POST
Offset drill holes at least 1/2"
DOUBLE WOOD POSTS DOUBLE WOOD POSTS
Protector Sleeves
prevent abrasion at angled
transitions on wood posts
(e.g. stair transition posts
or outside faces of double
corner posts). Fits 1/4"
diameter drill holes.
Use Beveled Washers for stair
termination posts with angled
holes. Available for both
Threaded Terminal & Quick-
Connect
®
fittings. Always
install the Quick-Connect
®
fitting in top stair post to
prevent rain water from
running down the cable into
the fitting.
Important Note: If using electric or pneumatic tools to tighten the Washer Nuts,
spin the nuts very slowly otherwise they will heat-up causing the threads to seize.