
Installation Instructions

Installing the Quick-Connect
®
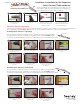
Internal Thread Adjuster
The Internal Thread Adjuster is comprised of a Quick-Connect
®
body and a stainless steel machine
bolt; bolts are available in several different lengths.
1
Drill 5/16” hole through your
post. Counterbore with 1/2” drill
on inside face if embedding
Quick-Connect
®
body. (Use 3/8”
& 5/8” drills for 3/16” fitting)
Drill 5/16” hole through your
post. Counterbore with 1/2” drill
on inside face if embedding
Quick-Connect
®
body. (Use 3/8”
& 5/8” drills for 3/16” fitting)
2
Apply a non-permanent thread
locking compound
to threads.
3
Thread bolt through post and
1/2” into Quick-Connect
®
fitting. Insert cable all the way
into Quick-Connect
®
fitting,
until it stops.
4
Tighten the bolt to tension the
line. Use wrench to prevent the
Quick-Connect
®
from rotating
during tensioning.
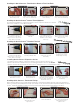
1
2
Attach washer and nut,
leaving room for final
tensioning of fitting & cable.
3
Insert cable all the way into
Quick-Connect
®
fitting
until it stops. Jaws lock
automatically.
4
Tighten the nut to tension the
line. Use wrench to prevent
the Quick-Connect
®
from
rotating during tensioning.
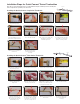
Installing Quick-Connect
®
Turnbuckle Fittings
Before installing a Quick-Connect
®
Surface Mount Turnbuckle or Jaw Turnbuckle fitting, adjust the length of the turnbuckle so
that it’s set in mid-position (halfway between fully open and fully closed). This will allow optimal adjustment flexibility. The Quick-
Connect
®
Turnbuckle installation is identical to that of the Fixed Surface Mount and Fixed Jaw Fittings shown above.
Insert cable all the way into
Quick-Connect
®
fitting until it
stops. Jaws lock automatically.
Install eyebolt. Remove clevis
pin and install Quick-Connect
®
Fixed Jaw fitting.
Measure, mark and drill pilot
holes. Bolt/screw Surface
Mount Fitting to wall.
Insert cable all the way into
Quick-Connect
®
fitting until it
stops. Jaws lock automatically.
Installing the Quick-Connect
®
Fixed Surface Mount & Fixed Jaw Ends
Installing the Quick-Connect
®
Threaded Terminal
Fixed Surface Mount Fixed Jaw End
fi
Insert cable all the way into
Quick-Connect
®
fitting until it
stops. Jaws lock automatically.
Spin turnbuckle body to
tighten the line.
Install eyebolt. Remove clevis
pin and install Quick-Connect
®
Fixed Jaw Turnbuckle.
Measure, mark and drill pilot
holes. Bolt/screw Surface
Mount Turnbuckle to wall.
Insert cable all the way into
Quick-Connect
®
fitting until it
stops. Jaws lock automatically.
Spin turnbuckle body to
tighten the line.
Surface Mount Turnbuckle Jaw Turnbuckle
1 2 1 2
1 2 1 2
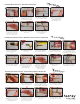
1
Drill 1/4” hole with masonry bit
to 1-1/2” (minimum) depth.
Blow debris out of hole.
2
Carefully tap the Expansion
Bolt until the machine
threads protrude 3/4”.
3
Tighten nut to set the anchor. Apply
a high strength thread locking
compound to threads. Spin Quick-
Connect
®
fitting onto Expansion
Bolt until it bottoms out.
4
Insert cable all the way
into Quick-Connect
®
fitting
until it stops
. Jaws will lock
automatically.
Installing Quick-Connect
®
Expansion Anchor
The Expansion Anchor Fitting is comprised of a Quick-Connect
®
body and a stainless steel
Expansion Anchor Bolt. Install the Anchor prior to attaching the Quick-Connect
®
body. DO NOT
attempt to install the Anchor Bolt with the Quick-Connect
®
Fitting attached, or you may damage the fitting.