
Installation Instructions

Installation Steps for Quick-Connect
®
Swivel Turnbuckles
Note: We recommend attaching the non-adjustable fixed-style end fittings before attaching the
tension-adjustment-style fittings shown below.
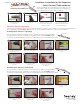
Spin Hanger Bolt Installation
Tool onto the end of the bolt.
5
Spin the turnbuckle lock-nut
onto the exposed threads.
Then attach Quick-Connect
®
and rotate the body 4 full turns.
6
Stretch cable tight across
fitting and mark at Cut Gauge
Line. Cut cable at mark.
7
8
Hand tighten the turnbuckle as
far as possible, then swiftly hit
the cable line with your palm
several times to ensure that
jaws are securely seated.
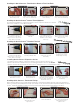
12
Drill 7/64” (7/32” for 3/16”
fitting) pilot hole. Harder woods
may need larger hole.
3
Drive Hanger Bolt into post
using socket or electric drill.
4
Drive until threaded section
protrudes 1” from post face.
Installing the Quick-Connect
®
Lag Swivel Turnbuckle
Tighten the lock-nut against
the swivel component to
prevent the fitting from
loosening.
10
fi
9
Use wrenches to tighten the
Quick-Connect
®
to desired
final tension.
Loosen the swivel component
2 full turns and insert cut
cable end as far as it will go into
the fitting; the jaws will
automatically lock on.
fi
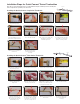
Hanger Bolt
Lock-nut
2X
Spin Hanger Bolt Installation
Tool onto the end of the bolt.
5
Apply a drop of high strength
thread locking compound to
machine threads of the
hanger bolt.
6
Spin the pivot component all
the way onto the hanger bolt.
Make sure the lock-nut is all
the way on the threads.
7
8
Stretch cable tight across
fitting and mark at Cut Gauge
Line. Cut cable at mark.
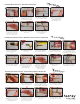
12
Drill 7/64” (7/32” for 3/16”
fitting) pilot hole. Harder woods
may need larger hole.
3
Drive Hanger Bolt into post
using socket or electric drill.
4
Drive until threaded section
protrudes 1/2” from post face.
Installing the Quick-Connect
®
Pivot Swivel Turnbuckle
Use wrenches to tighten the
Quick-Connect
®
to desired
final tension.
Hand tighten the turnbuckle as
far as possible, then swiftly hit
the cable line with your palm
several times to ensure that
jaws are securely seated.
121110
Tighten the lock-nut against
the swivel component to
prevent the fitting from
loosening.
fi
9
Loosen the swivel component
2 full turns and insert cut
cable end as far as it will go
into the fitting; the jaws will
automatically lock on.
4X
Attach the QC swivel component
to the threads with 4 spins. Do
NOT add the Locktite to these
threads, or you will not be able
to properly tension the cable.
fi
Hanger Bolt
Pivot
2X
Swivel
Lock Nut