
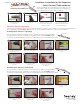
Installation Instructions

1
Drill 1/4” hole with masonry
bit to 1-1/4” (minimum)
depth. Blow debris out of
hole.
2
Carefully tap the Expansion
Anchor (with washer and
anchor nut).
3
Tap until approximately 1-
1/4” of the threaded shaft
protrudes from the wall.
4
Use 7/16” wrench to tighten
anchor nut until anchor is
properly seated and locked.
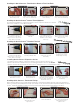
1
Measure, mark, and drill
pilot holes.
2
Bolt/screw Surface Mount
fitting to wall/post (bolts or
screws sold separately)
3
Spin the turnbuckle lock-nut
onto the exposed threads.
Then attach Quick-Connect
®
and rotate the body 4 full turns.
4
Stretch cable tight across
fitting and mark at Cut Gauge
Line. Cut cable at mark.
5
Loosen Quick-Connect
®
2 full turns and insert cut
cable end as far as it will go
into the fitting; the jaws will
automatically lock on.
6
Hand tighten the turnbuckle as
far as possible, then swiftly hit
the cable line with your palm
several times to ensure that
jaws are securely seated.
7
Use wrenches to tighten the
Quick-Connect
®
to desired
final tension.
8
Tighten the lock-nut against
the swivel portion to prevent
the fitting from loosening.
Installing the Quick-Connect
®
Expansion Anchor Swivel Turnbuckle
Installing the Quick-Connect
®
Surface Mount Swivel Turnbuckle
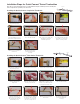
5
Spin the turnbuckle lock-nut
onto the exposed threads.
Then attach Quick-Connect
®
and rotate the body 4 full turns.
6
Stretch cable tight across fit-
ting and mark at Cut Gauge
Line. Cut cable at mark.
9
Use wrenches to tighten the
Turnbuckle to desired
final tension.
10
Tighten the lock-nut against the
swivel component to prevent
the fitting from loosening.
7
Loosen Quick-Connect
®
2 full
turns and insert cut cable
end as far as it will go into the
fitting; the jaws will
automatically lock on.
8
Hand tighten the turnbuckle
as far as possible, then
swiftly hit the cable line with
your palm several times
to ensure that jaws are
securely seated.
fi
fi
fi
fi
Lock Nut
Lock Nut
4X
4X
2X
2X
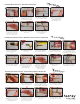
1
Install Jaw onto an eyebolt
or eyelet using the removable
clevis pin.
2 3
Stretch cable tight across fit-
ting and mark at Cut Gauge
Line. Cut cable at mark.
5
Hand tighten the turnbuckle as
far as possible, then swiftly hit
the cable line with your palm
several times to ensure that
jaws are securely seated.
6
Use wrenches to tighten the
Quick-Connect
®
to desired
final tension.
7
Tighten the lock-nut against
the swivel component to
prevent the fitting from
loosening.
4
Loosen Quick-Connect
®
2 full
turns and insert cut cable end
as far as it will go into the
fitting; the jaws will
automatically lock on.
Installing Quick-Connect
®
Jaw Swivel Turnbuckle
fi
fi
Lock Nut
4X
2X
Spin the turnbuckle lock-nut
onto the threads. Then attach
the Quick-Connect
®
and
rotate the body 4 full turns.
File #2014-751M