
Installation Instructions

Step 2 – Attach Post Caps to Posts
a) Insert the Post Cap on top of each post and secure
using two #8 x 3/4” screws (see Figures 2.1 & 2.2).
Note: the screws (included) are self-tapping, but
drilling a 1/8” pilot hole is recommended. Locate the
screws approximately 1/4” from the top of the post.
The #8 screws require a #2 square drive bit.
(Figure 2.1)
(Figure 2.2)
Note: Stair Kits accommodate 6-ft maximum length stairway, and a stair slope of between 29 and 34 degrees.
Since Kits are less than 6-ft, they do not require Intermediate Posts. Always position the Threaded Terminal End
Posts at the bottom of the stairs and the Quick-Connect
®
End Posts at the top.
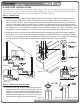
Step 1 – Attach Posts
a) Determine the exact position of the top posts (Stair Quick-Connect
®
End Posts) and bottom posts
(Stair Threaded Terminal End Posts). The edge of the top-post base plate must be between 1-1/4”
and 3” from the top nose, and the edge of the bottom-post base plate must be between 0”(flush) and
1-3/4” from the bottom stair nose (see figure 1.1 below). It’s important that the top and bottom posts
maintain a constant relative position to one another; for example, when the top-post base plate is set at
the minimum of 1-1/4”, the bottom-post plate must be set at its minimum of 0” (flush), and when the top
post plate is set at the maximum of 3”, the bottom-post plate must be set at its maximum of 1-3/4”.
b) Attach the posts to the deck surface using the included mounting lag screws and retaining washers,
see Figures 1.2 & 1.3. Be sure that the posts are aligned so that the RCB holes are facing the proper
directions. Use a string line and level to make sure that all of the posts are in a straight line and plumb;
shim as necessary. Conceal the hardware heads using the Lag Screw Caps (included).
2
1-800-888-2418 | www.feeneyinc.com
STAIR POST INSTALLATION:
AF# 2014- 806A
(Figure 1.1)
(Figure 1.2)
(Figure 1.3)
36” RAILING
4.5” MIN