
Installation Guide
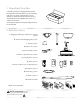
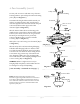


Locate 9 blade attachment screws,9 lock washers,9 nuts,and
3 rubber washers in hardware pack.
Slide one blade with the pointed side under the bottom of
motor, aligning holes in blade with holes on the edge of the
motor.
Insert 1 blade attachment screws and rubber washer from
UNDERSIDE of blade and 1 nuts (along with lock washers)
from TOPSIDE of blade. With help of the allen wrench from
one of the hardware pack, make sure to completely insert
screw so that the blade can be attached correctly.
Place blade ring under the blade, aligning all 2 holes in blade
with 2 holes on blade ring. Insert 2 blade attachment screws
from UNDERSIDE of blade and 2 nuts (along with lock wash-
ers) from TOPSIDE of blade. With help of the allen wrench
from one of the hardware pack, make sure to completely
insert each screw so that the blade can be attached correctly.
Place next two blades underneath the motor (between the
blades ring) and repeat procedure. Tighten all 9 screws
securely with the allen wrench.
WARNING: To reduce the risk of serious bodily
injury, DO NOT use power tools to assemble the
blades. If overtightened, blades may crack and
break.
Note: Tighten blade arm screws twice a year.
page 4
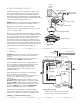
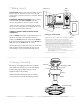
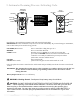
5. Blade Assembly.
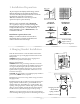
6. Fan Assembly.
CAUTION: Due to the size of this fan, it is advisable
to seek the help of another person to hold the
stepladder in place and to then help lift the fan up
to you once you are set on the ladder.
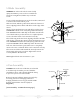
Remove hanging ball from downrod provided by
loosening set screw on hanging ball. Lower
hanging ball and remove stop pin and then slide
hanging ball off of the downrod. [Refer to
diagram 1.]
["Fan Assembly" continued on next page.]
set screw
hanging ball
stop pin
diagram 1
downrod
allen wrench
blade attachment screw
nuts & lock washer
blade
blade ring
motor